The second is inspired by Scenario 1 from basic Squad Leader (published by Avalon Hill) - 'The Guards Counterattack', a scenario that must surely be classed as one of the most nostaligic play experiences of a generation of board wargamers.
The rest of the post will concern itself with the design aspect of the two scenarios and conclude with some links to resources of interest, including the downloadable file for the scenarios themselves.
Please click on the 'Read More' tab for the rest of this post.
The story so far - Some months ago, I set out trying to fit a figure game into a playing area the size of a large pinboard. After some experimentation, the project culminated in adopting 4" hexes (on an 8 x 6 hex grid) and producing a dedicated set of hex based WWII tactical rules (Tigers at Minsk). For those unfamiliar with this blog, the 'labels' to the right of this text have the links to those earlier posts.
The pinboard - To date, the Kallistra grassed hexes have had sole occupancy of the pinboard and when wanting to show a built up area, thin grey hex templates have been laid down to cover the grass and then buildings placed atop. For the more significant cityscape needed for a typical Stalingrad type scenario, it would be impractical to lay down 48 grey hex tiles to cover all the grassed tiles. I need to buy 8 black (6 cell) tiles from Kallistra and do them up specifically as city tiles. In the interim, I have 'hexed' up the draylon fabric that was glued to the pinboard some months ago that provided the 'open' gaming surface. The green is rather muted and looks fairly grey under the lighting in the house, so while not ideal, it serves a purpose for now and allows me to get the two scenarios up and running. I have the blank tiles on order, so a later post can deal with building a cityscape. (EDIT - they have since arrived and work is being done on them right now. They are looking good so hopefully they will soon be ready and perhaps my next post can cover their construction).
Scenario 7 - The Storming of Pavlov's House. I thought there would be a ton of material when starting the research for this scenario, but besides the basics mentioned in 'Wiki' and similar repeated elsewhere, a bit of digging had to be done to get the geography right so that the 'scene' could be understood.

In front of Pavlov's building is the open expanse of 9th January Square, with the nearest feature being a tram line. Having got an appreciation of the locality and since the scenario is to represent assaults rather than firing from fixed positions, it seemed best to reduce this scene down to just Pavlov's House itself and the warehouse that stood behind it, since this contained the 45mm anti-tank gun. This 'simple' setting (as shown later in this post) would have the Germans attacking over exposed ground, reflecting the difficulties they faced.
The Soviets kept Pavlov's House out of German hands for 59 days, throwing back repeated attacks, until relieved during the Soviet counter-offensive. To get a sense of this in a single scenario, the game is split into two phases or rather two mini games in which the Germans make two sequential assaults, with the first having a chance to weaken the defenders in preparation for the second assault. The scenario also has to feel tough for the German player.
The Soviets count the house as being a fortification, which makes them less likely to abandon it as they take casualties and reflects their 'fight to the last man and bullet' type orders. They will also find it easier to recover from pin results.
Ideally, I wanted Pavlov's house to cover two hexes. This would allow the Soviets to have a force big enough to absorb the first assault without breaching placement restrictions (stacking limits). Also, the Tigers at Minsk rules do not cover multiple building levels, so the second hex would have helped provide a second location within the building, so that the Soviet grip would be slowy released rather than instantly lost if the Germans successfully got into the building.
Anyway, that didn't feel right, the scale was wrong, Pavlov's House should fit into a single hex for the scale used by the TaM rules. The fact that the house was multi-floored was a factor in the defence, so scenario special rules were adopted to help bring some of that feel to the game. The Soviets anti-tank rifle has rules to help suggest that it is firing from a rooftop position.
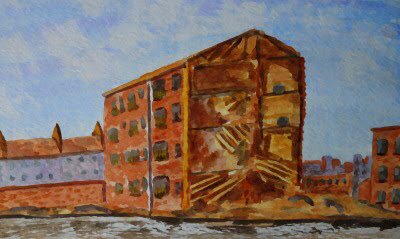
Pavlov's House was a red bricked apartment block and I thought (since all my city buildings so far are grey) it worthwhile to make a similar looking building from foam board. Considering it was the focus of so much action, the below shot shows it being surprisingly intact, though I am not sure at what point in the campaign that picture was taken.


During the first phase, the Germans are unlikely to win (by being sole occupant of Pavlov's Building) and can typically suffer excessivley high casualies. Their best plan is to try and remove the light machine gun in the weapon pit and even perhaps the anti tank gun in the warehouse, as these losses will lower the Soviet morale and make the second assault a little easier. If the opportunity presents itself, then of course, a direct assault on the house should still be made. Ideally, the Germans need to get in there with two rifle sections and the demolition charge, but realistically the charge will likely already have been used at the weapons pit.
The special rules only allow the Panzer III and the HMG to lay down covering fire, the infantry sections are compelled to move forward at every opportunity, with a view to engaging in close combat at either the weapon pit or Pavlov's House.
In the second assault (which introduces pioneers), time is tight and the Germans do not really have the luxury of putting down a lot of fire before the pioneers have to start closing in on the building. The pioneers are able to use the flamethrower allocation in close combat (adds 3D6 to the attack), so getting them into the building is essential. If they can retain their smoke laying capability, they should be able to get close quite early on.
The Germans initially attack under the cover of smoke, but this mostly burns off over the first few turns. Once the cover has gone, this is a VERY exposed battlefield and units can find themselves in a continual state of 'pin'. There are several things for the German player to be mindful of. The tank can help overrun the weapons pit, but that brings it within range of the antitank rifle. Units will try and avoid the field of fire of the 45mm anti-tank gun, but that causes them to bunch up into target rich hexes. German units that survive Phase 1 can be used in phase two, but as the German side take casualties and their morale crashes, they might all get swept off the board before phase 1 ends.

Having said all of that, the scenario balance overall falls in favour of the Soviets - preserving the historical sense of the action. The games are short and players will likely need to re-run the scenario a few times to get a feel of how best to use their units in this situation.
The scenario document contains all the specific information about the battle, the game board and the forces involved and can be freely downloaded from my Dropbox account (see links at the bottom of this post).
Scenario 8 - The 37th Guards. In the late 70's, I discovered basic Squad Leader, a board game designed by John Hill, that had infantry hopping over walls, machine guns creating fire lanes, engineers getting satchel charges into buildings and tanks also thrown into the mix. I was already doing 1/300 scale micro armour at the time, but this boardgame just seemed to consolidate my interest in all things WWII tactical and the game's scenario 1 'The Guards Counterattack' just seems to typify that awakening. As an affectionate acknowledgement to some memorable wargame moments and to what followed, this scenario is loosely based on that first scenario.
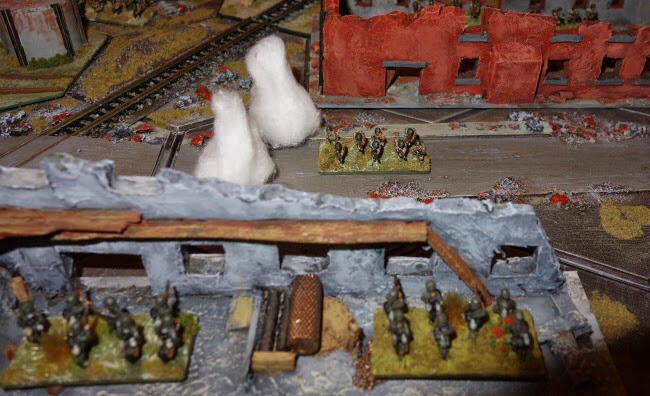
Above right - the first Guard SMG unit breaks cover and dashes across the street under the cover of smoke (yes, I know smoke does not appear in scenario 1, but this is explained later).

At one point, I had a scenario rule that allowed the SMG units to fire 2 hexes (double range) but only at half fire power.
This was not only unrealistic at this games scale, but encouraged SMG units to create a fire base and spend time firing rather than just getting on with the assault, so that idea was scrapped.
Secondly the hexgrain on the pinboard battlefield goes in the opposite dirrection to the one used by Squad Leader, so buildings have a different orientation but a similar relationship. Thirdly a gaming area of 8 tiles by 6 tiles cannot hope to relicate the sort of road net of the original and therefore not the building plan either.
We can however build up a scenario around the following observations of the original scenario; The terrain is a cityscape with some dominant key large buildings and several smaller buildings. There are roads that create open spaces for fire lanes, making movement dangerous. The Russians have a well armed and led force, with a core strike force of submachine gun armed troops. Both sides have heavy machine guns in support. Victory is dependent upon the capture and retention of key buildings. The Germans have 68 points of firepower plus 2 machine guns, the Russians have 68 points of firepower plus 1 machine gun. The Germans have a slight advantage in overall leadership, but the guard SMG units specifically are superbly led. The time frame is short and victory is objective based, ensuring that the players are forced into conducting manoeuvre, rather than just firing from positions of safety.

The fighting takes place in part of an area surrounding the Dzerhezinsky Tractor Works. Heavy casualties had weakened the German line and the Soviets took the opportunity to attack with a view to breaking through and getting reinforcements to the defenders in the Tractor Works.
To play the first Squad Leader scenario, the gamer only had to read a few pages of rules. It was intended to ease the player into the system with a pure infantry firefight without the distraction of armour or artillery rules.
This new scenario has kept to that intent, with the only addition being the provision of limited smoke making capability. Though Squad Leader did bring smoke into scenario 2, I brought it forward because the guards needed a bit of help after the change of hex scale, which reduced the weapon range of the SMG units.
To give our 'The 37th Guards' scenario added replayability and continue the enjoyment of looking at the Squad Leader scenarios, I have added an optional variant to the Orders of Battle to reflect the changes that Basic Squad Leader players saw by the time they got to scenario 3.
Essentially, this introduces, demolition charges, sewer movement and tanks. I have also added the Molotov Cocktail rule from 'Tigers at Minsk' for the sake of keeping the scenario balanced. It does not include engineers or flamethrowers because these were mainly associated with the scenario 2 side of the game board.
The scenario document contains all the information about gaming the battle (see links at the bottom of this post).
Final thoughts - It has been really enjoyable to work on these scenarios. One dips right back into my wargaming past and the other is still pushing the boundaries of a new project. Both have managed to make it onto the pinboard, again reminding us just how much action can be squeezed out of a small space.
I have played quite a few 'Pavlov' based scenarios in various tactical boardgames, but they have always been done on generic gameboards, so it was nice to try and get something that was designed from the ground up to better reflect the immediate landscape that influenced this action.
The Pavlov scenario is a wild beast and will need to be played a few imes to appreciate the finer points. The 37th Guards has been excellent in playtesting and the face to face games have gone down to the wire in each game. I think this is probably my favourite scenario to date, perhaps largely due to the nostalgic angle.
As work starts on the Kallistra city boards, I can see the potential for a bunch of diverse scenarios for other actions in other cities such as Aachen or even smaller towns such as Cisterna at the Anzio perimeter and the next post will likely have a closer look at those boards.
resources
Line drawn map of the area and aerial reconnaissance shots
The scenario card for Scenario 1 - The Guards Counterattack
The Squad Leader board and set-up for the above scenario
Free hex rules - Tigers at Minsk
Free Download scenarios 7 and 8 (as outlined above) for Tigers at Minsk rules
The Commanders website (this is a collection point for some of my figure gaming with hexes).
Hi Norm, Glad to see you are making progress with your game. I'm very much enjoying what you are doing. I remember the Guards Counterattack very well and must have played it more than any other Squad Leader scenario. I always tried a human wave attack once I had whittled down the German machine guns as this seemed to surprise my German opponents. Happy days!
ReplyDeleteAlso pleased that you have Napoleonics and ACW in progress. I've just posted a Battle of Waterloo map using an 8 by 6 hex grid on my blog. A work in progress but you might be interested.
All the best.
Jay
Hello Norm, thanks for the new scenarios! I particularly like the way you have handled multistory buildings, a simple yet elegant solution. I am also enjoying reading about how you go about/through the design process, most interesting and useful.
ReplyDeleteMy own 10mm pinboard project is going well and is about 75% finished. The high summer heat plays merry hell with my health so I've not been able to get much done recently, but I'll be getting back on track as autumn approaches and the temperature come down.
Regards - Russ
Jay, will be very interested to see how your Napoleonics go. I have Austrian and French 1809 in the painting queue, I also have the Snappy Nappy rules, which I fancy converting to the hex grid for a corps level game. under the 'Variants' label on this blog, there is a post about using Neil Thomas' rules using GMT Command and colours game parts, I put some conversion ideas in there which may interest you.
ReplyDeleteHere is a link to Jay's blog http://www.icv2.com/articles/news/29511.html
Russ, hopefully the 'definite' recent chill in the weather holds some promise for you. We all need to be 21 again. Glad you liked the article. I really enjoyed doing the guards scenario, it did take me back, I think those early scenarios have a connection for many gamers. The Pavlov was harder to get right and I think the number of dice used in this system can still produce wide ranging results in such an 'awkward' scenario, but it is fun and the order of battle for both scenarios does help a wider range of players put these two on the table.
My next post covers making some cheap but effective stand alone scenic hex bases and then the post that follows will be my cityscape terrain, which I am really pleased with.
Putting these to bed has allowed me to resume the painting of my ACW confederates with the Union to follow. I will do a video on them. I already have some home grown rules for ACW for a hex project that I did some years ago, so I will see if they are strong enough to proceed with here.
Anyway, thank you both for checking in, nice to speak, as always, Norm.
Norm, Thanks for not only posting the scenarios but also your thoughts on how you approached them and got them to work and finalise them. I too have fond memories of SL Scenario 1.
ReplyDeleteUnluckily I have been busy at work and home for the last two to three months with no near term end in sight. Any free time I have I have been working on restarting my ancient rules. I have a backlog of gaming stuff to catch up on and tigers and Minsk is high up there on the list. I really do look forward to giving the rules a go, but have no idea when ;-(
Hi Shaun, yes, there is something special about that scenario, it must be a nostalgia thing. Looking forward to see what you do with your ancients rules. I have just bought a couple of packs of new Kingdom Egyptians from Magister Militum in 10mm to see how they look painted and based ....... But they are in a queue :-)
ReplyDeleteI have started work on a campaign engine for Tigers at Minsk which looks promising.