Orchard and Wall for 10mm
For some time I have not been too happy with my representation of orchards on the table. The WWII tactical campaign that I am playtesting uses orchards and also needs some walls, which has highlighted the need for some remodelling.
For whatever reason, there seems to be a lack of commercially available walls for the 10mm gamer. So last weekend I set to work on both orchards and walls and designed them around maximum flexibility so that they worked harder for their home in our precious available storage space.
For the rest of this post, please press the 'Read More' tab.
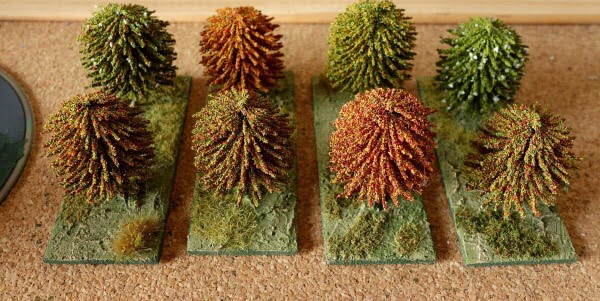
For the orchards to look distinctively different than woodland, I chose the 25mm trees from Kallistra as they are smaller than anything else I use.
While I would quite like the tightly packed look of 6 or even 9 trees to a hex, for practical purpose, these bases need to be loose enough that both terrain and figures can be placed in the hex.
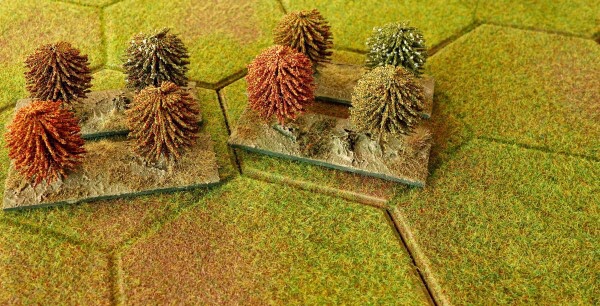
The trees have been mounted in pairs on 80mm x 30mm MDF bases, these were left over from a basing experiment that I did with 6mm figures, but they do the job nicely. Two of these bases sit comfortably side by side in a Kallistra hex, giving the trees equal spacing and provide enough room for figures. The bases can be parted if needed (see photo below) to have units put in the middle of the hex, or even used as singles to switch from orchard duties to just lining a road, field or a church etc (that is the maximum flexibility bit).

Construction is quite straight forward. The base is drilled to take the tree stem which are are hot glued into place, being careful not to let the metal stem poke out of the bottom of the base (mine did!). Filler is applied to the base. The filler has a colour added (sap green and a tad of black acrylic paint) to kill the white paste, together with a generous portion of your least favourite flock for light texture and some old bits of clump foliage for heavy texture.
When dry, a heavy coat of mucky wash goes onto the base, which darkens the filler paste to a more natural look. Next, dry brush with a light colour, followed by some irregular flocking, keeping the flock to less than 50% of the base area.
The orchards now have a much more defined look and are more versatile than their previous version as they can be split to just show a row of ordinary trees in a line (above two photographs).
Walls
Above - walls and corner pieces being prep'd on the painting tray. The plan was that these should be able to run straight or have turns and that the straight runs needed to be short enough that they could be used within a single hex, including having a turning wall within the hex. The dimensions used (excuse the mix of imperial and metric) are;
Long section, the base is two and a half inches long by half an inch wide. An 8 millimetre strip of card is glued vertically along the middle of the base to create the core of the wall and give a sub-structure for the stones to be glued to.
Corner turn, the base is half inch squared and likewise has a card core (set in a right angle) glued vertically onto the base.

Above - the combined length and corner turn allow an 'in hex' wall feature. Once the glue that secures the core to the base has dried, a thick coat of good quality PVA is added to both sides of the wall core and the piece is dipped into some large gravel (available from the model rail store), so that the stone sticks to both faces of the wall. Once dry, the top of the wall has a strip of PVA applied and fine gravel is scattered over it and left to dry.
A 50/50 mix of water and PVA is made up and applied all over the wall to ensure that the modellers gravel is locked down. The base and edges are painted a deep green.
Next, make a base paste up (the same mix as used on the orchard bases) and apply to the exposed base and leave everything to thoroughly dry. A dirty wash is then liberally added to both stonework and the base. Once dry, dry brush the wall with a light grey and the base with something light such as sandstone or other yellowish colour. The base can then be flocked leaving perhaps 50% of the texured base exposed.

Above - The length of the long pieces mean that they are short enough to be used as singles on a hexside. On this town base, the wall has been added to just one hexside.
The wall and orchard terrain pieces are useful in their own right, but also make excellent roadside cover.


Thanks Phil, re-cycled stuff for the most part, so that was a bonus.
ReplyDelete