
This post is looking at using his system for a home made dedicated scenario and some additional rules to get a slighter bigger game on the table - today we will be looking at McPherson's Ridge, the initial action at Gettysburg 1st July 1863.
Please press the 'read more' tab for the rest of this post.
Hopefully the opening attack on McPherson's Ridge (day 1 - Gettysburg) is an ideal scenario to use with these rules as the battlefield is relatively compact and the forces involved are relatively few. The scenario is resurrected from a project that I did years ago for 1/72nd scale plastics on 5 or 6 inch hexes using my own fast play rules that I was developing at the time, called Two Flags - One Nation. I am in the process of jacking them up again, but in the meantime, I thought this test bench scenario was a good candidate to see whether I could stretch the One Hour Wargames rules (by Neil Thomas) to cover a larger battle than he proposes in his book.
Readers of this blog will know I have a preference for hex terrain and that I have added a couple of house rules to the system to include some limited Morale and Command and Control rules, but things are kept simple in sympathy with the 1HW philosophy.
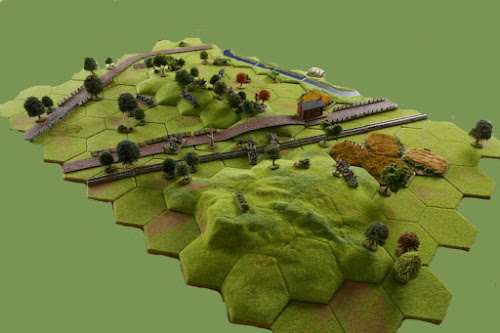 |
| The battlefield with Kallistra 4" hexes |
Although I am using hexes, the scenario presented here will be fine played with the 1HW as written, just lay the battlefield out on a 4' x 3' space and keep unit frontages to around four inches or any combination of those two ratios.
There is a resource section at the foot of this post that will direct the reader to the download file that covers all of the scenario elements in this game, including maps, historical background and Orders of Battle. Everything is held in my Dropbox (thank you Dropbox) account, but you do not need a Dropbox account to access my files - just click past the sign up screen.
The following account is supported by photography that shows the Kallistra hex system for terrain and Kallistra 12mm ACW forces.
Terrain - The essential elements of the scenario are that the Confederates must cross Willoughby Run and attack uphill to take control of McPherson Ridge. Holding McPherson Farm and the rail cut (hex E8) will also contribute to victory. For their part, the Union are defending with dismounted cavalry, trying to keep the Confederates back - or at least slow them down until Union reinforcements arrive.

1HW scenarios use relatively sparse game tables, so to make things look better to my eye, I am having the actual scenario terrain supported by additional incidental terrain.

This incidental terrain is for visual effect only and has no impact on the game what-so-ever, using things like lone trees and bushes and fences etc.

Units - Neil Thomas ACW rules have 4 classes of units, infantry, artillery, cavalry and zouaves. For whatever reason he uses the term zouves to represent elite type units. Consequently, in our game, the Union's veteran Iron Brigade would normally be classed as zouaves (yes strange I know). However in his game, zouaves are quite strong, so to have all the component regiments as zouaves would make the Iron Brigade too strong, so only two regiments at most (the lead regiment and then possibly a randomly selected regiment) will get that status.
Historically the Union artillery on the ridge duelled with Confederate artillery that was 1000 yards behind the Confederate line, so this is off board, well to the rear. The scenario rules represent this action with a special rule requiring the guns to duel for the first three turns.
I am a little short of cavalry and have no dismounted cavalry (not that Neil Thomas discriminates between mounted and unmounted), so my dismounted units will be represented by 1 cavalry base with 1 infantry base in front of it.
Changes - I am using hexes, leaders and morale, together with some special rules that pertain specifically to this scenario. These include a Random Event Table that will be referred to once in the game. All of these changes are purely optional in terms of playability of the scenario under the original rules.
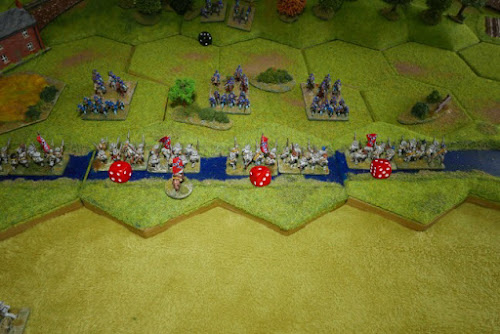
Turn 1. The scenario set-up is fixed. Gamble's cavalry brigade sits behind Willoughby Run, awaiting Archer's brigade to enter the board. Calef's artillery on the ridge begins an artillery duel with Confederate artillery (Pegram) who is 1000 yards to the rear (off board). Cavalry fire is reduced by two points in this system, which can really dampen down their effects.
 |
| Opening positions - note the union artillery on the ridge |
However .... each cavalry regiment rolls a '6', so would inflict 4 casualties on each target. I felt this stroke of extreme good fortune was too effective so early in the game and so the dice were re-rolled, getting gentler effects. The scenario rules require Cafel and Pegram to engage in an artillery duel for the first three turns, from the outset, the Conferedates (also treated as though in woods) get the better of this.
 |
| Archer's Brigade comes under fire in Willoughby Run |
Turn 2. The scenario has a Random Event Table made for it and this must be accessed at the very start of turn 2. The result says that on Turn 5, one randomly selected Union reinforcement will not make it to the battlefield at all.
Archer's brigade stops in Willoughby Run and returns fire. The scenario has the cavalry destroyed after 7 hits rather than the usual 15 required by the system. The Confederates roll 5,5,6 and 1. I feel this is too strong and return the favour that I just gave to Confederates by allowing a re-roll, this gave a more balanced 5,3,3 and 2.
Right, no more changing die rolls ... I promise, but this encounter has left me feeling that 7 hits leaves the cavalry too fragile, so I amended the scenario to allow the cavalry to absorb 10 hits.
I have introduced a morale rule to the system that whenever any unit takes casualties, it must take a test. In this instance everyone passes.
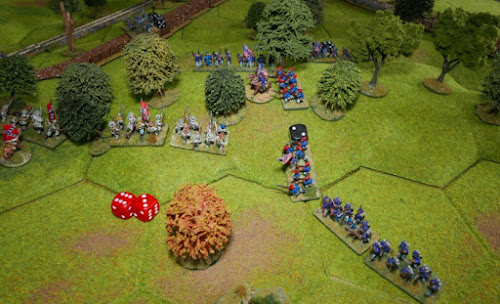
Turn 3. Davis on the Confederate left brings 4th Brigade onto the table on Archer's left flank. Archer presses the Union cavalry, who suffer badly. 12th Illinios / 3rd Indiana (combined) flee the table (destroyed) and 8th Illinois fail their morale, falling back 1 hex and picking up another 2 hits for doing so.
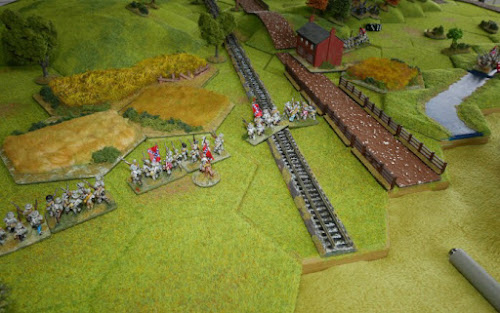
 |
| Archer's left advances, but his right falls back off the table - but can return |
The 14th Tennessee advance out of Willoughby Run, but on the right, 13th / 15th Alabama (combined) fall back under fire and retreat off the table, due to failed morale. A morale test is more likely to fail as hits increase - so far they have absorbed 11 hits and are vulnerable.
Turn 4. Davis advances on the far left, while Archer eventually manages to clear away all cavalry opposition.
 |
| Davis advances towards the hill and rail cut |
The artillery duel continues to go in the Confederate favour.
Turn 5. Firstly we have to resolve the Random Event generated at Turn 2. Which Union reinforcement will fail to appear?
This turns out to be the 24th Michigan from Iron Brigade, which was due to appear on Turn 9. It is the last reinforcement in the game, so perhaps the Union can give a sigh of relief. They nearly lost the veteran 2nd Wisconsin in a final 'dice off' which has guaranteed elite status in this scenario.
 |
| Hall advances two hexes along a road |
Hall's 2nd Maine Artillery arrives on the Chambersburg Pike. I am so glad that this didn't fail the reinforcement Random Event, as I have been making it up and painting it all week to get in ready for this battle!
With Archer fast approaching their position, Calef's artillery switches target from Pegram's artillery to the advancing infantry below.
Turn 6. 42nd Mississippi (Davis) approach the rail cut. Archer's Brigade starts to climb the wooded slopes of McPherson's Ridge and Calef's battery is destroyed.
 |
| Two regiments of 2nd Brigade arrive |
Cutler's 2nd Brigade (Union) starts to follow Hall up Chambersburg Pike.
Turn 7. The Confederates have made it to the cut (a victory point hex). Hall's artillery deploys right in front of them.
 |
| The steep sides to the cut prevent fire or movement over those slopes that form the sides of the rail cut - occupied by the above Confederate unit. |
The Iron Brigade has just started to enter the battlefield.
Turn 8. The situation at the cut becomes complicated.
 |
| Hall's artillery is exposed on it's right flank to an infantry regiment, if fired upon, the artillery will suffer a morale penalty. |
The Confederates have taken enfilade positions against Hall's artillery, so the artillery pulls back 1 hex. Culter's advanced regiment (56th Pennsylvania) pushes onto the rear slope of McPherson's Ridge while 76th New York turn to face the enfilading troops on the other side of the rail track.
 |
| The cut (occupied by Confederates) seen from the Confederate side of the board, 56th Pennsylvania are starting to climb the rear slope to the ridge. |
Having been earlier badly mauled by Gamble's cavalry, Archer's Brigade have chosen to stay within the wooded protection of the reverse side of the ridge. They will not be able to conduct ranged fire at the enemy (no line of sight over the crest), but they will be in a strong position if assaulted head on.
Turn 9. Half hearted firefights start (low dice rolls), centred around the cut as the armies close up. At this point the Confederates already control all 7 victory hexes (all wooded ridge hexes, McPherson's Farm and the rail cut) and they only need to hold 4 out of the 7 of those hexes to win.
Can the Union eject them by turn 15?
Turn 10. The lines close and the Union are getting the worst of it!
 |
| Confederates on the large hill look to be in a dominating position |
Turn 11. Hall's artillery has had enough and pulls back out of musket range.
Despite heavy casualties, the Union are pressing the Confederates. Iron Brigade have now started to climb the exposed rear slope of the ridge. Can the mauled troops of Archer's Brigade hold out?
 |
| The left hand unit on the ridge are zouaves, which represent elite status in this system |
Turn 12. Cutler's 56th Pennsylvania and 76th New York regiments (Union) are decimated and leave the field and 95th New York are pushed back down the hill.
 |
| 95th New York are at 13 casualty points - they are very vulnerable |
2nd Wisconsin (elite status) of Iron Brigade, rout the 13th / 15th Alabama from the ridge. It is difficult to see the Confederate flank holding out.
Turn 13. 84th New York (Union) fail their morale test, suffer a further 2 casualties and are subsequently destroyed, though Cutler who had been with them, survives and transfers to another unit.
Hall's artillery is shaky, but from a safe distance it continues to pour fire into the cut at 42nd Mississppi, who lose heart and fall back 1 hex from the cut, taking two more hits.
 |
| Confederates on the hill have taken a lot of casualties and face a fresh Union regiment |
14th Tennessee (Davis) break on the Confederate far left (on the hill) and the other regiment has high casualties, so this hill looks like it will soon be prised out of Confederate hands. Only two of Archer's brigades remain at the ridge and one of then is out flanked - it does not feel promising, but the clock is working against the Union.
 |
| Confederates are out flanked on the ridge. |
Turn 14. A last valiant stand on McPherson's Ridge sees the Confederates repel 1 regiment and break another.
Pegram's artillery (off board) is now able to fire against the right side of the ridge, against the emerging Union.
1st Tennessee are attacked in their flank, so suffer -2 on their morale check. Failing they fall back off the ridge.
 |
| Iron Brigade sweep along and behind the ridge |
Turn 15. Final turn. It is all over! The Confederates retain the cut, McPherson's Farm and 2 wooded hill hexes for a total of 4 victory hexes. The Union have liberated 3 victory hexes (on the ridge), giving a Confederate win.
 |
| The Union attack the cut position, but it will not fall before the game's end |
The Iron Brigade remain relatively fresh, most other units are starting to look a little shaky. One of the Random Events allow the game to go on for one more turn, but in this system movement comes before shooting and there is no direct assault / charge or melee, so the Union will not be able to push the Confederates out of a hex AND advance to take control of it in the same turn, even if another turn was played.
Conclusion. I enjoyed the game. I had no real idea that the scenario would work so well with the rules. This AAR was written as the game unfolded, so the outcome was unknown and this battle report reflects that. It was rather tight towards the end, so something must be working right.
I quite like the added morale rule as it adds a worthwhile twist, those units with high casualty levels fall back or dissolve rather than just hanging around to make that last unrealistic nuisance attack and the players start to care more about the condition of their units.
 |
| Units were moving 1 hex per turn, two on a road and muskets fired up to 2 hexes. Artillery has a range of 8 hexes. |
Overall the simple rules allowed me just to think about the game rather than the rules. The scenario produces a nice looking set-up in a compact space (4 foot by just under 3 foot).
I will re-run the scenario using another commercial set, just to compare the process and feel of play between the two and then set that against the final game outcome, just to explore the question that Neil Thomas raises of complexity over result.
RESOURCES.
Hex conversion and House rule play sheet - https://www.dropbox.com/s/bpzkvzo54zhlvc7/acw%20-%201%20hour%20hex.pdf?dl=0
McPherson Ridge Scenario download - https://www.dropbox.com/s/grzd32digtpgynm/mcpherson%201hwg%20%281%29.pdf?dl=0
Previous review of the rules - http://battlefieldswarriors.blogspot.co.uk/2015/04/1-hour-wargames-initial-look.html
Commanders website - I have just subbed up again for another year to keep the site running. It is a bit more snippet based than here. Please visit and bookmark if you like it there. http://commanders.simdif.com
Interesting. Thanks for sharing.
ReplyDeleteHi Stu, There are a few things that I think are worth tinkering with. One as you say is to give variable strengths, but since that would not effect fire capability, it would only effect how many hits a unit takes before being removed, so would need to be morale / training based rather than size based.
ReplyDeleteI would also like the idea of a unit being able to recover from some hits, say losing one hit for every turn that it stayed out of action.
The Iron Brigade has 5 units and so under the rules would be too strong if all elements behaved in an elite fashion. They get +2 to their dice when firing. Once they get into woods (where hits against them are halved), they are murderously difficult to dislodged as they dish out high fire-power and are slow to take hits, so in this particular game they would be too powerful ... though save by the fact that they arrive rather late to do too much other than accomplish their historical performance in this battle.
My own morale rules are giving the Iron Brigade a -2 Morale Test benefit (-2 is a good thing as it reduces the value of the testing dice to try and get them below the number of hits suffered by the units).
The rules are very generic, which provide a solid base for tinkering, but they are subtle in the way they have been stripped down. I only used them here as a bit of fun and to show what can be done by taking the rules away from the 'teaser' style scenarios in the book to something more historic - but they still have their weaknesses that are inherent with an easy play generic system, so at what point you abandon tinkering and go with something else I am not sure, it seams an easy line to cross.
I adjusted the strength of the cavalry specifically for the sake of the scenario, so that they could eventually be pushed aside without the Confederates being too badly hurt that they cannot hold out in the second part of the game.
The loop that I seem to travel with the rules is that they are uber easy and one can just get on with the game, but there is plenty of detail that wargamers like that are missing and one is then tempted to tinker, which undermines the 'total' simplicity that is aimed at getting people to get figures moving on the table.
The book is a good study of that balance of what we can accept before things stop feeling like a wargame - which of course is a different point for each of use.
thanks for the thoughts - cheers Norm.
It is nice when a plan comes together like yours did, and it was a good read about it too!
ReplyDeleteReally nice looking game. I am jealous of your hex terrain. It looks fantastic.
ReplyDeleteThanks Dale, I have collected the terrain slowly over time and made some of my own pieces. I think I was a little lucky with this shot as the light just fell in the right direction to highlight the various terrain features.
ReplyDelete