1st Bio-Tech.
In Miniature Wargames Issue 390, I presented a Sci-Fi article concerning an alien incursion in a small town environment. The article had a background narrative and a set of rules. It also ran three linked scenarios, that followed 'C' company from 1st Bio-Tech, as they initially entered the town and then progressed to various objectives to defeat the Alien incursion.
This blog post gives access to the rules part of that article as a free download and covers a new simple AAR, done in a narrative style (because the mechanics are covered elsewhere - links below). There is also some discussion on creating a town environment in hexes.
Please use the 'read more' tab for the rest of this article.
There is a resource section at the foot of this page that includes a number of useful links, including a link to a download version of the rules. The AAR presented here has used Kallistra Hexon II terrain tiles and Pendraken 10mm Sci-Fi forces.
The game fits into a convenient 3' x 2' space and can also be converted to a non-hex format by using a ratio of 4" to equal a hex.
The basic board is formed from a hex grid that is 8 hexes wide by 6 hexes deep. As a town centre, it has a crossroads at its heart, having four ruined buildings placed astride it. The board has some integral areas of rubble built into it. The rest of the terrain (buildings and parkland) was distributed around the board to make an interesting landscape, giving a mix of open and closed areas. There is also a rail track with some stationary rail carriages on the track. The carriages will count as buildings. (Below - an overview of the board).

The scenario deploys the whole of C Company (Horus command vehicle, 1 x Dreadnought, 2 x Walkers, 5 x Infantry teams and 2 x heavy weapon teams), which will enter play anywhere on the left hand side of the board. Their objective is to counter-attack into the town and try to take control of the cross-roads and destroy the enemy forces, in particular the Alien Queen. (Below - C Company).

The victory point schedule for C Company is 1 VP per whole building controlled (being the last player to occupy them), an extra VP if the building is on the crossroads, 2 VP's for destroying the Alien Seeder or a Nest and 4 VP's four destroying the Alien Queen. The Alien side get 2 VP's for each C Company team removed from play. If C Company earn more VP's than the aliens, they win. Any other result is an Alien victory. The game lasts for 10 turns.
At the start of play, the Alien player gets a Queen, 1 x Seeder, 2 x Nests, 2 x Juveniles and 3 x Warrior bases. The player rolls a D6 for each base which determines which row the base sets up on. The player can choose to place the base in any hex in that row of their choice and up to three bases can co-exist in the same hex at the same time. (Below - a Queen with a Juvenile at her feet).

The following video clip is less than 2 minutes long and demonstrates the battlefield layout and set-up locations.
Chapter 1. C Company waited on their start line patiently for the order to advance. Captain Smith was watching the large screen above her command console, located at the rear of the Horus command vehicle. The airborne drones fed her live footage of the carnage below as they surveyed towards the town's centre. Nothing ... everywhere was desolate. As the drones swept around the crossroads for their return journey, movement in the ruined cinema caught Smith's eye, the domed shape of a forty foot seeder had carelessly revealed itself ...... "they are here, they are bloody well here" shouted Smith - team coms crackled to life. "Horus to all teams, a big fat Potato Head has been detected at the cinema at the far end of town. Proceed with caution, the mission is to secure the crossroads, keep your cams on pan and give me 360".

"Copy that". The company moved out, using the Granary as their axis of advance, with the left anchored on the rail carriages. "Target left ", the tell-tale tap tap tap of critters dashing down the rail track was unmistakable. Alien Juveniles, masters of ambush, fell upon C Company's left flank, but the warning had been enough to bring a wall of fire against the crab like creatures. They exploded as their weak armour was shot apart, but not before they had taken out McCarthy from a RKZ heavy weapon team. (Above - the Juveniles clatter down the rail track to attack).
Even as the flamers went in to complete the job, cursing the crustaceans and giving victory whoops, little did they know that the Alien grip on the town was intensifying as the secretive Seeder selected a secluded corner at the cinema to begin her nesting ritual.
Chapter 2. The cams were picking up movement in the nearby buildings. The Horus directed C Company into positions to prepare for the inevitable attack. As three teams picked their way through the Granary to get to the far wall of the building, the first wave of Alien Warriors charged at the building, their strange haunting war cry cutting across unnatural silence. Getting to the wall just in time, their automated weapons cut a swathe through the attacking hoardes, a couple got through and dealt death in their usual way, but the marines fire never stopped and the attack faltered. (Below - the first Warrior attack goes in at the Granary).

Chapter 3. Knowing that the Alien Warriors would quickly regroup, the teams in C Company rotated out their two teams that had just taken casualties at the wall, bringing them back into the safety of the rear areas at the Granary. Fearing that they would find themselves hemmed in around the Granary complex, Smith moved the Horus, together with an infantry team up towards the large office block, to see whether a better route existed to get into the town. The two RKZ heavy weapon teams, took up fire positions and put down suppressive fire at the first sign of movement, keeping the Alien squads at bay.

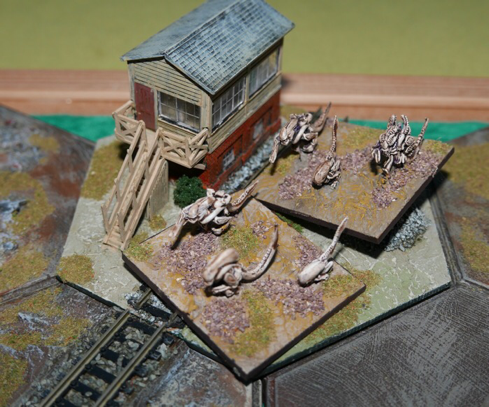
Chapter 4. The initial swarms of Aliens had taken many casualties and each were close to destruction, but behind them, five fresh Warrior swarms were emerging from their juvenile pens and moving up. The Horus pulled back, knowing that if they stayed at the office block for much longer, they would soon be overrun. Smith knew that they needed to start destroying nest sites, but the enemy were just too numerous to risk advancing over open ground. If she could just get teams into The Hotel Marmont at the crossroads, they could bring the first nest under fire. (Above - fresh Warrior swarms gather at the signal box). (below - Warrior swarms move to within striking distance of the hotel).

Chapter 5. The Dreadnought lumbered forward out into a position that gave relatively open views and with a fire plan plotted by the Horus, and supported by the Walkers and RKZ teams, poured fire into the weakened Alien ranks and decimated them. With a clear break in Alien cohesion, Smith ordered the teams forward. The right flank crossed the Granary wall, heading towards the Foundry, while the left took their first crossroad building - The Hotel Marmont, but almost half their numbers had already taken casualties amongst the infantry or suffered damage to the vehicles. (Below - C Company advances, the wooden markers show hits).

Chapter 6. The Dreadnought loaded up one of it's two Starburst missiles, targeting Warrior swarms that were gathering to reclaim the hotel. The blinding flash momentarily hid from view the carnage of the missile strike, but the devastating direct hit had left the target zone totally levelled. In the same instant, the deafening noise of a second explosion grabbed everybody's attention as the Foundry erupted into flame and billowed smoke, with rubble fragments shooting off in every direction for a hundred yards or more.
Aboard the Horus, there was immediate confusion. The Foundry lay well outside the fire plan, but the harm was very real. Coms dropped and the 'vitals' screens closed down. Smith had no way of knowing what shape those teams at the Foundry were in or indeed if any had survived the explosion. A ruptured gas main was her considered opinion, she had seen this twice before, but never involving such loss to her own side. Any sense that the Marines had started to get the upper hand had been just been wiped away in a second.

Her diverted attention was shockingly returned to her own position at the hotel. A surprise attack from two Warrior swarms hit the hotel, with their efforts clearly concentrating on her vehicle. The Horus could never hope to survive such an attack. Covered in burning secretions that carved through the light armour, Smith and her crew were dead before any counter-measures could be taken. The distraction of the Foundry explosion and her own perchant for being too far forward instead of letting the cams do the work for her, had resulted in a catastrophic loss to the company. (Above - the hotel comes under warrior attack, with the Horus the prime target).
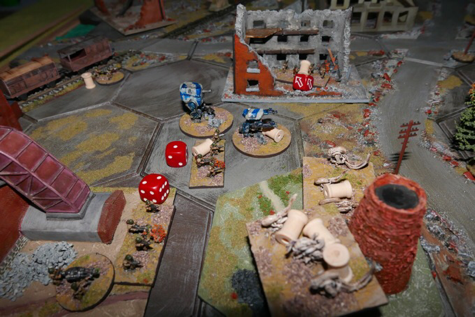
Chapter 7. With the Horus down, Command and Control systems struggled to co-ordinate. The Dreadnought has some limited command capability for such situations, though it simply allowed all the teams to continue to network directly with each other, it was not intended to have a co-ordinating role. Being in the middle of a firefight just put an extra level of stress on the Dreadnoughts command capacity and three of the teams lost their coms and surveillance systems - they would just sit tight and defend themselves, hoping the situation was temporary. (Below - a serious command problem, red dice show the teams that are out of command).
As casualties and disorder diminished the company's capabilities, another wave of attacks came in. This time the Dreadnought, a Walker and an infantry team were caught in the open. The two machines were great weapon platforms, but practically ineffective in close combat. By some miracle that their assailants were drive off.
Chapter 8. The situation for C Company worsened as Warriors swarmed over The Hotel Marmont, denying its strategically important fire position to the marines. Now exposed in the open, they were forced to start falling backwards towards their starting positions. With the situation hopeless, the remaining elements of C Company were ordered to withdraw from the town. (Below - The hotel Marmont is recaptured by Warrior swarms and C Company fall back onto the granary complex).

Conclusions: That was a lot of fun. I think if I re-ran the exact scenario again, I would remove either the Seeder or 1 Nest from the at start Alien force, the Aliens were too strong in this game - even the Queen was able to stay out of harms way, but if she ever gets involved in the fighting her aggression levels can halt the heaviest of assaults...... though she could well die in the process, as she is compelled to attack by the rules, even when that might be tactically unwise.
C Company was extremely unlucky to get caught in the gas explosion, which was a random event triggered if an attackers die rolls included 3 or more sixes, which the Dreadnought did when it fired the Starburst missile. At that moment, with the loss of three bases, the fortunes of war substantially moved in favour of the Alien force.
C Company losses were high. Off the table by the end of the game were three Infantry Teams, the Horus and a Walker. C Company had gathered just 3 Victory Points for occupied buildings (none being at the crossroads), while the Alien player had 10 VP's for the losses they inflicted.
In my linked 3 scenario campaign that I put together for the magazine, C Company moves across the board in stages, with the last battle cornering the Queen and hopefully taking down the Seeder. There are recovery phases between each scenario that allow some hits to be removed and one infantry team to return play. This sort of mini campaign opens up a lot of nuances to what is effectively a very simple system of cat and mouse amongst a heavily terrained board.
Resource Section
Rules from a DropBox download (thank you DropBox)
Blog post on construction of the city tiles
Another blogged AAR - of the linked scenarios
Blogged construction of forces - a fast gaming project
Link to my COMMANDERS sister web site.
Norm, while I usually skip over any content that is sci-fi/non-historically related, I must say that your troops and terrain layout are first rate! REALLY amazing terrain piece. Your battle recap was well told and well written.
ReplyDeleteGreat job!
I forgot to add: Congratulations for getting this piece published!
DeleteHi Norm
ReplyDeleteGreat post. I have also shared your blog post on 10mm Wargaming Facebook Page (https://www.facebook.com/10mmwargaming/)
Take care
Andy
http://www.10mm-wargaming.com/
Great stuff, Norm! Not usually my area of interest but that was a compelling tale compellingly told, and lovely figs and terrain as well. The explosion was actually quite a shock to read. Nicely done. Also enjoyed the Hotel Marmont :)
ReplyDeleteCheers,
Aaron
Thanks all (thanks for sharing Andy).
ReplyDeleteYes - I am not particularly a Sci-fi gamer, but these armies were very quick to put together and some experimentation with tactical forces NOT having facings, made it an enjoyable project. I wish I had had the bits, pieces and capability to perhaps show the explosion at the foundry more graphically. that gas rule has been in the rule set since the outset and never been triggered before (or more likely I have forgotten to notice six 3's being rolled :) )
very interesting article!got into sci fi wargaming more and more this past year!mark walkers "night of man"has been a great find for me!my wife god bless her bought me the starter set dropzone commander from hawk wargames for xmas so i'm busy at moment painting and assembling the models and card buildings
ReplyDeleteKeith, I think the Dropzone stuff is also roughly at the 10mm scale. I had considered getting one of their expansion sets, as the walkers look rather finely made.
ReplyDelete