The Ardennes, December 23rd - 27th 1944
Battles of the Bulge Volume 1
Designed by Roger Miller, developed by Richard Handewith and published by Revolution Games. The game covers that latter part of the Bulge campaign (1944) when German forces came closest to the Meuse River.
The following post gives an overview of the game mechanics and the flow of play.
Please use the ‘read more’ tab for the rest of this post.
Firstly I should disclose that Revolution Games have two of my games in print. However that does not influence what follows here. This is not a review site, I just post on games that I have enjoyed playing and I like this game.
In the Bulge games that I have played over the years, I can never remember seeing the Germans get at far as Celles (historically this was their furthest point of advance), so getting this game that specifically has a focus on this westerly half of the campaign area, with its complicated terrain, detailed road net and having the Meuse being tantalisingly close, makes for a fresh take on the gaming subject for me.
The game comes as ziplock game with a 22” x 17” map, 88 counters and a 12 Page rule booklet, with only around 9 pages really being rules. Because the rear of the counters show a ‘used’ side rather than a casualty side, two step units are represented by two counters and so in fact there are around 40 combat units represented and many of them start off map, to arrive over the course of the game as reinforcement. So this is a very manageable game on unit count alone.
The map (by Mark Mahaffey) is really nice and distinctive, doing a superb job at conveying a winterised landscape. It has large hexes that comfortably take the larger sized counters and since most things don’t stack, troop movement is an easy thing to manage. The right side of the map has the town of Hotton at its edge, so we have in effect just moved past Bastogne, which is off map beyond the lower right corner
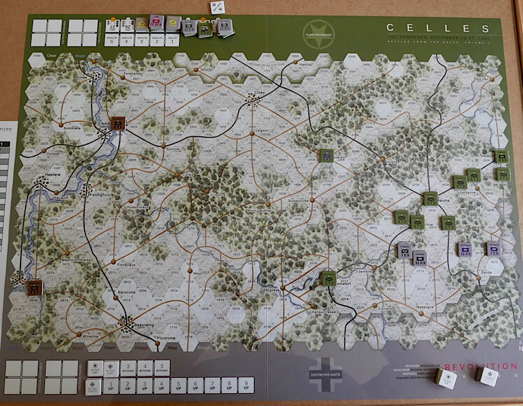
The counters use a nice sized font to make game pieces easy on the eye. They are colour coded by formation which is an important for activation and they are rated for attack / defence / movement.
Though the rules are relatively short there are quite a lot of unusual mechanics and happenings going on in the system.
Both players have a draw cup. At the start of a turn, a player adds tactical chits to their cup, plus formation chits that are listed for being available that turn. Some formations have two chits in the cup. The player with initiative can choose who draws from their cup first. After that play alternates between the players, as they activate one formation, deal with it and then hand the turn back over to the other player, who will draw their formation etc.
Regardless of how many formation chits go into the cup, the number of formations that can activate per turn is governed each turn according to the allowance on the turn track. So there are frequently occasions in which a formation you want to use, does not get their formation chit drawn and so they remain inactive.
While attempting to draw a formation chit, the player may draw one or more of their tactical chits out. These are kept to one side as they are drawn, but as soon as a formation is drawn, play halts while the player chooses whether to use any of their tactical chits or not. For the Allies this may be an air attack and both players have tactical chits that allow replacements, a free move of one unit or a combat modifier chit that can be saved.
When a formation chit is drawn (they are actually called action chits in the game, but using the term formation is a better description for our purposes), the player activates the associated formation (usually a division) on the game board and on a unit by unit basis, has them move and / or fight.
The Germans generally do better on night turns and the Allies on day turns. This is reinforced during play by a variety of modifiers or allowances.
Interestingly movement and combat is combined into a single action. So a formation is activated and then it’s units spend their movement points to either move, fight or both. For example a unit with a movement allowance of 9, might move for 1 MP and then spend 6 MP’s on a Medium Strength Attack, that would leave them with 2 MP’s to continue moving if they wished. Putting in a heavy attack (9 MP’s) gets a combat bonus and a light attack (3 MP’s) suffers a penalty.
Once a unit does not wish to spend any further movement points to move / fight, it is flipped to its used side, which has lower combat stats and this can leave it a bit vulnerable.
Although units activate one a one-by-one basis, through a clever mechanic they can still combine with other units to attack. Basically, when a unit declares it will attack, it must attack every adjacent enemy unit (sounds dangerous!), but then any friendly unit adjacent to those enemy units, also gets drawn into the attack as well. The combat values of both sides are added up into a single attack / defend figure, which is converted to a ratio in the normal way of odds ratio systems. The combat die (D10 not supplied) gets modified by the terrain and other influencing matters, such as a penalty for a attacking while out of supply, or a bonus for the Germans attacking at night etc.
Only the unit that initially made the attack is flipped over to its used side, so other participating units of that formation that have not yet used their movement allowance, remain free to move and attack and it is a design intention that this ‘wave’ effect of attacks is represented.
These features, plus varied terrain come together to make this a very thought provoking, dynamic and nuanced game. Each hex matters and often there is a sense that you are playing a game of ‘what units can’t do’ rather than what units can do. It is common to just be one hex too short, or fail to activate soon enough in a critical area, or finding that the terrain types or road net put whatever you want just out of reach.
A design philosophy is that the Meuse cannot be crossed, because by this stage it was too heavily guarded, though the Meuse still remains a significant Victory Point destination because for every German unit adjacent to it in the Victory Point Phase. Of each turn, the Germans will get 1 VP. If 20 such points are ever accumulated, the Germans get an automatic win.
If they can’t do this, victory is established at the end of the game by the holding of specific towns, plus the number of step losses and the points scored by these are added to any points that may have been earned during play by reaching the Meuse.
Because the Combat Result Table runs off a D10 and a +2 or -2 modifier is a common modifier range, there are quite a lot of potential results for any one given odds ratio column and this can produce quite wide swings of fortune if one rolls low or high.
This is an area of the game that has the potential to frustrate due to a sense of the process seemingly being a little luck driven. However it does bring advantages, low odds attacks are often necessary and the CRT makes that possible, also, especially for solo play, it takes certainty away from the players and probably cramps the style of combat factor counters. Indeed if one looks carefully at the strengths of units and their reduced steps, there is a clever mathematical inter-play going on that revolves around unit strengths and the 3:2 ratio column. The processes in this game have been well thought through to provide a cohesive whole.
Essentially the flow of play will be that the Germans will push for the Meuse (on the left of the map) and the Allies will try and cut that advance. Because of this likelihood, the Germans have to hold the centre, so that they are not enveloped as they push a finger towards the Meuse and they should also be working to capture the VP towns on the right of the map (Horton, Marche and Rochefort) for their supplementary VP value. The Germans have much to do!
REPLAY NOTES.
The game opens with the night turn of December 23rd. The Allied main defences are formed by the 84th Infantry Division along the Marche to Horton Road (on the right of the map). They also control Rochefort. Each turn represent 12 hours and the game runs to 27th December.
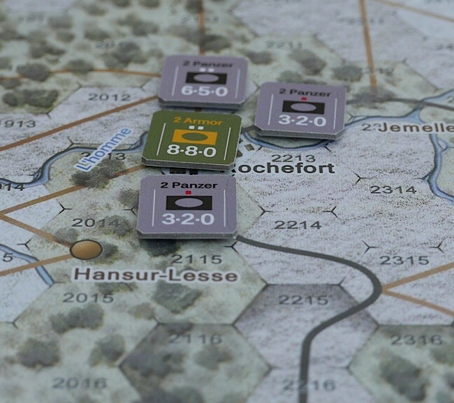
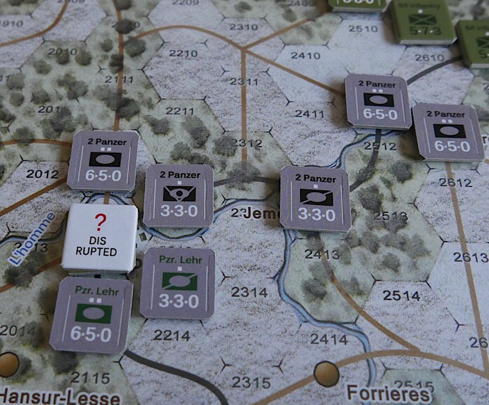
Just to example the opening action …. The Germans draw the Panzer Lehr chit and two units of that formation enter the map on the main highway to Rochefort, which is defended by a lone infantry unit. The weaker panzer unit (7.5.9) advances first, spending three and a half Movement Points to move next to Rochefort. It has five and half movement points left, but neither wishes to attack or move further, so it flips over to its used side (3.3.0).

Next the other panzer unit (11.8.9) moves adjacent to Rochefort, spending 2 MP’s and leaving them with 7 more to spend. A Medium Assault costs armour 6 MP’s and they call the assault. That unit must attack every adjacent enemy, but here there is just one, the unit in Rochefort. Next any German unit, used or not, that is adjacent to any attacked units, gets drawn in. In this case, this is just the other flipped Lehr unit. The attackers total the attack values of their two units (11 + 3 = 14) and this is compared the the total defender strength (7) to give an attack ratio of 2:1.
The Die Roll (a D10) is modified by +1 (plus is good) for the Germans making a night attack and -2 for the defence value of the town, for a total modifier of -1. The die roll is 7, modified down to 6 and cross referenced with the 2:1 column on the Combat Result Table. Results can affect either the attacker or defender and in this case we get a ‘Defender Disrupt’ result.
Disruption reduces movement by a third, cause the unit to suffer a detrimental die roll modifier of 2 in combat and they lose their Zone of Control. Disruption markers are automatically removed at the end of the turn. The attacking Lehr unit has 1 MP remaining, which it does not wish to use, so it flips to its used side. If later in the turn, the Germans manage to get another unit up to attack Rochefort, they should be able to get the Lehr units involved (at their flipped strengths) and take advantage of combat penalty caused by the disrupt status of the defender. (Note - this does indeed happen in this game when 2nd Panzer move across to attack Rochefort, but their die roll is so poor, they get a ‘no effect’ result!
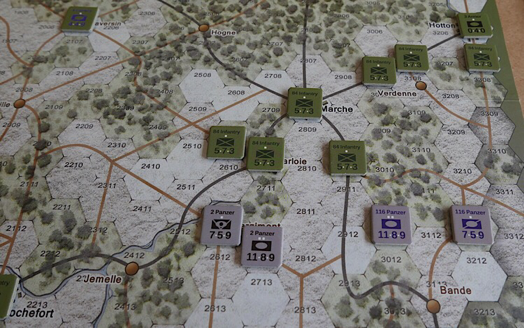
The Allies bring the first two of the 2nd Armored units into play, these are powerful 15.12.9 units and their presence anywhere on the battlefield will give the German play much to worry about.
Rochefort eventually falls and the way west to the Meuse is open. Lehr pushes on for the river, while 2nd Panzer cover the centre. On their right, 9th Panzer arrive to join 116th Panzer in their efforts to engage the 84th and take the Marche to Hotton area.
As Allied 2nd Armour gather in strength, they decide to move westward to try and head off Panzer Lehr’s unobstructed advance towards the river. Lehr reaches Beauraing (lower left of map), but becomes involved with 2nd Armor and takes very heavy losses. 2nd Armor also manage to re-take Rochefort. The German effort is now in a lot of trouble.
Amazingly, surrounded at Beauraing, Lehr manage to hold out for 24 hours and then during the night of 26th December, successfully infiltrate out of the town to move back towards their lines. The same evening, the Allies, who have become surrounded at Rochefort, also infiltrate out towards safety.
The following day, a reorganised 2nd Armor counter-attack at Rochefort and recaptured it.
This was the last main action of the game. The German advance to the Meuse had been cut before any victory point could be earned there and they had only captured Marche (worth 2 VP’s), having lost Rochefort, abandoned Beauraing and failed to capture Hotton. And so it went to casualties and in this regard the Germans had been badly mauled, losing 11 steps compared to the Allied 5 steps.
On the map it looked like an Allied victory and the victory point system simply confirmed that.
In a follow up game, Lehr did reach the Meuse and started to gain victory points. They also capture Rochefort, Marche and Hotton. The Germans lost 10 steps and the Allies 11 (yes it was a very bloody game) and so on VP’s the Germans won. I only mention this so that the reader can see the balance in the game and also the re-playability value.
Conclusions - This gives an enjoyable game, the small footprint and relatively few counters give engaging play. When you activate a formation, you concentrate on the potential and capacity of that formation, so there is a feeling of getting closer to the formation and the tactical options. The variety in the terrain and the value of the road net through the difficult terrain also makes the player engage with the geography of the campaign area and every hex matters, it is just too easy to be one hex away from being able to do what you want and having this hand of restraint on your shoulder intensifies the enjoyment of play.
So despite short rules, the unusual system and the problems and opportunities that unit can encounter makes play quite a cerebral thing, bringing a strong sense of engagement for the player.
The unusual system is ideal to represent fighting in difficult terrain in which the road net is important and the chaos of small units holding up large units and units being able to push aside defenders and make relatively deep movements. The combination of single unit activation, the unpredictability of the Combat Result Table and the infiltration rules all work to this end.
Road hub hexes are important and blocking lines of retreat / supply and following up with attacks against disrupted units without sticking your own neck in a noose, makes for thoughtful play and since you play formation by formation, your focus is really drawn in to small parts of the action and having a feeling that things at this local level matter.
Complexity - On the face of it, the rules are not long and this is not a complicated game, but it brings some uncommon ideas to the table, so it is worth reading the rules twice and taking some ‘reminder’ notes. It will likely take a turn or two for players to get a good feel for how formations will act, interact and perform. Understanding how you can bring more of your own units into a battle while reducing the enemy presence is important. After that, everything is very straight forward and this is a good sized game to come onto the table often with minimum rules preparation etc.
Solitaire - This is a two player game that is easily playable solitaire. Indeed, the variables that result from the chit draw system and CRT enhances solitaire play to an enjoyable level.
Time - Two and a half hours is about right for decisive play, but this has some potential to be longer for gamers who spend a bit of time thinking about their moves.
Size - The map is 17" x 22” (a half mapper) and there is one A4 sized reference card with the CRT and other tables on it, so this is a good kitchen table candidate. The low counter density and good hex size makes this an easy game to manage.
Resources:
Web site for Revolution Games. Note at the top of their page that deals with this game, there are two detailed videos (by Stuka Joe) that run through the game and describe how the game is played. LINK
http://www.revolutionwargames.com
UK stockist of the Game LINK
As expected from your fingers, another comprehensive review.
ReplyDeleteThe map is really quite pleasing; the counters, average.
As you mention, a number of interesting mechanisms embedded in this one. For the "move, fight, or both" concept using movement points and movement allowances, perhaps a more useful analogy for this activity would be "Effort" since each movement point seems to reflect a unit of activity focused on a specific task. I like how different levels of assault require different levels of effort expenditure. Disruption (friction) makes these activities more difficult. Nice!
The mechanism of attacking every enemy around you and every friendly around the enemy attacking cohesively, is an interesting concept and requires more thought. What do you suppose this mechanism is modelling on the battlefield? Wen one of the "participating" unit's activation chits is later pulled from the cup, can it activate again under its own chit?
I did not know you were a published boardgame designer. Congratulations! My eye has been on Revolutions Games' ACW series on Pea Ridge and Cedar Mountain. Have you tried either of those? If so, your thoughts?
Thanks again for a good review on a game to which I am unfamiliar.
Thanks Jonathan, I have not played their ACW stuff, but am keeping an eye out on the ACW range to see how it develops, but I think the next time I am in my game store, I will look inside a ziplock, to see if it fits my wants.
ReplyDeleteI am quite keen at the moment on series games, so I don't mind the longer rules or a fuller system, if I can play it over several titles.
I have just picked up the two Hexasim Eagle titles as a potential Napoleonic series (hopefully Ligny is next) and would like both an AWI and ACW series to follow.
Sorry Jonathan, I missed your 2nd para in my reply. Yes, a participating unit can be used later in the same turn if it's formation is drawn, as the first thing to do is flip all counters of that formation to their face up side I.e. Their unused side.
DeleteI think the mechanic is doing two things. It is cleverly allowing multi unit combat in a system that is driven by single unit activation. It could have gone to single unit combat, but that would have likely needed a differential combat table rather than an odds ratio one and there are simply too many incidents of one unit coming up adjacent to two units for it not to be a problem. Also since each turn is 12 hours, I think it is allowing the units in the immediate sector that might normally get dragged into a 'developing' battle to do so. It is a clever way of bringing together single unit activation and multi unit combat in a controlled way into a sub-phase of the formations activation. It is just neat!
Norm, the size of the map is 17" x 22", not 11" x 22". I do agree with the previous poster that the map is quite pleasing and the counters are average.
ReplyDeleteI am one of those players who suffer from analysis paralysis and all my solitaire plays of Celles have taken between 3 and 4 hours. I've played it once or twice a year since I bought it 3 1/2 years ago and find it easy to get back into without studying the rules in details.
I played Gazala (it uses the same system) a little more often than Celles because I find the decisions easier to make because of the nature of the desert terrain. The map is again very pleasing but the original counters were too dark which made it a little difficult to differentiate between certain formations. Revolution Games lightened the counters and that solved the problem.
Your 1066 games are next in my Revolution Games to try.
Thanks for mentioning the map size ( text corrected ). I have Gazala, but unpunished and did not realise it is the same system, how interesting since the terrain is very different.
ReplyDeleteI wouldn't normally mention that the game could take longer depending on player styles, but it struck me that this particular game is quite thought provoking and prone to needing 'thinking time' :-)
If you get a 1066 game, I hope it meets your expectations. Thanks for commenting on the blog. Cheers Norm.
Unpunished! Hmmmm that should be unpunched ..... you have to love auto correct!
ReplyDelete"Unpunished" works too!
Deletelook forward to the first opportunity to play this with you.
ReplyDeleteMike, it is a different take that I think you will enjoy.
DeleteWhile I don't own many, if any, boardgames. I thoroughly enjoy your reviews, they make for a good read with ideas that may translate to the tabletop - thank you.
ReplyDeleteThanks Peter, our shared enjoyment of grids does often allow some of those ideas to more readily translate to the table. If I ever get my 1066 stuff painted, I plan to bring an entire boardgame system to the table.
DeleteGreat report that shows that small boardgames can work and present just as much a challeging game as a larger one. And it is a game that will fit in my map drawers - excellent! I may have to look into these games more. I know they are out there but never really have investigated much. I have a lot, and played some, of the older Metagaming Microgames and some small SPI capsule games. But anything more recent that 2000? Not really.
ReplyDeleteThanks Shaun, for one of my games, I just set it up on a pinboard, so that I could move it around and I just did the odd turn here and there on a high table that I have that has telescopic legs, allowing me to play standing up (something that I know suits you), with the game being played over 2 - 3 days.
ReplyDeleteGlad you liked the map and enjoyed the game, thanks for the review!
ReplyDeleteNo problem, the map conveys a good sense of winter in the Bulge landscape and nice maps are a huge part of my enjoyment of a game.
ReplyDelete