
The units represent brigades and divisional artillery and the rules are set at the lower end of the complexity spectrum. Play is solitaire friendly and fits into an evening game session.
To read the rest of this post, please tap on the 'Read More' tab.
I have been wanting to do this for a while and the 200th anniversary of the Waterloo campaign battles in mid June has given me the motivation to just get on with it. I am intent on using the rules with a Kallistra hex battlefield (4" hexes) and Pendraken 10mm figures.
This is very much a work in progress and at this moment in time, I do not even have figures for the Waterloo campaign. Having originally planned to do the 1809 Danube campaign first, I have French and Austrian 10mm figures (Pendraken) in the painting queue.
Anyway, this doesn't matter so much because it struck me that I can use GMT's Commands and Colors game parts to play the game and test the rules. The plan is that by mid June, I will have posted a more refined version of the rules together with a Quatre Bras scenario based on a 12 wide by 9 deep hex grid (on a 4' x 3' table when using 4" hexes), though it will of course also work fine on a GMT C and C board with blocks.
 |
| GMT's very popular Commands and Colours is ideal to do some play testing with while I get the figures and terrain sorted out - thank you GMT Link to GMT shown in resource section. |
The first play test one was done solitaire. I used GMT's Quatre Bras scenario as the basis of play. The turn structure, cavalry charges, formation rules and game clock remain from that play test, but pretty much everything has since been tweaked and some parts, substantially so.
Quite a lot of work had already gone into the rules, but I hit a wall. I knew what I wanted to do, but the relationship between the processes just seemed messy. Even producing a table to help bring everything together just didn't help. It simply wasn't intuitive enough. Anyway, a few days later I combined two attack charts and bingo, the cloak of darkness fell from the system and then in rapid succession a number of other improvements fell out of that. The result being the Beta April 23rd version that would be used in a face to face game with Mike.
 |
| Two French attack column have just become disordered while crossing the stream. Using GMT's game parts |
We played our game which resulted in some mixed reflections. The game had gone alright, but it needed to be bloodier and a bit more dynamic. It felt a bit dry and some of the processes were still a bit disjointed - and so on to the next version - the version presented here.
I ditched the average dice (a hangover from the first version) and went to D6 for combat but stayed with D10 for command. The game generated more heavy casualty markers and to dampen that effect down a bit, units would test for removal from play after taking four such hits rather than the previous 3. The army disintegration levels were changed from being based upon total units removed to instead being calculated by the number of heavy casualty markers accrued during play. Movement rates were increased from 1 hex per turn to between 2 and 3 hexes depending upon terrain. Plus there were a load of other refinements that came out of several re-writes.
To give an idea as to the flavour of the rules, here are some of the main features;
Units are rated 'mixed ability', 'reliable' and 'good'. These could typically reflect militia, veteran line and guard respectively.
To do some things, a unit will need to take a Command and Control test. This is done by rolling a D10 against the units rating (described above). As a unit takes heavy casualty markers and is disordered it becomes harder to pass these tests, which encourages the keeping of fresh reserves.
Combat uses a D6. Hits are always inflicted on a 6, and also on a 5 if the target is not in cover. A roll of 1 will always hit the attacker. The first hit is simply a disorder / retreat type result, subsequent hits (in the same attack) generate the heavy casualty markers. Multiple dice can be rolled in a single attack.
The sequence of play is contained within the structure of a turn, but the number of turns is somewhat irrelevant as the game is governed by a game clock (like the Tigers at Minsk rules) that is managed using a normal pack of playing cards. Quatre Bras for example will start at 2 pm. At the end of each turn, four playing cards are drawn and their combined values will determine how many minutes the clock will advance. Royal cards and aces are worth 15 minutes each, everything else is worth the value of the card.
This clock will be used to determine when reinforcement will arrive and some combat results say things like 'the unit retreats 2 hexes and then it cannot do anything until at least 1 hour has elapsed while it re-organises'.
 |
| I recently got these rather nice napoleonic themed cards. The four cards shown would advance the game clock by 45 minutes. |
Because the turns can represent anything up to an hour, unit facing is not used, though flank attacks can still be made when attacks are made against the same hex and those attacks are separated by at least 1 hex side.
Formations of line, attack column and square are used and each of those can be either ordered or disordered.
Cavalry do not move around the battlefield at top speed each and every turn, rather, they move the same rate as everything else, but their charge is powerful and more to the point, (as it is with assault columns) it combines movement with attack in the same turn. As they charge their target, there is a defender reaction which is different depending upon whether the target is infantry, artillery, light cavalry or other cavalry.
I like the horse artillery effects, which are managed simply via the sequence of play. Phase B allows horse artillery to move, Phase C allows all artillery to fire including any horse artillery that just moved and Phase D allows any horse artillery that fired in phase C, but didn't move in Phase B to now move. This gives horse artillery the flexibility of move / shoot or shoot / move, throwing them into action at points of crisis.
The sequence of play follows the following phases;
Phase A - (re-order) units can change formation, cavalry can lose blown markers and disordered troops can become ordered, but they must pass a Command test.
Phase B - Horse artillery can move.
Phase C - All artrillery fires including any just moved horse artillery.
Phase D - Horse artillery that did not move in B but did fire in C may now move.
Phase E - Cavalry charge and units react.
Phase F - Infantry in attack column that are not adjacent to an enemy can move AND if they do, they must attack.
Phase G - Units that have not done anything in Phases B - F can now move.
Phase H - Infantry and cavalry that have not done anything in Phases B - G can now attack. Squares cannot attack and units in attack column now firing (not used in F) lose 1 attack dice.
Phase I - Army disintegration, armies that have reached 25 heavy casualty markers take a Command test for every unit on the table and those that fail fall back two hexes.
Player 2 now conducts the same phases
Admin Phase - The players draw four playing cards and advance the game clock accordingly. Player one begins the next turn.
Anyway, there is a link at the foot of this post that gives the reader download access to the current beta version of the rules. Hopefully there is something there for you to like. Remember - this is just for fun.
I have also been working on a Quatre Bras scenario written specifically for these rules and this can also be downloaded using the link at the foot of this page.
This post will now give way to an AAR giving an overview of the latest play test with the Beta 30th April rules. I am setting up using Kallistra terrain and the unit blocks from my Commands and Colours base game to have a first go at my Quatre Bras scenario. We will be doing a face to face, so hopefully Mike will like the changes since we last played.
Setting up - The game begins at 2 pm. The Anglo-Allies have a fixed set-up with exception that they have a single detachment that they can place anywhere adjacent to the stream or pond. The French player is Player 1. Their forces start off the table, so they will most likely introduce them in Phase G (general movement phase), though reinforcements can charge onto the table with cavalry in Phase E, or arrive in attack column formation in Phase F to assault a unit.
 |
| Quatre Bras map, viewed from the French perspective. |
Scenario rules - There are a number of special rules to deal with some unique aspects of the battle.
 |
| The table (reverse view of above map - this is the Anglo-Allied side of the table). The photography does not really show the hills well. |
Winning - the major goal is the same for both sides, hold Quatre Bras and collapse (25 casualty points) the enemy army while avoiding that fate themselves. If neither player achieves this by 9 pm when the game normally ends, then a draw is declared. Players can determine whether a minor victory exists based upon heavy casualty markers accrued and or terrain objectives held.
A player will also win if they push the enemy beyond collapse and on to breaking point (32 heavy casualty markers) during play.
Opening turn. Time 1400 hours. French heavy casualties = 0. Anglo-Allied heavy casualties = 0
The French get themselves onto the table.
Turn 2. the time is 2.41 pm.
 |
| The first assault on Gemioncourt |
At set-up, Gemioncourt is defended by a detachment (special rule), represented by a single block. They only get 1 attack die and can only take one heavy casualty marker. But here, that is good enough to repulse the initial French assault, with the attackers becoming disordered - represented by their blocks being spaced apart.
 |
| Early gains for the French |
(above) Another French column strikes. The target is 1st Brigade (2nd Dutch/Belgian Division) located in the rye field adjacent to Gemioncourt. The attackers score 2 hits, forcing the defenders to take a Command & Control test, which they fail. The ultimate result is that they take a heavy casualty marker, are forced to retreat 2 hexes and are also marked that they cannot advance (or conduct ranged fire - not applicable to them) for one hour. A note showing 3.41 pm is placed next to them as a reminder as to when this restriction will end.
Turn 3. Time 3.10 pm.
The 3 pm Anglo-Allied reinforcements arrive behind Quatre Bras, which include Wellington and British 5th Infantry Division. This is a welcome sight for the Anglo-Allied player. Wellington takes over the role of army commander.
The French have started to develop their right wing by moving lancers and supporting horse artillery toward the right hand bridge (E9)
Turn 4. Time 3.34 pm.
 |
| 10mm figures from pendraken facing a position that is getting steadily stronger |
The French have started rolling badly - there is nothing for it other than to replace a unit of blocks with my only two bases of painted French infantry (I have a French and an Austrian 10mm army in the painting queue) - these fine fellows are bound to change French fortunes!
The rest of British 5th Division arrives.
Turn 5 - Time 4.11 pm.
 |
| Gemioncourt falls |
Gemioncourt falls but already the way ahead is well defended. The French wait for some support to follow up.
 |
| These Anglo-Allies are in square are vulnerable to the French in attack column |
(above) French lancers have previously attacked an enemy infantry brigade, forcing it into square and inflicting a heavy casualty. The cavalry falls back, disordered and blown (just visible at the top of the picture), while disordered French foot in attack column assault the Dutch / Belgian square. Their attack is particularly effective and they inflict another two heavy casualty markers. When the unit now takes a command test, the die roll is modified by +3 for the casualty markers and +1 for being disordered, making it much harder to pass a test - players are rewarded for keeping a reserve of fresh units ..... such as the fresh column (above) that is marching up the road to support their troubled comrades.
 |
| This unit gets a bloody nose after assaulting the high ground beyond the stream. |
This French line unit has been pushed back and is not allowed to advance for an hour (until 5.11 pm).
Turn 6 - Time 4.38 pm.
Merlen's 3rd light cavalry Brigade (Netherland Cavalry) was the first Anglo-Allied cavalry on the field. Historically, they were a reliable unit, but they had been riding to the battlefield for 9 hours and their horses had been saddled for 20 and were exhausted. As soon as they arrived they were put straight into action - and were put to flight.
There is a special rule in the scenario that deals with this. On arrival, they are considered 'reliable', but the first time they take a command test, they test their rating. In the game, the die roll did not favour them, they dropped from 'reliable' to 'mixed ability'. Then on their charge, they rolled two 1's, which inflict self hits. The outcome was the cavalry retreated 2 hexes, took a heavy casualty marker and would not be allowed to advance for an hour - which sort of nicely reflected the history.
Turn 7 - Time 4.57 pm. French heavy casualties = 4. Anglo-Allied heavy casualties = 16
Unlucky timing for the Anglo-Allies, the clock falls just a few minutes short of them being able to receive their 5 pm reinforcements.
 |
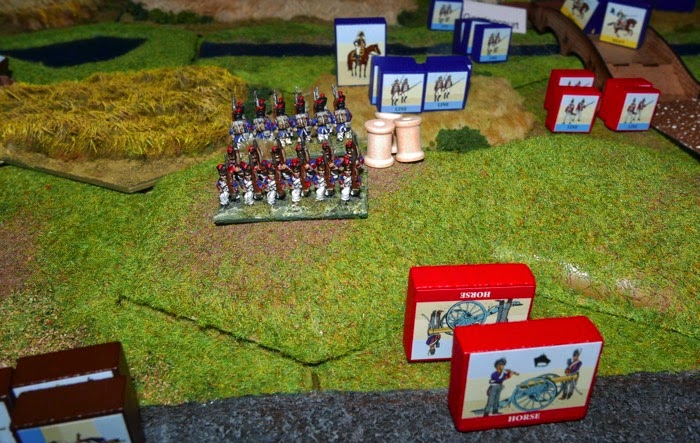
| French Lancers attack artillery |
(above) The artillery is in hex B9, near the woods, by the second bridge (photo viewed from the Anglo-Allied position). French light infantry (1st Brigade - 5th Division) have penetrated the wood and are poised to attack the artillery, but before they do, French lancers charge the artillery and the guns are abandoned by their gunners (guns removed from play). The lancers are left disordered and their horses blown. Bottom left are Merlen's Hussars, which are also disordered following their rough handling in the previous turn.
Prince of Orange is to the right, attempting to re-order the disordered infantry. It will be noted above (in the turn detail) that the Anglo-Allies are taking substantially more heavy casualties than the French. Though reinforcements are now arriving, it is possible that too much harm has already been done to their army to give them the time they need to develop attacks.
Off picture (to the right) Anglo-Allied horse artillery gets up on the hill, adjacent to French line and fires at close range, but the attackers roll three 1's (disaster) and suffer two heavy casualties. This combines with the 2 heavy casualties they have already. Once a unit reaches 4 heavy casualties it must take a command test and if they fail, they are removed from play (treated as broken and routed) - unfortunately for Wellington, that is exactly what happens.
Turn 8 - Time 5.42 pm. French heavy casualties = 5. Anglo-Allied heavy casualties = 18
 |
| French heavy cavalry recoil |
It is not however all entirely going the French way. On their left, the Anglo-Allies have retained control of Bossu wood and are starting to build up their numbers there. French 2nd Heavy Cavalry Brigade (11th Cavalry Division) charge, but the British (in front of the woods) handily make it into square and the cavalry are repulsed with a heavy casualty (and blown) marker.
Above - French artillery will move up and occuply the field to the right of the heavy cavalry.
 |
| The French Centre - is this where victory will be claimed? |
(above) The French centre. They want to clear the high ground to deny the enemy a vantage point for their artillery.
Turn 9 - Time 6.15 pm. French heavy casualties = 8. Anglo-Allied heavy casualties = 20
The British guards arrive at 6 pm. The French are unnerved at so much red uniform on the other side of the table.
 |
| Lots of Anglo-Allied reinforcements making into Bossu Wood (position shown from the Anglo-Allied side of the table). |
The French need to crack the Anglo-Allied will to fight quickly before their own left flank collapses.
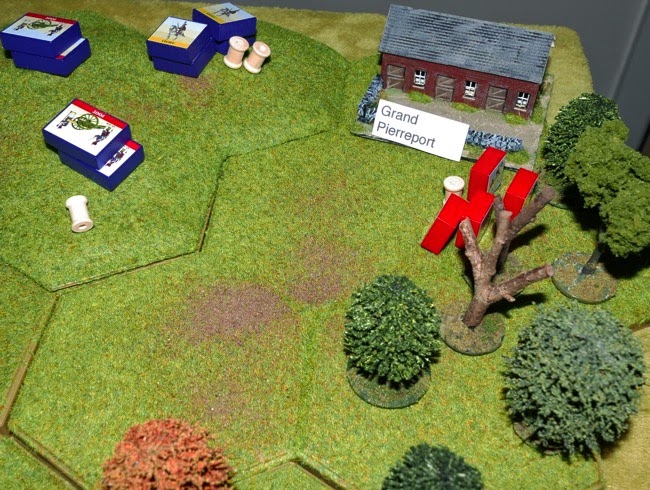 |
| French light cavalry come under increasing pressure from long range snipping fire from the Brunswickers Light Infantry Brigade. |
The Brunswick Light Brigade have pushed right down Bossu wood and captured Grand Pierreport. They continue their sniping at 1st Brigade's light cavalry (2nd cavalry Div), forcing them to retire off the hill.
 |
| The French left is checked! |
Looking at Bossu wood from the French position. The red uniform is starting to come through the woods. Dutch / Belgian troops are on the left in the tree-line.
Turn 10. Time 7.10 pm. French heavy casualties = 11. Anglo-Allied heavy casualties = 22.
 |
| French infantry line brigade in square, holding onto high ground. |
French line have managed to get onto the high ground South East of Quatre Bras and despite cavalry forcing them into square, they have withstood repeated attack - even by horse artillery brought up to the base of the hill.
Turn 11. Time 7.57 pm. French heavy casualties = 11. Anglo-Allied heavy casualties = 24.
The end is getting close! In the centre, a French column inflicts the 25th heavy casualty marker and the Anglo-Allies must now adopt Phase I into their sequence of play as they have reached the army collapse level.
As a special scenario rule, the collapse also released the French Imperial Guard Cavalry to Ney (2 brigades of light cavalry and 1 battery of horse artillery). EDIT - I have changed this so that the cavalry are released when one side reaches 20 heavy casualty markers, as that suggests collapse is imminent and it gives them some time to get into place on the table to make use of that collapse (or ensure it happens!).
In their Phase I, the Anglo-Allies generally roll badly for each unit on the table. There are a number of retreats off the table and some units blocking the path of others etc and the culmination of effects creates enough new heavy casualty markers that the Anglo-Allied army reaches the 32 casualty break figure - at which point they simply lose the game.
This all happened in the last moments of turn 11, so I turned over four more playing cards just to see how far the clock would advance if another turn were played, resulting in the time advancing to 8.49 pm, so just just 11 minutes short of the end of game time, so I was quite pleased with that in relation to the progress of the battle compared to victory and collapse and clock time.
 |
| Main lines of attack and defence during the game. The French centre-right won them the day, but they were close to losing their left flank. |
Conclusions: Well, I enjoyed that very much, it did fit my notion of napoleonic warfare .... but I am mindful that self praise is no recommendation and that I am not even a napoleonic buff - indeed it may all be a bit too rock, scissors, paper for some, as I may have fallen for some stereo-typing.
While Quatre Bras makes for a nice compact battlefield, it also seems to provide a lot of cover (looks like it would make a good ACW battlefield) and so those hits on 5's and 6's may just prove too much on a more open field - only time will tell. The cover makes the game less lethal, which in turn extends play.
A 12 x 9 grid (on a 4' x 3' table) does seem to give enough room for the game to breathe and for there to be a sense of very different things happening at various locations at the same time, with small narratives cropping up here and there, such as my French units in square on the enemy hill, that stoutly defended against the odds and an artillery piece that twice repelled light cavalry charging in the opening turns and the failed attacks upon Gemioncourt, reflecting how these little strongholds could impede the advance of a whole sector.
Interestingly, we both felt that when we did the second play test using just GMT game parts (including the scenario) that it became a little difficult to mentally unlink C and C with what we were trying to do - sort of "if it looks like C and C, then that's what it should be and anything else just feels plain wrong". Once we moved to the 3D terrain - even with the blocks, we felt that wasn't the case so much. Likewise, just adding a couple of stands of 10mm figures on the table, just seemed to give the game its own feel and it should look nice when a couple of armies are painted up.
The game clock seemed to work alright, especially for a meeting engagement in which reinforcements are being fed into the battle against a set time-table. Compared to the last game, over roughly the same number of turns, there was a 50 minute difference, so perhaps just enough to do things like delay or advance reinforcements by a turns worth etc. In our game it mattered a couple of times - no doubt Wellington would liked to have seen his guards a turn earlier.
Anyway, I hope that this post encourages you to download the rules and have a look through, you may even see something to take away for your own games.
I have made the most recent beta versions of both rules and scenario available via links at the foot of this page.
RESOURCES -
LINK - Beta April 30th version of the rules.
LINK - Beta April 30th version of the Quatre Bras scenario.
LINK - GMT Games.
Please also stop by to see my sister web site - Commanders