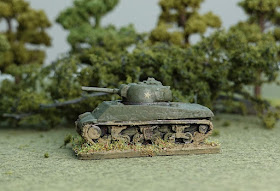
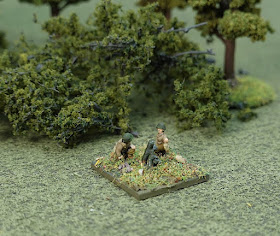
My recent foray into the new Blitzkrieg Commander IV rules from Pendraken, got me thinking about new 10mm armies. The two gaps that I want to start filling next are British and U.S. Western Europe 1943 - 45.
At the Phalanx wargame show in June this year, Pendraken had just put together a number of starter army packs for BKC based around 1500 point armies, so I picked the U.S. 1944 - 45 set.
These are nice sized army bundles as the contents are enough to give you a game with BKC (or other rule set), but being starter armies, they are not overwhelming to tackle as a painting project.
The rest of this post just looks at moving this starter pack from raw lead to completed game pieces.
Please use the ‘read more’ tab for the rest of the post.
Firstly, what do you get? This list, as given on the rear of the pack, is of course intended for the Blitzkrieg Commander rules, so described in those terms.
1 x CO
6 x infantry units (6 bases)
1 x mortar unit (3 bases)
1 x MG unit (3 bases)
1 x 57mm Anti-Tank unit (2 bases)
1 x M8 armoured car
5 x Sherman 75mm tanks
1 x Truck
The mix
This is a fair and useful representative force for a starter army. The only weakness for me was that the infantry did not have enough poses to make the bases as interesting as they could have been. They could have included the pose from their catalogue that has a soldier with his rifle to his face, firing. The catalogue says that the kneeling figure carries the BAR, if so you get proportionately too many of them in this mix (close to 50 / 50 with rifles), though at this scale, that is not really an issue.
Anyway, I ordered a pack of 10 bazooka armed men and painted 4 of them up, just to add a bit of diversity within the infantry stands. At the same time, I bought the U.S. 6mm / 10mm decal set also from Pendraken.
Prepping the figures.
The figures are pretty clean and other than gently passing a small file over the infantry helmets to clear light mould lines. The only real cleaning that is needed are where the pieces have been attached to the tree in the casting process, which is the bottom of bases for infantry and the rear corners of the vehicles or their tracks. Everything then got washed in hot soapy water.
The Shermans are the new sculpts with separate track / running gear, allowing deeper and richer detail. So the tanks come in 4 parts, a hull, two track pieces and a turret.
The truck can be made up as an open top or have a canvas canopy added. The only bit of surgery I had to perform was on the M8 armoured car, where the HMG ‘stem’ drops into turret. There is a small receiving hole in the rear of the open topped turret. To give this union some durability, I reduced the length of the HMG stem and drilled out the receiving hole to be a bit wider and deeper, so the HMG drops further down into it, it probably sits too low now for the purist, but in my mind, for a wargame piece, it is more secure this way. I should add that the fiddly bits like the M8’s HMG and the .30 cal HMG’s for the HMG teams are nicely cast and clean and not needing any prep!
The anti-tank guns come in two parts and make an easy union. I always base anti-tank guns (not crew) at the prepping point, so I can build something up at the front end for the gun barrel to rest on, keeping it secure, stable and safe from dropping accidents. In this case, I built up a small wall to the front of each piece. I could have done a hedge, mound of earth or fence instead.
For my own rules, I need a pair of artillery observers, so I stole one of the crew members from each A/T gun (dropping them from 3 to 2, which fits the base better anyway) and just made a radio up from balsa wood and wire. They look like the observers in my other armies, so that’s fine.
Painting.
I have come to conclusion that for lead, it is better that a special primer is used, so I prep firstly with Hammerite Special Metals Primer. It is a reddy brown colour in a tin for brushing on. There are suitable sprays, but I am trying to reduce my reliance on solvent based products. The Hammerite helps deal with smooth slippy surfaces, which of course is the nature of lead.
When dry, I coat with Vallejo’s Polyurethane black primer. This is very thin, suitable for airbrushes and so is easy to push into all the crevices, such as into the detailed track assembly. It becomes very effective when going over the Hammerite primer, but I feel it is less useful as a primer when applied directly to raw lead as it can even rub away during the painting process. The black is added to shade the recesses, though the brown of the Hammerite brown makes a good base for horses when doing cavalry armies.
Next up is a light dry brush with Vallejo’s Polyurethane grey primer, this just brightens up the higher areas of the figure so that the paint will retain some vibrancy. This paint is so thin that I doubt it has any impact on detail.
After that it is just block painting. I think the infantry jackets are the short type, so I painted them a light brown (GW Zandri Dust). The U.S. uniforms use a mix of browns and green/browns, which I think can look much more distinctive on a bigger figure and with the smaller scale, you either have to exaggerate the difference between the various colours / shades (which can look a bit cartoony if made too obvious) or just go with it and use some highlighting after inking to help a bit.
Everything then got a thinned wash. I tried something new (to me), Vallejo Umber Wash (73.203) mixed with GW Lahmian Medium at a ratio of 1:2 as the Vallejo washes are very strong. Everything then got a very fast, almost careless highlight, with dabs here and there just to bring extra contrast. Finally, after applying the transfers to the vehicles, I dabbed all of the vehicles with a slightly yellow green, using the foam sponge that comes with the blister pack, just to get a mottled look that breaks up the ‘one shade green’ that I had used. I would normally just dry brush at this stage, so I am trying this as a new technique to the scale.
Here the sharpness of digital photography is not so kind as the technique looks more obvious than it does to the actual eye and they have some campaign credibility!
Transfers.
These went onto the turret sides, but one of the Shermans also had one applied to the hull front, purely in case at any point, I needed to use and identify a command vehicle. I’m sure the transfer positions on the M8 are absolutely wrong, but done is done!
First varnish.
While the figures are still on their painting sticks, they get a quick brush swipe up each side of the figure / vehicle with Vallejo Matt Varnish. This has two considerations. Firstly, the swipe is important. Scrubbing and repeated brush stroking will re-activate the ink wash and just make the varnish dirty. A quick swipe prevents that. Secondly, this varnish application is only intended to catch the high points of the figure, the parts that will typically get handled and rubbed during play. This coat is just to toughen up those parts.
Basing.
My WWII armies are based using artists poster board, but this time around, I used Kallistra plastic 40 x 20mm bases for the infantry sections and the card for everything else. The infantry support weapons are individually based on 20 x 20mm and the vehicles individually done to give roughly 3 - 5mm showing each side and very little to the front and rear, unless a long gun needs protecting. Each force gets an artillery observer and this is based on card cut to a rough triangle just so the piece is distinct when on the table
For basing paste, Ronseal wood filler is good for the deeper fills and Vallejo basing texture for shallow fills and feathering out. A muddy texture was applied to the vehicle track facing and sides. The flocking / grassing / stoning of the bases are very mixed, so that they can look okay on a wide range of surface backgrounds.
Final Varnish.
I use one of two products depending on immediate circumstances. Either thinned Vallejo Matt Varnish applied via an airbrush or a fairly light spraying of Matt Varnish from Winsor and Newton. It is an artists material, so I use it in the blind faith that it is at least as good as other rattle cans and perhaps the least likely to yellow. Air delivered varnish at this point also helps lock down the basing materials. The varnish is only lightly applied because I have already used a varnish in a previous step.
Anyway, Job done! and the Americans are ready to take their place in the fields around St. Lo. With the help of the extra bazooka figures, I made a total of 8 infantry bases, one of which only has four figures on it (rather than 5) and can be used to signify either a rifle section or command base as needed, depending on rules being used.
Next up, I will expand the infantry force with another 3 or so bases and get a couple of jeeps and M10 tank destroyers, but there is no rush for that.
Resource Section.
Pendraken Web site LINK
My sister webspace COMMANDERS is a bit more snippet based than here. Link.


