During the past fortnight, a knee injury has driven me to sitting at the dining table for sustained periods, so there has been some boardgaming going on and no doubt too much iPad browsing.
For a figures fix, resurrecting my Pinboard Battles for the distraction of a mini side project caught my imagination ….. except my recent ‘sell-off’ of all 'unnecessary' things has meant that I have parted company with all of the goodies needed to get that to the table, so what to do for a quick hit?
'Use, buy and make', all played their part in assembling a fairly speedy game board that would be enough to give a feel for play and let me do some testing of various rule sets for gun / penetration comparisons, which alone is a great distraction activity for me.
This post is just a ramble loosely on Pinboard Battles, but its primary purpose is to add to the series of posts about getting to a gaming table cheaply.
Please use the ‘read more’ tab for the rest of this post.
It was while browsing my photo library that I came across this;
 |
| A previous attempt at pinboard battles |
It being an old project bringing 6mm Napoleonics to a large pinboard (roughly 2' x 3'). I think this had a 4" square grid, with built up areas (BUA) modulated on coffee coasters to fit the grid and tree bases slightly smaller.
Anyway, it seemed a good figure / table solution, taking up only the same space as a typical boardgame.
Though that pinboard had long gone, I still have my 'posh' pinboard that was felt covered, so when painted with emulsion paint, it gave a nice ground texture. It is bound in an aluminium frame. I’m now glad that I hung onto this as it is the starting point of the project.
So the 'use, buy and make' bits to get another board going are as follows. The only bit I really wanted to convey here was the 'make' section, but it will not take long to discuss the wider interests of the board.
Buying bits;
Two items were bought. Firstly a couple of bags of the Victrix 12mm vehicles. You get 6 to a pack and it seemed that a set of American Shermans and German Panthers would give the gun / armour spread that would help with interesting and meaningful comparisons between rules.
These were bought from Wargamestore (Brimstage) and they arrived after 2 days (thank you).
Secondly, for some formal greenery, I ordered a small bag of hedges from K&M and they arrived in 3 days (thank you).
So the absolute basics were set. There was no real need to base the hedges, but the tanks are fast build kits and need putting together, but they only have around seven parts, including fully modulated wheel / track / suspension units - so they are easy and quick to make and hoorah for that!
Using bits;
Well there is not much left really on the wargame shelves here that will fit the 12mm stuff. I gave my very small hills away and all the nice little trees were sold. However, There was a smallish hill left and some orchard trees for the 28’s. The trees while not too big, have oranges on them bigger than a mans head - Oh well!
I did dig out a sheet of textured crafting foam sheet that could double as a field. It is called corrugated embossed foam sheet and it is from Hobbycraft (UK) costing £1 per sheet.
Making bits;
Within the limitations of time and mobility, a quick hit could be made from making road and roadside / field wooded boundaries and once I started, I was surprised just how cheaply these could be pushed out for and so I thought it worthwhile to give the ‘recipes’ here for anyone keeping an eye on their wargame budgets.
Roads - Checking online, I found some unpainted latex roads at £5 per 12”, given that most gamers need multiple feet of road, with associated junctions, then that can add up.
My road build here is not something special, I have seen the process highlighted several times on various blogs and videos, but anyway this was how I put it into practice.
The local Pound Shop sells packs of three self adhesive floor tiles (like a lino) for £1. The DIY shop sells Caulking sealant (it must be acrylic caulk, not silicon and avoid white if possible) for £2 a tube. The other things needed are some paint (craft type paints are best as they are cheaper as the project will use too much of your quality model paints), a flat plastic spreader, PVA glue and some fine flock.
This is messy so some disposable plastic gloves and a work bench covered in newspaper will help. I actually built mine on an old off cut of perspex.
Cut the tile into strips of the desired width. This can be a tough slippy material so take your time on this part to avoid mistakes and injuries.
Peel off the backing paper and with this sticky side up, apply the caulk in a long strip and then spread it out with the plastic spreader, fully covering the tile strip, but keeping the caulk thin and even.
While still wet, I lightly sprinkled some chinchilla sand over the surface to get some texture. You could put some wheel rut marks in at this stage, but avoid revealing the tile surface. This is set aside to dry. I gave it 48 hours.
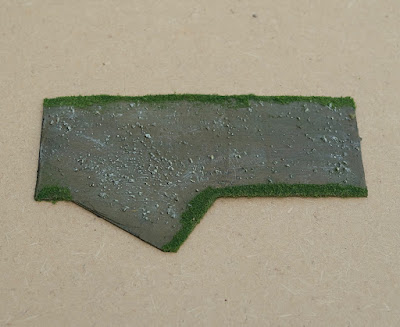
Once dry paint it burnt umber, let that dry and then put a second coat of paint on. For this second application, I used yellow ochre and burnt umber on the palette, not fully mixed, so there was some colour variation in the road. Once dry, lightly dry brush to highlight the texture. I used Titanium Buff for this.
 |
| A road junction |
With PVA, seal the short ends of the road and leave to dry. Then seal the long edges, but bring the glue up onto the surface of the road along the edges to a depth of around 3mm and sprinkle fine flock along this to give roadside grass. Finally a coat of spray mat varnish went on, just to help lock the flock into place.
Sealing the edges helps mask any exposed sticky adhesive on the tile. When complete, check for any sticky parts of the edge and add more PVA if needed.
They are not competition winning, but they work. Indeed close up digital photography can be a cruel medium for such things, but on the table, they look fine.
If you bought just 6’ of road at £5 a foot, then the commercial product would be costing £30 plus postage. From our tile, you could get at least 6’ of road out of just 1 tile (so 33 pence for the whole 6') and less than half a tube of caulk (so £1), making quite a cost difference.
Wooded boundaries - Seeing the trees in the photo of my napoleonic board, I remembered how easy these are to make, so here we are.
Things to buy are tongue suppressors, cocktail sticks and something to make the foliage from. I just happened to have some Woodland Scenics clump foliage left over from another project, otherwise I would have used lichen, spray glued it and rolled it in fine flock / turf to give it texture.
Process. Cut the tongue suppressors down to half lengths and take off the rounded ends. Drill 2 or 3 holes along the length. Cut down some cocktail sticks and hot glue them into the drilled holes.
I photographed these very bare sticks of wood stuck into a base and then annoyingly deleted the files, so I can't give before and after shots, which is a shame because the differences are stark and it is surprising how such effective pieces can come from such rudimentary beginnings.
Paint the lower half of the cocktail sticks brown, then bit by bit, using a hot glue gun, build up the foliage of each tree using clump foliage or your preferred material.
 |
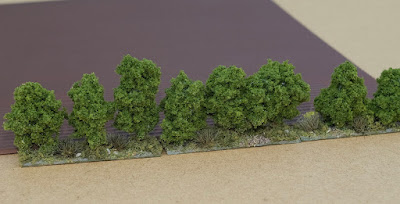
| The road lined with the wooded boundary |
Once done, with a pipette, add drops of diluted PVA glue to the tree foliage. Three thinner coats are better than over soaking the pieces. This will set the foliage hard so that it remains durable.
Do this on a plastic tray or something similar because dilute PVA is just too messy to trust near your carpets or good furniture etc. After dropping a bottle of red paint on the carpet last year, I am now a caution convert!
Finally base with your basing materials of choice. I used artists modelling paste tinted with brown acrylic paint, followed by various flocks etc. Again a blast of mat varnish will help lock everything down.
Here the wooded boundaries are placed up against the brown textured foam, if you click on the picture, you should just be able to make out the corrugated texture, looking like a ploughed field.
I haven’t got as far as painting the models yet, but the set-up is doing what it was intended to do, giving me some short bursts of activity at the dining table. All the bits are stored in a shoe box and set up / take down time is literally minutes.
Overall, I have been surprised how quickly this could be put together and for those who like 'Pinboard Battle' type games, I will continue to add some future posts, covering this most convenient size of game.
Resource Section.
There is an old WWII 10mm Pinboard Game post on the blog. LINK
http://battlefieldswarriors.blogspot.com/2019/10/shermans-on-pinboard.html
And an ACW one with BlackPowder rules here. LINK
http://battlefieldswarriors.blogspot.com/2018/12/pinboard-battles-project.html


