
Hot on the heels of Warlord Games announcing their new venture into smaller scale ACW, the latest issue of Wargames Illustrated magazine has hit UK stationer shelves, with a free sample ACW sprue attached to the cover.
This post just gives some initial observations of the figures, the experience of painting them and then comparing them to the figures of Kallistra 12mm ACW and Peter Pig 15mm ACW.
please use the ‘read more’ tab for the rest of this post.
Firstly - what’s all this about?
Warlord Games are doing a new launch that takes the ACW period using a figure size that is described as 13.5mm from foot to eye, to give a mass effect on the table, working in conjunction with their Black Powder rules.
The product will be in hard plastic and the initial starter box will provide 12 x 100 men regiments per side, plus 12 guns per side and leaders. There are other support elements planned (Zouaves and cavalry) for the future.
The starter box is coming in at £90, so if you count every infantry man as 1, every mounted man as 2 and every artillery (and crew) piece as 8, which seems standard industry practice for pricing, then the package adds up to 2576 infantry man equivalents, which at 90 British Pounds Sterling is working out at just over 3 pence a figure.
Actually, it is cheaper than that, because the package also gives you an MDF building, an A5 copy of the Black Powder rules, a background and scenario booklet, bases and some snake fencing.
So of course one of the big things being discussed on wargame media at the moment is the pricing point of the product.
However, accepting that and setting it to one side, this post is going to look at what it might mean to my wargames table, if cost alone is taken out of the equation.
The first thing that we can tell from the sprue and the advertising information is that a regiment is formed of 5 bases, each with two ranks of 10 men, so that is 100 figures for the regiment. The base frontage is 60mm, so the regimental frontage is 300mm, which is actually bigger than the typical regimental frontage in 28mm, so on the face of it, this doesn’t seem something that is intended to cross the bridge between big Black Powder tables and our more modest kitchen / dining tables at home.
Having said that, there is talk that there are some amendments to the Black Powder system for ‘Epic ACW’ and clearly, a starter box that has 12 infantry regiments per side and a scenario book, must by default have scenarios that are based upon using 12 regiments or less, so perhaps getting this to the smaller table is within the design goal of the product.
Also, the Black Powder universe has tiny, small, standard and large formations, so perhaps all of the 5 bases are only used when representing large units? We will just have to wait and see.
However, wargamers in my position with a smaller table, will likely just create smaller units, perhaps of 2 or 3 bases and anyway, we are used to successfully adapting Black Powder to the smaller table with scaled down game measurements.
The bases have peg holes in them to mate up with pegs on the bottom of the figure strips. It looks like the bases are to be multi functional as an infantry base only has two pegs, but the base has 5 holes, so it looks likely that these bases will also be used to mount cavalry in fives and possible single skirmishers at some point.
Anyway, onto the prep and painting of our free sample from the cover of WI magazine (a superb free gift by the way and rather a coup for the magazine, which is already running high after their recent free Never Mind The Billhooks rules for Wars of the Roses).

Above - this is a picture of the two sprues that come with the magazine, the second sprue holds the bases. You will note the figures sprue has 100 infantry, 1 gun in 3 parts (cleverly done with the gunners attached to the wheels) and one mounted commander. Also note the peg holes in the bases.
For a test, I took one infantry base, one artillery base and the commander.
I originally thought it best to paint these on the sprue, but found this a little awkward, except for the gun wheels and attached crew, which are better painted on the sprue for greater accessibility to all aspects of the figure before the cannon is assembled.
Instead, I glued the mounted leader to his base with plastic cement and the front rank of infantry to their base, but for the second infantry rank, I attached that temporarily to a spare base using Copydex glue, which is a sort of latex glue that stays flexible enough for a couple of days to allow me to still get the figures off that holding base after painting them. Mounted this way for painting, access can be gained to the front and back of both figure strips before mounting them permanently on one base.
The strips have two small lugs underneath that slot into anchor points on the base, so they will not sit flat on wooden lolly sticks, hence the reason for attaching them to their bases.
The WI magazine has a painting guide article. They make good use of contrast paint and describe speed painting that means the rear of the front rank should not get too much attention from the brush as it is hardly on show .... however, while speed painting or impressionistic painting is a valuable skill to learn for small scale mass forces, I can’t help myself from doing my normal painting with Vallejo paints, with a tidy job over all of the figures.
Though that said, by the very nature of the way the figures are presented, there is a definite and natural speed gain from the dab, dab, dabbing of small paint strokes going along the line of tightly packed figures.

Above photo - my process for the bases shown here was to wash the sprues in hot soapy water, then connect to bases as single ranks (not the artillery wheels / crew, which stayed on the sprue). Prime with black Vallejo Polyurethane acrylic primer and lightly dry brush with Vallejo off white to bring out the detail.
The figures were then block painted in Union colours and then each strip was washed with a mix of Army Painter Dark Tone and Army Painter Acrylic Medium to thin the wash at a ratio of 1:2.
Then going back in to highlight with the same colours as the block paint, but with a dab of Vallejo Ivory added to the uniform colours to ever so slightly lighten them. I know my colours are a tad too bright for Union uniforms, but I like them that way!
Once done, they were coated with mat varnish (hand brushed) and then the strip that had been held on a spare base with the Copydex glue was gently lifted and then permanently glued as the second rank on the other base.
I found the surface of the bases to be very smooth, so where there was space, they were rubbed with some fine sand paper to get a good key. In future, I would do this first, as part of the washing process, before anything is glued to them.
To blend the step of the figure strip to the base, a mix of artists acrylic modelling paste was dirtied up with 2 drops of brown paint and applied around the figure bases with a small old brush and a super thin palette knife. Also the gap between the front and rear ranks were carefully done and the base edge was painted Forrest Green (GW).
Once dry thinned PVA was added to most of the base with a small brush and various flocks, tufts and fine gravel were added to dress the bases.

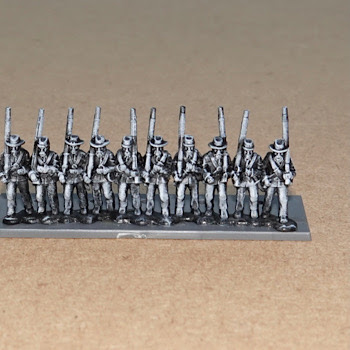
Above - the front face. Overall, they have turned out well and the way the strips are done, with the figures shoulder to shoulder, makes it very easy to progress along the row in a factory production line sort of way and of course the figures pretty much don’t have any sides to worry about as they are joined shoulder to shoulder.

Above - the rear face. I am a little bit over lit by camera flash in these shots.
There is nice detail on the figure and it is cleanly raised so that the paint brushes catches it easily, making them both easier and faster to paint.
In some respects that actually caused me a timing problem. While I ‘felt’ that the painting was faster and even easier than normal, these few samples still took a few hours to paint up, longer than I thought they would and that is simply because the detail is there.
Close up to your face while painting, the detail is clear and I felt compelled to paint it, but once down on the table, most of it disappears in normal lighting, to my older eyes anyway and I think I just need to find a technique that strikes a better balance between speed and doing all of the detail so meticulously.

Above - for height and bulk comparison purposes with other figures I own, the above shot shows a 12mm Kallistra base, the Warlord Games Base and Peter Pig figures side-by-side, in that order. To the eye, it may seem from this position that they are close to each other, but in terms of bulk and being spaced on the base, the differences are noticeable, with them being closer to the Kallistra.

Above - But in this more aerial shot, the differences become more apparent. Gamers that already have 12mm - 15mm collections are probably more likely to have bases that have spacings between the figures. Even if these figures were re-based to have the figures tightly bunched up, I think the bulk of Kallistra and Peter Pig figure would still be noticeable. I am wondering whether the slimness of the Warlord Games figure would actually be closer, as a scale and style, to the Van Dyke models, but I don't have any to compare.

Above - the artillery are again Kallistra, Warlord Epic and Peter Pig in that order and here they are much closer to each other in appearance, probably helped by similar sized basing.

Above - even in the aerial shot they are not that eye-catchingly different.
While painting these, some things that may factor towards a buying decision have crossed my mind;
They are cheap at the ‘per figure’ calculation.
They are easy to paint, but that is slightly off-set by there being a lot of them.

Above taken from an official advert in the Wargames Illustrated magazine - the figures do not run exactly to the edge of the base, so when bases are all lined up as a regiment, the impression of a single cohesive unit is interrupted by the space between blocks of figures.
This may be a deliberate design feature that the starter box rules will make use of. The artillery piece is so cleverly and thoughtfully constructed, that one can assume that the nature of the infantry basing is very deliberate.
For ACW 15mm gamers, a lot of current collectors base to either 25mm (1”) or 30mm, so if absorbing the figures into a current collection, one might need to count the Warlord Epic bases as 2 bases. However, it is also true that Black Powder champions the 40mm bases for larger figures and so the designers must have something in mind to make the 60mm more Black Powder compatible ... we shall have to wait and see what secrets the literature in the starter box has.
With 20 figures to a base, yet being in plastic, they are noticeably very light and robust, so this will be a portable set.
There is plenty of 10mm and ‘N’ gauge terrain available, which has a slightly smaller footprint than 15mm and this would work well with the aims of ‘Epic’.
I suppose to keep the sprues cheap, they have gone for a single infantry design to cover both armies. So each infantry strip has men wearing a mix of kepi and broad felt hats. I have seen one gamer on a video (link below) use a sharp knife to craft away the broad felt hats so that they look more like kepi’s for the Union bases, but that is a step too far for me. In truth, at this scale and en masse, I suspect it is not going to matter too much at the three foot rule.
Overall, I can see the Epic endeavour being successful. Those who already have big 15mm ACW collections may see differences in scale and basing an unconvincing reason to ‘buy in’. Those not so heavily invested will be easier to encourage and those new to the period or to wargaming or wanting to dabble in a new side project will see much to like.
The fact that the product exists (almost) will have people wondering what will come next (if anything) and so it may be that the legacy of ACW may become the important factor.
If I have any reservations, they come from something as daft as I prefer bases to mate up so that there are no eye catching gaps between the figures on neighbouring bases, but in real play, rather than analytical discussion here, that may not be so important, I need to get a few more bases prepped up and see how that looks.
I was also surprised that after spending a few hours painting in all of the detail, once they were out on the table, that largely disappeared and I was just aware of blue ranks with pale areas for face and hands and we are back to that three foot rule.
In some ways this disappoints me, because I like seeing 'the figure', but it probably reinforces the view that If I were to get into these, I would need to finder a faster and more impressionistic way to paint them that would both do the detail some justice, while also going for overall effect.
For the smaller scale gamer, the real positive hit of all of this comes from the fact that Warlord Games as a big advertiser is influential and hopefully we will start to see our magazine coverage and wargame show scene having a bit more scale diversity.
It will be a real shot in the arm for smaller scale enthusiasts to see their preferences reflected in wargame magazines and shows and for the wargame scene in general to ‘appear’ less 28mm centric.
With the other big plastic manufacturers also dabbling in the small scales, this knock on effect at shows and in magazines is going to gather momentum as we have Plastic Soldier Company doing 10mm moderns and 15mm ancients, Victrix doing 12mm WWII and Gripping beast doing 10mm ancients.
Anyway, a big thumbs up, another area of choice for the customer and in our relatively small hobby, it is good to see the confidence of firms to continue to invest in our hobby.
Resource Section.
A very good video by the gamer who carved away the broad felt had and gives a useful description of the product. LINK.
Norm, you have answered many of the questions I had about these new figures. with 10mm, 12mm, 15mm, and 18mm figures are the mdi-range of the size profile, why introduce a 13.5mm figure? Is this a "true" 15mm figure in old money? The modeling on a strip of figures with infantry elbow-to-elbow reminds me very much of Old Glory's 10mm ACW (of which I have a few thousands). These Warlord figures may be much too big to fit in with the Old Glory 10s. You don't happen to have any Old Glory 10s laying about for comparison, do you?
ReplyDeleteHi Jonathan, no I don’t have any OG to compare. The Warlord fit in two ranks on a 20mm deep base and there is a respectable gap between the front and second rank, so they are slim front to back as well as side-to-side.
ReplyDeleteI imagine the range will be quite complete for most gamers needs, but I know some are wanting command bases to be sold separately because at the moment only 1 in 10 bases is a command strip i.e. one per 5 base regiment, those wanting to make more smaller regiments with be looking for ways to make extra command strips.
True 15’s were of course small, but I can’t recall any being this slim. The proportions are in fact very nice.
Thanks, Norm. Are you planning to go this route with your ACW collections?
DeleteThat is a difficult one for me, made a little more-so by quite enjoying the results of these and I shall paint up another couple of units while I ponder.
ReplyDeleteFactors for me are that I already have fair numbers of Kallistra 12mm and a growing force of Peter Pig’s 15mm, which I like. The biggest factor though is my use of the 100mm hexes. My kallistra at 80mm and Peter Pig at 90mm are a better fit to my hex system than a 60mm base would be, though in 2020, I didn’t do much with hexes, but over the past few weeks have been going over the hex rules again. So it all rather up in the air. As with everything else I do in gaming, I need a bit more time to think about it, so that I can become even more unsure :-)
I wish Warlord Games would give some insight into what tweaks Black Powder will have in relation to the Epic Games.
Norm you're not the only one it's been difficult for! I was VERY interested in the rules tweaks for BP. The tough thing for me would be starting a completely new scale for AcW when I'm effectively already playing Altar of Freedom in 10mm and tactical ACW in 15mm! Ugh!
DeleteWhy can’t it be like the good old days when there was only Airfix to choose from! :-)
DeleteThanks Norm useful to see them they of course raised some interest. Not because I want 15mm ACW as I am quite happy with my 28’s obviously warlord don’t have ACW but don’t want to compete with Perry 28’s. The future is really interesting napoleonics would be fantastic like this but the similarity of figures and uniforms in ACW lend themselves to this style. Naps would be more difficult cost wise. My only thought with the figures are a fear of the painting you get almost too many for your money, 100 man units is a lovely idea if you can manage a really effective painting style at speed.
ReplyDeleteMatt, exactly so, I am watching out for the ‘how to’ YouTube videos as someone is bound to come up with the right balance.
ReplyDeleteI think for bloggers and vloggers there is always the thing that figures will come under scrutiny once the cruel detail of digital photography exposes painting jobs for blog shots, which invariably are quite different from the views that the human eye is getting at any one time.
A really nice job painting these Norm. You're making them difficult to resist!
ReplyDeleteThanks Steve, they are quite compelling.
DeleteNorm,
ReplyDeleteA good review as you know I have some of these guys, I painted one set as Union and the second set as Rebs. I chose to paint on the sprue and it took me around 8-9 hours to do the full 100 figures artillery piece and Officer. There is a certain discipline required with these, there’s a lot of detail and like you I like to paint what is there, here it was more dot and dab to suggest the detail and using the army painter and highlights to make them pop a little.
The WLG live chat hinted that the main changes in BP for epic was around scale (inches to cm?) personally I don’t use BP and like you suggested I will be counting one of the epic bases as 2 for the rules I use. I think I will buy in very much capping my Peter Pig collection using them for Brigade/ Divisional actions and using these chaps for larger engagements
Graham, that is a very good painting rate for the full sprue. I timed the various sessions that I did for painting, inking and highlighting and for the three bases I cam in at just over 4 hours.
ReplyDeleteYour painting time makes the point that I need to move to a speedier technique if I want to deal with numbers involved in something like the starter kit.
I think under coating in blue or grey might help and in fact, when the official figures launch, they will be in blue and grey, so there are some possibilities there.
Because there is a gap between each unit, I can see some gamers using the formations as brigades, with the individual bases being regiments. I’m pretty sure that once these are out, we will be seeing all sorts of arrangements.
Norm,
DeleteIn my mind I’m tentatively looking at one base being 400-500 men (figure scale 1:20 or 1:25) with the formations being brigades as you say
ideal.
ReplyDeleteLovely job on the painting Norm, and I think Warlord may be onto something with these. Though ACW is not my thing, if they branched out to do ECW I’d be all over it like a pigeon on a chip.
ReplyDeleteThe ACW period allows for few demands on an initial figure range from a sprue creation perspective, so perhaps in the same way that the Perry's explored 28's in plastic ACW in 2008, we are seeing the same here, while the waters are tested.
ReplyDeleteIt will certainly be a new market area for WG to exploit, but will it generate truly new sales from gamers moving into the scale or will some of the traditional and favourite small firms that have produced the small scale for years come under pressure from a big competitor. We shall see.
I am hoping that instead, we are gong to see a new appreciation of the small scale by a wider audience than before.
Norm, if you want my ACW spruce email me your address and I’ll post it to you. It won’t get used here which is a shame!
DeleteA kind offer thanks, but I am good. I am deliberately avoiding further distraction while I do a separate 'lock down' project. I am determined to have something to show for this 6 week 'stay at home' order :-).
DeleteAs a side note, you may want to check e-bay, there is what appears to be a lively market for sprues :-)
Thanks for a very good review of the figures Norm, with the pictures being very helpful. I had considered these as a possible alternative to Pendraken, as they look nice and are exceptionally good value. However they are sadly too big in terms of height and base width (for the rules I use) so will stick with Pendraken for the moment.
ReplyDeleteHowever I hope they do well to highlight the smaller scales that are sadly neglected by the magazines and rarely seen at shows.
One final thing and this is me being picky, why couldn't they have added more spokes to the wheels of the guns, as they just look so wrong? Not a difficult thing to do at all!
Thanks Steve, It would be very helpful if warlord Games would do a short video to show how they intend their units to be used on the table and gamers would then be able to judge base size v rules v game space etc.
ReplyDeleteI think the real win here is that an era of 28mm focus and skirmish focus is having a light shone on smaller scale, big battle stuff, a place that we have not been for quite a long time ..... and ripe for a fashion change :-)
I never really thought about the spokes until putting it next to other manufacturers and seeing the variation in approaches.
This is an interesting development Norm although I have no intention of getting into the ACW, if the long term plan is to take the "Epic" scale into other eras, I could possibly be tempted.
ReplyDeleteKeith, I think there will be many who will watch this space and see where this takes us.
DeleteThanks Norm, that was very helpful.
ReplyDeleteThanks Martin.
ReplyDeleteThat's a great review Norm!
ReplyDeleteLeaving aside questions of scale compatibility which have been already commented upon above, I was mostly struck by WI's initiative. I understand the marketing rationale behind the freebies attached to the magazine, but I believe these initiatives have tremendous potential to attract newcomers to the hobby. If you're someone in front of a magazine rack, the chances are that a hundred figures in a plastic bag are bound to catch your eye.
I just hope more such initiatives are taken up by wargaming publishers and manufacturers in the hope of fostering more interest in historical gaming.
A very in depth and informative review Norm with useful supporting images, especially the scale comparisons. I must admit to being slightly torn re the single sprue for both sides because the reality was that the Eastern Union troops were very distinctive and slouch hats would have been a rare sight amongst them as would the shorter cut coat. Maybe my years as an ACW reenactor have coloured my judgement on this, but it does bother me somewhat in the same way as the Baccus 6mm did with the muskets shouldered on the left! That said I can certainly see the appeal of these figures for building mass ACW armies and the close order strips look accurate in pose. The scale would not bother me as Warlord are planning to expand the range (why do the Zouaves have bayonets fixed while these do not? shame that). I'm hoping to grab a copy of the magazine so I can see for myself.
ReplyDeleteOn the wider subject of plastic figures in the scale it will be very interesting to see where this goes. I see a lot of people talking about Napoleonics, I have no doubt that while AB have captured the market in 18mm Napoleonics with their exquisite detail, plastic figures at just a few pence each will certainly have an appeal.
Hi Lee, I can see how an ACW re-enactor would be giving the sprue and extra level of scrutiny and that of itself opens an interesting conversation of to what degree the roll out of these figures is tied to high volume generic sprues.
DeleteIf this is central the marketing requirements, then it might make a move towards napoleonics less likely, but then again if the ACW product is just a safe exploration of this sector of the market and part of a learning curve, then perhaps if successful, there will be more latitude in design and style scope of other periods.
I think down on the table and in large enough numbers, some of these differences disappear anyway.
There is certainly a lot of chatter surrounding this announcement and the wargames Illustrated look to have sold out, though WI have said they have managed to source a few more copies, so interest, even if just from afar, is high.
As you say, it is the question of where this will take us that is the most tantalising.
Nice work Norm.. but corr... a Napoleonic version would certainly set some lights off here in the loftwaffe! The bases to my mind eye look like battalions (like Graham C said) but I think I would be tempted to take a micro saw to trim the base edges down, and maybe even divide them in order to better represent manoeuvres/deployments...
DeleteThanks Steve. The bases are not fully solid to the depth that the eye sees. There is a slight rim that runs around the edge underneath that adds a bit of height and therefore there is a slight hollow to the core of the base.
DeleteTrimming them would expose this cavity. It would of course not be beyond the wit of man to fill and smooth that back to a normal looking surface, but it would be a faff.
I am guessing that the eye will quickly get used to the gap, it is really only comment-able because we are typically versed in seeing tightly formed bases.
ACW is a fairly safe ‘test the waters’ venture - so who knows, if a success you may get your napoleonics wish :-)
Hi Mike, good point, as a youngster, the high street was chock full of things to ‘press the button’ of a new hobbyist, whether that was a camera shop, hobby / model shop or even the fact that every town had a bookshop that stocked wargame books .... which is how I started. So today, with many hobby type shops disappearing (at least in the UK) having the newsagent stocking wargame material at eye level must be doing some good in recruitment and hobby exposure.
ReplyDeleteThese miniatures are getting a lot of attention which is great. For me, the nice thing about them is the shoulder to shoulder look which is able to convey that mass infantry appearance that you usually can only get in smaller scales like 6mm.
ReplyDeleteYou did a nice job painting them up and a service for the community who are interested in seeing them. 😀
And even though I love the ACW, I can’t see myself getting these as I already have an ACW collection.
Thanks Stew and your sentiment about already being an invested collector is a good point made.
ReplyDeleteVery interesting and well argued piece. I was completely off the ACW, Warlord and inbetweeny figures (I do 30mm or 2mm). Nice tips on painting. So... I ordered the WI sprue and am pretty much sold.
ReplyDeleteHi Mike, thanks for dropping by. It’s an interesting thought as to how many people have been influenced by having hands on that sprue and how many will have been brought to a new period / scale.
ReplyDeleteI'm gonna put my hand up and admit that this looks like a fairly cheap and fun way to get into ACW gaming. The price is reasonable, the quality of the moulds (going by the WI sprue) is good.
ReplyDeleteIt's definitely caught my eye and will probably be my only game system purchase this year.
Hi FedRat, thanks for dropping by. this product is certainly causing a ripple right across the hobby in a way that I can’t recall since the Perry’s launched their historical 28mm plastics (also ACW) back in 2008.
ReplyDeleteAs a sole purchase, it will in anycase keep you busy painting :-)
Good looking strip , I think I'd be priming blue/grey,flesh,black wash! My nephews gone all in for the pre order deal,so I guess we shall see,I'm still firmly 28mm, I had read they're considering Napoleonics depending on how this goes.
ReplyDeleteBest Iain
Iain, I think the starter set will come with blue and grey sprues, so that may well help a paint job.
ReplyDeleteThanks for this Norm. If I was a youngster I would be very very excited about this development.. I was impressed by the figures and could see the huge potential for big games. The box set is brilliant value and if I was a member of a club I would be pushing for the club to buy some boxes. I only hope Warlord actually continue this route and offer additional units and add ons to encourage younger wargamers.
ReplyDeleteHi Robbie, it will be interesting to see some of the spectaculars that clubs will put on at the wargame shows once they start. WG seem to have a pretty solid history of rolling out support.
ReplyDeleteThey will have had an idea in their heads of how many units they would have sold (or needed to sell) by this point as today was their cut-off day for the bonus pre-order leader figures, so it would be interesting to know how the pre-sales numbers have turned out for them so far and whether expectations have been met or otherwise.
It would be nice to imagine that in forty to fifty odd years time, there will be gamers who look back on the starter box with the same nostalgic fondness as we do with some Airfix covers from our early days.
Great Post Norm. The figures do look pretty cool, the way you've painted them. I got my free sprue only today, like you, I can see these really taking off!
ReplyDeleteHi Ray, yes, i think it is a fairly safe experiment for WG in commercial terms while they test the waters. It will be interesting to see whether the first year encourages them to more further into this direction.
ReplyDeleteThanks for your post which provides a true 'users' perspective.
ReplyDeletePresumably it is a simple matter to cut the sides off the bases (or some of them) so as to be able to form a contiguous line?
The 13.5 mm scale seems to be a crude way of locking people in to the brand, rather than having made them compatible with any existing scale. Mind you, they are not alone given the scale-creep of 15 mm to 18 mm and, of course, 25 mm to 28 mm (or are they 30 mm now?)!
Regards, James
Hi James, thanks for calling by. The edges could be trimmed by say 3mm either end. It would expose a slight gap to the base edge because they are not quite a solid base, but have a slight lip. I think visually it either wouldn’t matter or if it did, it could be built back up with a thin sliver of card.
ReplyDeleteOne issue would be that on the command stand the soldier at one end is different from all the other figures and has his musket poking out to the side. This doesn’t matter when there are gaps, but take the gaps away and that rifle will like contact the next base.
I would be rather inclined to play the bases as individual regiments with the 5 bases being more like a brigade.
Great Review Norm! Be interested to get your take on the news that Warlord's next 'Epic' foray is into Napoleonics!
ReplyDeleteThanks for dropping by. I am intrigued by the news, but at the moment have many questions. I like the period and at the moment in 28mm have Austrian / French stuff to build, I have an eye on Russians in the future …. So, since the Warlord Scale is unique to them, will they service all these sort of interests? which is a big task, or will this be a limited project to just Waterloo, in which case it would be a bit of a dead end project for me.
ReplyDeleteAlso, will we get all the unit types, another big commitment, or will generic types creep in. Will this be a metal, plastic or resin product and what will subsequent waves (releases) look like?
I have a few hurdles to jump before signing up, so I am really looking forward to the official announcement which will give more, plus in 4 weeks, the net Wargames Illustrated will have a sprue and no doubt an article and that, perhaps based on the experiences of the ACW package will put me on the right track.
Regardless of whether or not it ticks my boxes, I still stand back and see that this niche hobby is wonderfully dynamic and vibrant with all this sort of commercial support going on.
Biggest issue I have with most things warlord does honestly is they seem to go on the idea everyone has a dedicated game room with a 12-ft table or whatever like the Perrys do or like this was the '70s and you could reasonably expect an 8x5 or something like that table in the "wargames room". Somebody interested in historicals and without anyone to play the fact that all the games expect you to have big ass tables makes it really annoying because nothing is scaled for regular tables in a regular apartment or something for regular people.
ReplyDeleteHi wayne, thanks for dropping by. Totally agree, though I can sense a shift of emphasis to the more ‘standard’ 6x4, which in truth is bigger than the modern kitchen table, which would be 4x3 to 5x3. The recent Epic book on waterloo uses a lot of 6x4 tables, but also up to 8x5 for the bigger games.
ReplyDeleteI am just using the Epic napoleonic at the moment and have been playing with units of 2 bases rather than the suggest 4, which makes a difference and brings any game that needs an 8x5 down to a sensible size. In my last few games, I have been trialling units of 3 bases, which looks good, but is getting on for the same frontage that I use my my 28’s!
One thing that helps is to go with 10mm buildings instead of the Epic ones . I have been using the Battlescale resin buildings which are nice,