
Men of Iron is the title of a series of boardgames that cover battles from just before the 1st Crusade to the introduction of gunpowder. Published by GMT, the first three games in the series have just been printed again and brought together in a single box, so that now all three games come in a good value for money Tri-Pack.
 |
| Box art |
Today we will be looking at the Blood and Roses part of the package that covers the Wars of the Roses, by highlighting the introductory scenario of 1st St. Albans.
Please use the ‘read more’ tab for the rest of this post.
Designed by Richard H. Berg and developed by Ralph Shelton, the Tri-Pack gives us 20 battles from the period, with dedicated maps, orders of battle and with named leaders. I primarily bought the package for the Bosworth battle, but 1st Battle of St. Albans makes for a very good intro game, plus the map is a delight with a detailed layout of the town, St. Peter’s Church, St. Michaels Church and Mill, Sopwell Lane and Tonman Ditch all making their appearance. It is unusual to get a medieval based boardgame that highlights a town in this sort of detail.
So briefly, this weighty box gives us seven and a half counter sheets (the half sheet has big counters that bring the Agincourt battle to the series, that was originally published in the 3Ci magazine), 18 Maps, being a mixture of full standard size and half sized maps, a core series rulebook, plus three individual play books for the three games in the module, the original Men-of-Iron, Infidel and Blood & Roses, each containing detailed scenarios. There are also some nice heavy card play aids. The system uses ten sided dice (provided).
The set up instructions for each side are clear. Each force is divided into a number of commands (usually 3), which are termed as Battles (also known as Wards), which in modern terminology would be similar to something like brigades or divisions, each being a combined arms force, able to act somewhat independently. Each Battle has their main leader, with ratings that represent their historical character and ability and each has a command radius to control their ‘Battle’.
 |
| Opening positions |
So in our 1st Battle of St. Albans, if we look along the Yorkist line (white), we see from left to right, that Richard Neville, 5th Earl of Salisbury sits on the left, Richard Neville, 16th Earl of Warwick is in the centre and Richard Plantagenet, 3rd Duke of York to the right (the three are referred to as Salisbury, Warwick and York and their formations are colour coded). The line is a mixture of standard infantry and dismounted men-at-arms, with bowmen out in front (note - the two Nevilles are father and son).
Salisbury on the left is the slightly better leader, having an activation rating of 5 (rolling equal to or less than this allows activation). He has a rating of +1 for charisma and 7 for command radius.
The stand out feature of the game engine is that turns do not exist in the traditional sense. Rather a Battle will activate and do as it wishes. Then that player will attempt to activate another of their Battles and this process is called Continuation and it becomes slightly harder to activate each subsequent formation. A failure to activate means that play goes over to the other player, who follows the same principles. They get an automatic activation and then follow the ‘continuation’ mechanic.
There is also an opportunity to interrupt this process and ‘steal’ the Continuation by playing a chit and passing a test, but this is a limited opportunity as each side only has a limited number of such chits (this is a change to the 1st edition game). In our game today, the Yorkists get three of these chits and the Lancastrians two. This interrupt system also has a potential for moments of some other outcomes to arise, such as disordering an enemy or rallying a friendly unit, all adding a bit of chaos to the pot.
One of the optional rules for this Wars of the Roses module is ‘Battle Flight’ (it also encompasses the ‘Pursuit’ rule). The designer says it is optional because ‘it adds detail and complexity (and time), although it does impart much of the flavour of these battles’. Basically, once an individual Battle sustains more than 50% losses, it tests (only once in the game) and if it fails the test, it will simply flee the scene. The attacking Battle that caused the flight must then also take a test to see whether they pursue. The strength of the Battles in our small scenario today are so small that this rule will not have a big impact, if any, but I will employ it anyway, as flavour is flavour.
Another optional rule is ‘Engagement’ with means that as units get involved with each other, they are covered with an engagement counter, which semi-locks them into a relationship. One side can leave (disengage) by spending an extra movement point.
I don’t generally go for optional rules much, certainly in a first playing, but these seem pretty integral to the nature of warfare at the time, so they will be used here.
As I play and write about this game, at the back of my mind is a recent post by another blogger (Steve at his Sound Officers Call blog - link below) who is enquiring into and running a series of posts into the ‘allure of the simple game’. As I am using some current play session to feed into his play research, my ‘Complexity’ section below will be expanded with a second section that is specifically addressed to Steve.
This particular battle is the smallest in our Wars of the Roses package and benefits from not having mounted units, so the charge and and counter-charge sections do not have to learned in a first reading (I didn't find that out in time :-) ). The scenario notes says that playtesters were playing this scenario in around an hour. By contrast the Bosworth battle takes around 2 hours and the largest battle of the period, clocks in according to play testers at around 3½ hours. That seems to pretty much cover the spectrum of playing time for these games.
So let’s have a look at how this system goes about delivering the 1st battle of St. Albans as a game.
The first thing that I came up against was the rule book. Now I must admit that this all took place in a week in which I was very tired, but I couldn’t really get an immediate grasp of the rules in a first reading (26 pages) - plus, I did also read the charge and counter-charge rules, as I though I might be playing the Bosworth scenario first.
Unsure of what was being asked, I instead set up 1st St. Albans as a short scenario and immediately struggled with a lot of rulebook hunting. The designers say this whole scenario can be played in an hour, it took me the full hour just to do the first set of activations with the Yorkist army (all three Battles managed to activate once).
But typically, a sort of motion of the basics quickly developed as I followed whole chunks of the rulebook. After a couple of hours, I decided my ‘hands on’ feel for the game had brought me to the point of understanding the big themes and that I should read the rulebook again, to capture the nuance of play, which I did and must say the whole lot just fell into place (with the help of some note writing as a future aide-memoire for myself).
Why do I say all this - well, I am not sure why I struggled, as the system is fairly straight forward, but I did, so I would suggest to anyone who might feel the same, don’t put the game back on the shelf, just have a few practice rounds and then re-read the rulebook again, it will significantly break that learning curve. The box puts complexity rating at 4, that is the lowest end of the medium complexity scale. I think that is about right ...... once you get beyond the first contact with the game and having done that, you have 20 battles before you to play and that investment is hugely rewarded.
Anyway, the game was set up for a second time and I found play very rewarding. So, here we go!
 |
| Richard envelops the Lancastrian line |
Opening Moves.
Richard’s (Plantagenet) forms the right battle in the Yorkist line and he takes the first activation. His bowmen move towards Tonman Ditch and volley at Somerset, with very effective archery, disordering the defenders. Richard with his Men-at-Arms (MAA) move to engage, whilst other infantry move to envelop. Archers can shoot during any part of their movement, but once they shoot, they cannot move further in that activation.
On the Yorkist left, the bowmen engage the enemy while their infantry cross an undefended part of the ditch, getting disordered and taking some time to sort themselves out. The shorter Lancastrian line is in danger of having both flanks enveloped.
 |
| Warwick attacks in the centre |
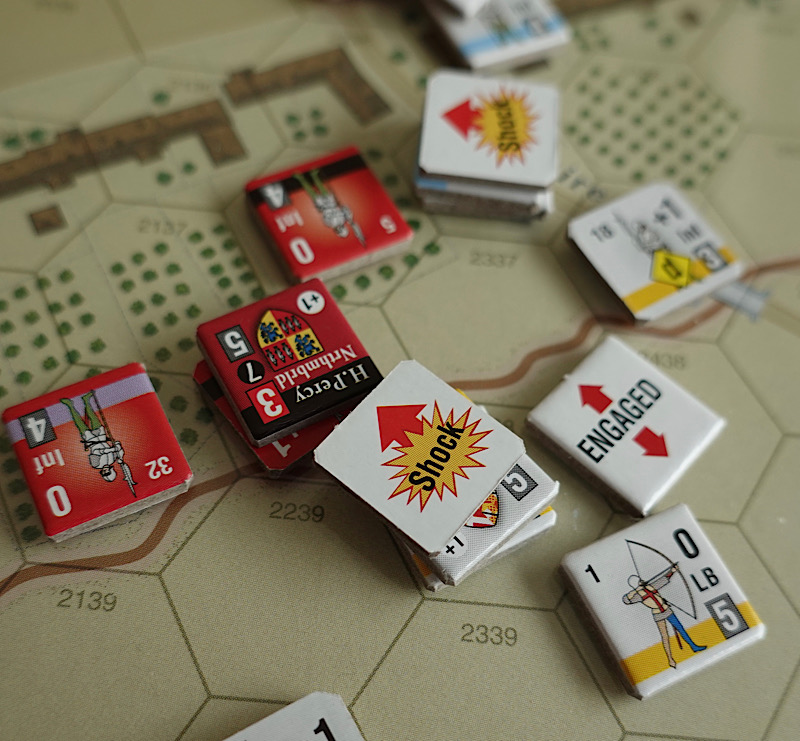
To the centre, Warwicks men attack across the ditch against a determined defence. Both sides become engaged and soon the lines are disordered. In this system, close combat or melee is called shock. Some cavalry types can charge, charging is better than shock and is resolved on a different table, but if the charging unit suffers successful counter-charge or missile shooting on the way in, their charge may be reduced to a shock attack.
 |
| Richard presses the Lancastrian left |
Richard starts to overwhelm the Lancastrian left. The Yorkist Battles are bigger than the Lancastrian Battles and also easier to activate, so over the course of play, they stand a better chance of activating by continuation and having a force advantage of roughly 3:2
 |
| Somerset bursts through the gardens into Richard's flank |
Mid Game.
Above - Somerset, having seen part of his force retire and then rally at the King’s Standard, collects a group of men and infiltrates the buildings to strike Richard and his MAA in their flank, but they are fought off. Richard’s Battle gets amongst the buildings and fighting breaks out amongst the gardens, with Somerset’s men taking heavy casualties. They are really getting pressed now.
 |
| Warwick attacks Percy |
To the Yorkist centre, Warwick has had to pull back his line to re-order, but his own MAA are fresh and he pushes forward with them, hitting Percy (Northumberland), inflicting heavy casualties and breaching the ditch.
 |
| Somerset defends The Standard |
End Game.
In the top right of this picture, you can see York seriously pressing Somerset, but they hold out, no doubt invigorated as they fight so close to the King’s Standard!
 |
| Buckingham brings the reserve to support the left |
Richard pushes hard against Percy, killing him. The Lancastrian creaking left is now in full flight and Buckingham moves with his MAA reserve to restore the Lancastrian left.
 |
| The Lancastrians pull back and form a new line |
Though the Lancastrian activation ratings are lower than the Yorkists, in a series of good fortune with dice rolls, the Lancastrians are able to fall back and reform a new line amongst the buildings.
 |
| Richard deals with Buckingham! |
Finally, Richard’s bowmen (top right in the photo) come across Buckingham’s MAA on the high street and they disorder them with effective archery, that then allows Richard to follow up with an assault with his own MAA, destroying Buckingham’s formation, which pushes the Lancastrian ‘Flight’ level to 8 (6 is an army collapse) and the Henry’s army breaks and flees.
Conclusion.
Going back and playing the scenario again (properly!), saw it last 90 minutes, but I was recording the game, taking pictures and still accessing some rule checking, also the Lancastrians held out rather well, so all things considered, I am guessing my actual game play came close enough to the one hour estimate of the play testers.
Overall, I enjoyed the game, there was a fair bit of nuance going on down at the individual hex level. When I first saw the game and noticed that combat was run from a D10, I was a bit disappointed as my exposure to D10 has frequently shown them to a have a too wider range of possibilities, so that combats can feel luck driven rather than situation driven. But that doesn’t seem to be the case here as the spread of results is narrower. Sure, if you rolled a zero or a 9 in the same circumstances, the results will be wide apart, but the middle ground is much more tame and the modifiers don’t tend to create extreme extremes.
The activation system works well, creating uncertainty, giving and taking away opportunities. It also helps in making the Battle formations fight independently of each other.
The way that the combat / casualty / loss thing works is that units start in good order, will deteriorate to disordered and finally deteriorate to ‘Retire’. These terms sound fairly gentle, but they are not. Disorder in this system is quite disadvantaging, the player is limited to how the unit can perform, it suffers further combat results on a different (read worse) column and they are only one step away from retiring or straight elimination. Retired units are lifted up and put with or next to The Standard, where they have an opportunity to rally.
This all means that a force deteriorates with some warning. A player can pull disordered units back in the hope of recovering them (if they don’t do anything and are not adjacent to an enemy), so there doesn’t seem to be a single moment in the game when the tables suddenly turn into an instantly losing situation, the whole thing is gradual and largely is influenced by the combined effect of what is going on in several local hexes, drawing the gamer in to very local hex-by-hex outcomes. This does hold interest and helps with a narrative that feels right.
One of the difficulties with simulating medieval battles is that often three Battles line up facing each other and ‘go at it’, which could be both potentially boring and just coming down to a lucky dice fest. This system manages to make each small action that occurs within each Battle formation interesting and important and has players looking for tactical ways to create advantage.
I am very pleased with my purchase of this game and hope to explore a wide range of the battle situations on offer. I have started to streamline my boardgame collection, so that it is more reliant on series games that share a common rule book - this package has the makings of fitting my early to late medieval interests quite nicely.
The designer, prolific in his art, has sadly recently died. The Developer, Ralph Shelton, gives superb support to the game over on BoardGameGeek.
Complexity - As stated, the box scores this 4 (out of 1 - 9) and I think once the game has been played and the inter-relationships between the various mechanics are understood, then this is fine as an overall guide, but one has to put a work in first. The series rules are a great help in the idea of ‘learning once’ and then playing a lot. Those who have previously played games before that have a ‘Momentum’ type engine (Continuation in this instance) will quickly grasp the fundamentals of the rules. I found that by my second game or rather my first real game, I was hardly needing to make reference to the rules and when I did, I knew exactly where to go, a quick browse and then I was back into the game - it is all there, well explained. There is a bit of meat to the system and I like that, so the trade off between playability, realism and complexity seems to be at a place that suits my own wants. The play aid is very good.
Specific Complexity response for Steve, styled to answer a list of his specific questions (see link below) - Steve, the game gave a few really nice moments, we have Somerset bursting through the gardens to hit Richard’s MAA in the flank and later the Lancastrian line, unexpectedly managed to disengage and form a new line, following a short string of uninterrupted activations, with them holding the Yorkists off for longer than I expected. This is one of the smaller scenarios and it took under 90 minutes. The Yorkists won as expected, but there are scenario balancers if the player wishes. The number of rule consultations reduced during play and were acceptable (after my initial game). Victory is based around Flight of the enemy, which itself is based around casualties - the capture of King Henry VI would have been enough to put the Lancastrian army to flight! The tension in the game comes from not knowing which Battle formation will activate next, you are desperate to pull your disordered troops out, but suddenly they are hit before you can do that! This gives a lot of bang for little rules overhead. The outcome was very historically plausible. Troop behaviour was conducive with their type (i.e. MAA against infantry against levy against knights is differentiated and leader characteristics are brought into play). I think for me, the experience of this game alone has settled my mind that ‘my kind of simple’ is where the rules are meaty enough to convey the flavour of the subject and deep enough to give nuanced play, but that that level of complexity (probably medium complexity) that comes with that is lowered by the fact that the game being part of a series system, so that many games can be played from the one learning of the rules. I suppose this is even more relevant to figure game rules as there are many different titles covering the same period and it is easier to find a sweet spot, while boardgames do not have that many specialised series systems. I am looking forward to your conclusive post on the ‘Allure pf the simple game’.
Size - This is a kitchen table sized game. Most battles in the box are half mappers with a couple being full map. There is a play aid that should sit next to the map (Flight Track), but that could really be placed anywhere as constant reference is not needed. There is also a fold down play aid with all the game charts, but this can just be kept on a chair next to you with the rules. I played this game on a large pinboard, which I moved off the table at meal time. The game comes in a 3” deep box of the standard bookcase style.
Solitaire - The solitaire rating on the box is 7 (high). I would agree with that. This is a two player game that as with many wargames, plays fine solo. The back and forth activation of Battles is ideally suited to solitaire play as the player when managing a Battle formation cannot be sure what formation will next become active. The only area that is not solo friendly is the use of the interruption chits, but that is not a biggie and is typical of the sort of mechanics that solo gamers are used to working around - in fact, I forgot to use mine!
Time - The box says 1 - 3 hours for the scenarios. Conveniently each scenario suggests a play time, so you can match that to your available time slot. With individual Battle formations possibly fleeing when they get over 50% losses and the automatic collapse of the army under the Army Flight rules, sides will not fight down to ‘the last man’, but these things will add in some variables to the times stated in the games. For example, my game above probably lasted a bit longer than it might, because suddenly the Lancastrians got lucky with a series of continuous activations and pulled their line back and got into good cover.
Resource Section.
My sister webspace COMMANDERS is a bit more snippet based than here. Link.
Steve’s Sound Officers Call blog on the subject of ‘the simple game’ LINK
https://soundofficerscall.blogspot.com/2020/08/the-allure-of-simple-wargaming.html
Very interesting Norm, many thanks. I actually feel quite tempted by this one!
ReplyDeleteAs you say, interrupt mechanics are not very solo friendly, but are normally solved very handily by just ignoring them...
Thanks, there looks to be a lot of play in this package.
ReplyDeleteThanks for the play-through, Norm. You make the series sound inviting. As I have mentioned before, the map for this game is beautifully rendered. If you have reviewed this game before, your blog is probably where I first saw the map.
ReplyDeleteI have ARQUEBUS from this series but have yet to pull it off the shelf for a try. I ought to read through the rules and give this series a go. Do you plan to move through the other titles in the series, perhaps to include ARQUEBUS?
Always enjoy your work, Norm. Thanks.
Thanks Jonathan, I get the impression that a couple of features that were in Arquebus were taken and back-fitted to the three games in Men-of-iron.
ReplyDeleteI will put Bosworth up next and see how that goes, if this becomes a series that I want to support, it would make sense to add Arquebus to strengthen my 'series' approach to rulebooks.
A very good review of the rules and how the game plays, which i found very interesting. The map is lovely and a perfect resource for creating a 'traditional game' on the table with terrain etc, should one so wish. It's nice to see so many games covered but with one set of rules and all in one box.
ReplyDeleteThanks Steve, the ‘series’ rules is a great strength. With the package covering a fairly wide period, I think most people would be able to pick a favourite or two out of the box. I thought the system did well to be able to make a ‘town’ fight work.
ReplyDeleteA great post, Norm! Thanks for taking the extra time and effort to address the questions. So a seemingly complex game maybe not quite as complex as you initially thought? I love the narrative and small, interesting things that happened in this battle while you were playing. For me it's all about the storyline and what is happening on the ground and it seems that this game really gave an account that one would read in a history book. Those are the best games. The map is beautiful as well. Board wargaming certainly has come a long way, hasn't it?
ReplyDeleteThanks Steve, yes Boardgames have much to recommend them and I think more gamers these days are likely to both figure game and boardgame, with one complimenting the other - I think the old view was that they competed!
ReplyDeleteI think the thing of complexity can be reduced by familiarity, but I suppose this still needs the gamer to have a narrow focus on a few titles for games to be played frequently enough to claim familiarity, so not necessarily the solution to ‘simple’ gaming.
Cheers Norm. Great write up and a nice reminder that I too should get Blood and Roses off the shelf and back to the table!
ReplyDeleteThanks Aaron, even just moving it up the queue would be good :-)
ReplyDeleteNice review and summary of the game. You have a unique talent of making pictures of chits on a board interesting. War of the Roses is a period I have often been tempted by but scared off by the thought of painting the miniatures. Maybe a board game would be a nice compromise. 😀
ReplyDeleteThanks Stew, the great thing about this period for a boardgame is that the heraldry is done for you :-)
ReplyDeleteYour description and narrative definitely make this a very enticing prospect. The detailed town map and gorgeous counters in your photos almost sell it alone. Never mind that it covers three major historical episodes with loads of battles, all of which interest me. Will talk more about it with you later.
ReplyDeleteMike it is very much a players game.
ReplyDeleteNorm you have done it again, hurt my wallet! I was looking at this before reading your well written piece, as they usually are, and have taken the plunge.
ReplyDeleteI have also purchased SPQR but will use SGBOH to play. The series concept has me hooked, getting too old to learn rules all the time. Another good read.
Thanks!
Dave
Thanks Dave, always happy to spend someone else's money :-)
ReplyDeleteI also got the new SPQR with the SGBOH rules, so for the learning of two rulesets, I will have my ancients to late medieval covered ...... that is a lot of fighting in those two boxes. We are on the same wavelength!
Sounds like a good boardgame,lovely map,I do fancy doing first St Albans some time!
ReplyDeleteBest Iain
I really like seeing a medieval town with the ditch around it in a big top down view. I don’t think there is another boardgame that does this. 2nd St. Albans uses the same map, but is deployed over a wider area as it is a bigger battle.
ReplyDelete