

The scenarios from the base module give us Quatre Bras and Waterloo, while the Prussian expansion has Ligny, Wavre and Placenoit.
This post gives a replay of the Ligny battle, together with some observations of the game and battle.
Please click on 'read more' for the rest of this post.
Although many of the replays on this blog give a detailed overview of the relevant system, I feel that the C&C family is either so well known or so well covered in other places than here, that we are just best to crack on and assume that the reader already has the requisite system knowledge (if not, there are plenty of good places to get it).
Ligny was one of four major engagements in the Waterloo campaign of 1815. Essentially the Prussian army under Blucher and the Anglo-Allied army under Wellington were trying to unite to defeat Napoleon on the battlefield. For his part Napoleon wanted to keep these two armies separate while he defeated each in detail. On 16th June, his forces faced the Prussians under Blucher at Ligny, while just six miles down the road, part of his army under Marshal Ney, faced Wellington and the Anglo-Allied force at Quatre Bras.
Neither battle would prove decisive and so two days later on the morning of 18th June, on the Waterloo battlefield, those three great armies would once again meet and Napoleon would be defeated.
The Ligny / Quatre Bras battles on the 16th have the interesting aspect of some command confusion concerning D'erlon's I Corps. This corps marched and counter-marched between the two battles as both Ney and Napoleon ordered them to march towards their respective battlefields. In effect they moved back and forth between the two battlefields and as a result arrived at neither. Their contribution might have turned either battle to the favour of the French (it is a splendid example of why wargames benefit having mechanisms that bring some chaos to play, levering away total control from the player, which in this system is exactly what the command cards do).
However, Blucher at Ligny was not without similar problems. He had four corps in the campaign, but due to a problem with the 'interpretation' of orders, Bulow's IV Prussian Corps did not make it to the battlefield. The 'what if' scenarios that could fall out of these 'happenings' are not represented in this game - the fight is based on the forces at hand and reinforcements will not arrive.
The fighting started at 2.30 PM. The Prussians sufferred greviously from French artillery fire due to their infantry being deployed on the forward slopes. Napoleon lacking the strength to turn the enemy flak, resorted instead to costly frontal assaults. St. Amand changed hands several times. By nightfall the French had successfully cracked the Prussian centre, but the Prussians were able to retreat from the field and remain sufficiently cohesive to fight again at Waterloo a couple of days later.
Well that was the history - but what happened in our game?
Game Board - We are on the standard 13 x 9 hex grid (for those doing this with miniatures), with the major features being the river dividing the map and the settlements of Wagnelee (far lower left) and Ligny (upper right) bounding the flanks, with St. Amand playing centre stage in the middle of the map. The river is fordable, though in the game it disrupts movement, most notably charges. Below is the game map and unit dispositions. The French are below the river, as are the two Prussian units in St. Amand and the adjacent woods (centre of the map).

The scenario map has some distortion. Wagnele (Wagnelee) is actually much higher up, nearer to Blucher's position. Bry is over to the right and la-Haye (presumably St. Amand la Haye) is immediately above St. Amand and there is the tributary running of the Ligny Stream.

The below sketch shows the Actual layout of the battlefield with the French positioned ready to attack the three villages. It looks like the scenario has straightened out river, pushing Wagnele forward (into the Wagnee position) and also bringing la-Haye onto the Ligny Stream line. This still gives us the essence of an assault against four settlements on a steam, without the problem of flag results pushing defenders in key positions off the map (retreats) early in the game.
There is a lovely period map shown in the resource section at the foot of this post.
 |
| The historical battlefield. |
Forces General - Units are generally at the divisional level (brigades being the Prussian equivalent) and those leaders present are divisional / brigade commanders, with the exception of Blucher who is the Prussian army commander. Cavalry units look like they are each loosly representing a corps.
 |
| French (this side of the river) and Prussian's gather for battle! |
Forces - French, 7 x line infantry, 3 x light infantry, 2 x Young Guard, 2 x Old Guard, 4 x foot artillery, 1 x Guard artillery, 1 x heavy cavalry, 2 x light cavalry and 5 leaders.
Forces - Prussian, 1 x grenadiers, 7 x line infantry, 1 x light infantry, 2 x reserve infantry, 4 x militia infantry, 2 x foot artillery, 1 x heavy cavalry, 1 x light cavalry, 1 x lancer, 1 x militia lancer, 4 x leaders. They also get 4 Iron Will markers.
Victory conditions, the game ends when one player has taken 11 victory banners (Banners are gained for each entire enemy unit or leader removed from play and also for occupying the majority of the towns, church and windmill hexes).
Special features, The Prussian expansion introduces the new mechanic of 'Iron Will'. This reflects the Prussian obediance to orders and spartan discipline. Essentially each Iron Will token will allow the defender to ignore a retreat flag result.

The following AAR with be divided into 1 hour reports - the system does not use traditional turns or a clock, however, I will just simply treat the play of each card as equalling 4 minutes, so after every 15 cards played, there will be an AAR update, showing developments over the hour. I have given some of the units some identifiers, these are not part of the game and have been provided simply to help with the narrative.
2.30 PM.
The battle opens.
 |
| Opening positions |
The French have a balanced hand of cards, favouring flank attacks and they have the 'Give them Cold Steel' card. The Prussians have a weaker hand (and 1 card less), but can at least initially respond in all three sections. They have a Cavalry Charge card and a Fire and Hold card.
As I look at the set-up, it feels like the French plan needs to involve an early capture the buildings on the left flank before the Prussians can build up a defensive line there. There is also a lot of strength on the French right that needs to be active.
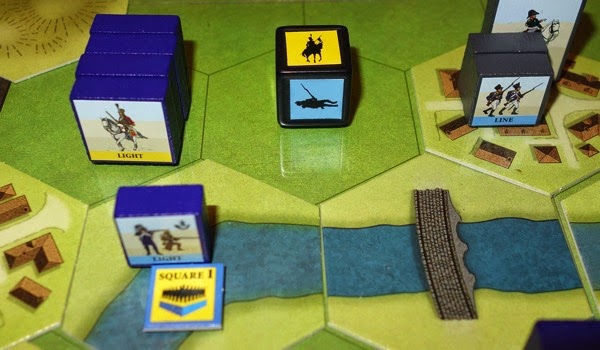
Taking the initiative to take the villages on the left flank, before the Prussians strengthen the line, Gerard crosses Ligny Stream with 13th Infantry Division and pushes the militia out of La-Haye. Maurin's light cavalry crosses and secures the village of Wagnelee (far left). The ejected militia keep La-Haye under fire and a stray shot kills Gerard.
The Young Guard move forward in support, but are decimated by accurate Prussian artillery fire, taking 75% casualties. The remnants are forced back across the stream.
On the right flank, French infantry ease themselves forward, but take very heavy casualties from withering fire by an isolated brigade of reserve infantry. These Prussians would receive the praise of Blucher himself as they held up the French advance for an hour and wrecked two French divisions in the process.
 |
| Prussian reserve infantry defend the church |
 |
| Prussian line hold St. Amand, with supporting light infantry in the woods |
With the left flank looking dangerously close to collapse following the loss of the Young Guard, foot artillery is brought up to support the La-Haye position and engage the enemy artillery.
 |
| French foot artillery moves up to support the vulnerable left flank |
3.30 PM.
The French really need to re-organise themselves and perhaps get the Guard into action, but any delay will just result in the Prussian defences being further consolidated; the French need to maintain their momentum.
 |
| French line advance (10mm Pendraken figures) |
At last, the church is taken, though it is directly under the Prussian guns up on the high ground behind.
With the French left now looking very shaky, Tippelskirch gathers two Prussian brigades and retakes La-Haye.
 |
| Tippelskirch takes La-Haye |
The French get a much needed boost in morale when their light cavalry charge and completely smash the remnant of the Prussian 3rd and 5th Hussars, who had been trying to see off a weakened French infantry unit, that had gone into square. But the hussars had been held off long enough for the French lights to come to their rescue.
 |
| The game dice marks where the Prussian 3rd and 5th Hussars (light cavalry) were lost |
This respite for the French left was short lived. They lost another division on the stream just outside La-Haye and then their own light cavalry was pushed away, leaving all of the La-Haye sector securely in Prussian hands.
 |
| The Prussians hold the La-Haye sector |
In the centre, the French capture St. Amand and also reduce the threat from the adjacent woods, but they are without immediate reserves and they can see an awful lot of grey uniforms nearby!
 |
| The Prussian light infantry prepare to abandon the woods |
4.30 PM.
On the right flank, French heavy cavalry cross the Ligny Stream to position themselves for an attack against the Prussian artillery up on the hill, but they are pushed back onto the stream by the artillery, while Prussian 3rd Brigade move behind them to retake the Church.
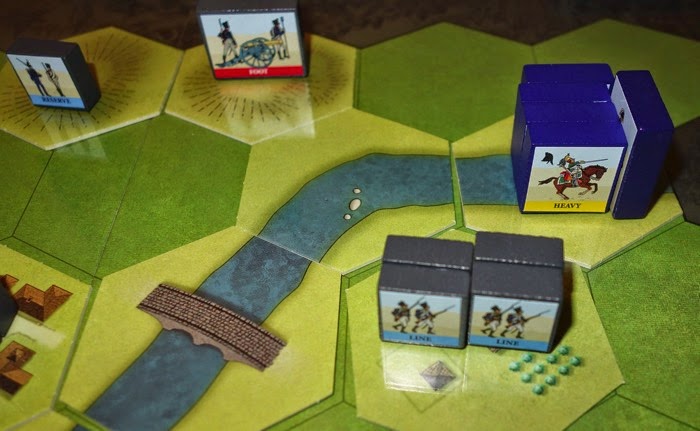 |
| Milhaud's Cuirassiers from 13th Cavalry Division are driven back into the stream. |
The French are having difficulty recovering from the heavy casualties suffered in their head-on assaults in the first hour of battle. The bloody repulses degraded much of the first line, substantially reducing their offensive capacity.
On the left, the French hussars single out 2nd Elbe Landwehr (militia) and charge. The militia do not go into square and are virtually swept away. The cavalry breakthrough the position and charge into the already shattered 3rd Elbe Landwehr, who are ridden down. Exhausted, the hussars are themselves driven off by militia lancers of the 6th Kumar Landwehr Reigiment.
Looking back at the right, Milhaud's heavy cavalry, are at last in place to charge uphill, striking at the Prussian artillery with great force, but the artillerymen shown an 'iron will' and successfully hold back the cavalry. Undaunted, Milhaud returns his cavalry up the hill a second time, this time taking the position and silencing the guns for good.
In an effort to keep up the momentum of attack as the battle reaches a tipping point, the French attack with 'cold steel'. On the high ground on the French right, Milhaud's 13th cavalry Division, see off some militia infantry and then battle downhill to clash with Prussian heavy cavalry (Treskow's 2nd and 5th Dragoons, who have foolishly formed up there), with dramatic results.
 |
| Treskow's Dragoons (Heavy Cavalry) are heavily defeated by Milhaud. |
But overall, local success cannot reverse the desperate situation developing in the centre. The relatively untouched Prussian formations of the centre launch a powerful assault against the St. Amand position and although their grenadiers bear the brunt of the casualties, the village is cleared and the resulting gaping hole in the French centre is all too obvious.
 |
| Overview - with St. Amand captured, the French centre cracks open |
 |
| The lone 11th Division rallies an additional 2 units - but to no avail |
Berthezene's 11th Division rallies in face of this impending onslaught, but it is too little, too late and the collapse of the centre is complete.
As a final act of mastery of the field, the Prussian's show inspired leadership, getting five of their brigades immediately to respond to the French misfortune, seeing two more French units off the board....... and it was suddenly all over. The Prussians held the key villages on the Ligny Stream and had dealt a fatal blow to the French army.
 |
| The French centre evaporates |
5.30 PM.
Its all over. There are a few French remnant units on the left that Lefol hopes to get to safety, but this is an army that is shattered ......... I wonder what is going on over at Quatre Bras? have the French been defeated there also?
 |
| The French left is shattered |
On the right flank, the Guard and the artillery batteries are still intact and will be able to cover the retreat.
 |
| The French Guard - were they saved or wasted? |
Banner points - At the end of play, the Prussians had taken 9 banners for destroyed enemy units, plus 2 banners for holding the villages, giving the 11 needed for victory. The French had collected 5 banners, all casualty based.
Casualties in the game (in terms of blocks lost) are shown below. The French never really recovered from those severe infantry casualties they took in the early flank assaults.

The game as always was a lot of fun and there were several moments during play that I thought how clever the system was to deliver the right feel without a ton of complexity.
Conclusions - The Prussians are an interesting army to play. They have a fair percentage of militia (and reserve infantry) type units that will retreat further than anything else for each flag rolled and have every chance of running off the map and being lost when defending near their baseline, but the Iron Will tokens add a dynamic to the effects of flag results. The line infantry will retreat 1 hex for the first flag and 2 for each subsequent flag, so some twists can crop up there - but if they melee in battle back or without moving, they get a +1 bonus die, making them an interesting and capable of delivering a bloody nose to the French.
Solitaire - This is a two player game and is great fun played that way, as you are never sure of what card hand the enemy has and of course you only need to concentrate on operating one side and managing one hand of cards. Like many games though, the solitaire player is used to making things work and so it is here. I would suggest that you just play each side to their best advantage and when picking up a card at the end of the round to replace the card just spent, don't look at it, just add it to the hand blindly. That way it will not be seen until you next manage that sides hand. As players typically manage 4 to 6 cards each, this means that you will not know between 18% and 25% of a sides hand while playing the other sides cards. For the most part, you will be making some obvious card choices because the places of importance and moments of crisis are obvious and so often the solitaire player will be doing much of what two players might be doing anyway. Playing time increases for solitaire play, partly because of managing two card decks, but mostly because of the thinking time needed to re-orientate yourself as the other player and make the best decisions in that role. Perhaps not ideal, but the system can at least be enjoyed by the solitaire player. The game played in this AAR here was solitaire'd just to encourage the solitaire player to have a go. Last Friday I played two face to face Waterloo games - I have enjoyed all three plays! (3 battles played in as many days - that says much for this system, it is a game that gets onto the table).
Size - The board is around 20 inches deep by 30 inches wide and the players will need some room to the side to place eliminated units, the card draw pile, chits and some space for either player to have a couple of play aid cards, so this is fine on a kitchen table. The bigger scenarios typically have around 20 units per side. You get a lot of kit in the base game, so you will likely find yourself keeping the original box for the units, rules and charts, while transferring the game board and terrain tiles and perhaps even dice to another spare box. The base game plus expansions can start to take up quite a bit of shelf space - but you do get a huge amount of game time back (plenty of scenarios) for that investment - and certainly compared to storing an equivalent amount of miniatures and terrain, it is more compact.
Complexity - The box says 'Medium'. The rules are 24 pages long and are well illustrated and well explained. Once the game mechanics are understood (they quickly become second nature) this becomes a fairly easy game to remember and play. The play aids are very good and when you buy an expansion, typically you can dive straight in after reading only a few paragraphs of new rules. Once the gamer has the first few games under their belt, there is a massive amount of replayability that rewards any investment in rule reading. I would say if you are new to the system, there is an initial learning curve of 4 to 5 out of 10 for complexity and that then quickly drops to around 3 and expansions are also around 3 for complexity, with the complexity not actually being the mechanics, but rather the players appreciating the nuances between different unit types and learning the tactics that will best manage them.
Time - The box says 1 hour for a battle. That is probably about right for face to face, with solitaire play needing longer. We can generally fit in two face to face battles in a comfortable evening session.
Resources:
Map of the battlefield.
I bought all the C&C Napoleonics a couple of years back but could not get hold of the Prussian army expansion for love or money. Eventually I pre-ordered the reprint from GMT and I now only lack the forthcoming La Grande Battles.
ReplyDeleteI have to admit owning at least part of the series (and the Ancients) several times and going through the stickering process, but ultimately the series is not for me ..... but I have said that before :-)
ReplyDelete