

Valour & Fortitude are a set of war-game rules authored by Jervis Johnson (of Black Powder fame) in collaboration with the Perry's, covering land actions from the Napoleonic Wars
With version 2 of these rules released tomorrow as a hard copy freebie with the October edition of Wargames Illustrated magazine and also currently available as a download from the Perry Miniatures web site, I thought I would give them a run and put them under a bit of pressure by having only 1 brigade per side, showing how suitable they are for an easy game at home.
Essentially the rules were initially conceived to help the Perry demo table at conventions, to get through a big game of 28’s in the limited time that a show permits. So designed with big tables, several brigades and multi-player games in mind, how will these fare on my smaller domestic table with a smaller scale and just one brigade per side.
Well, with some minor tinkering, I could get version 1 to cope, but the changes made to version 2 actually make this an easier thing to do.
Anyway, if any of this remotely interests you, please use the ‘read more’ tab for the rest of this post.

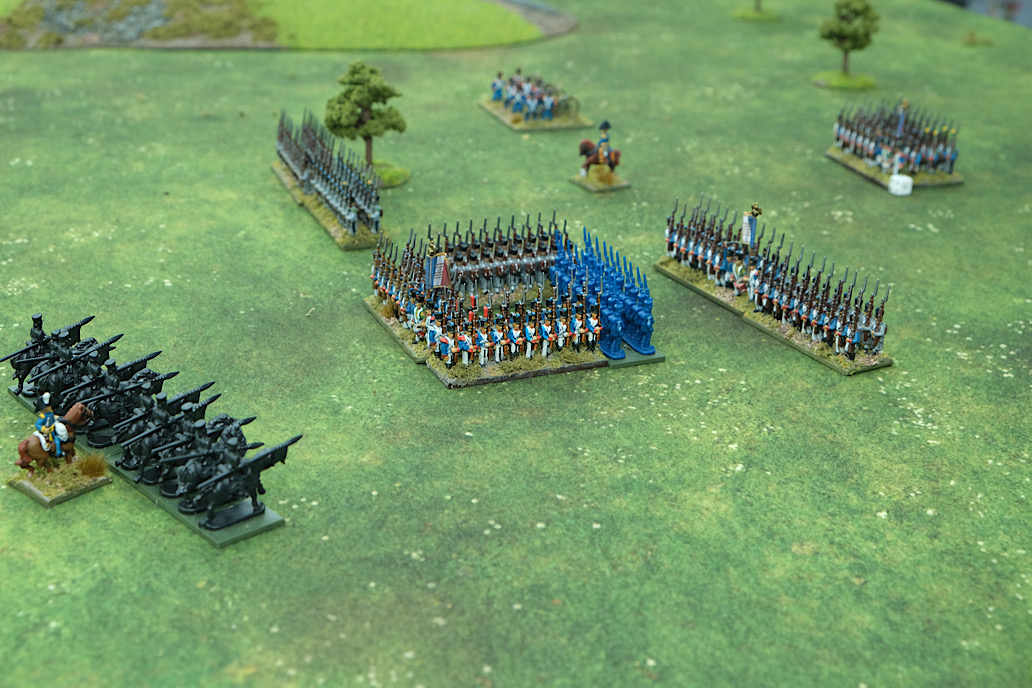
Above - at start. I am using the Epic figures from Warlord Games, which can be thought of as small 15mm.
The Prussians are at the top of the table in the photo, occupying the hill. They have 3 x line infantry, 1 x landwehr infantry, 1 x Uhlan lancer cavalry, 1 x field artillery and 2 x companies of jäger.
The French at the bottom of the picture have 4 x line infantry, 1 x field artillery and 1 x cuirassiers cavalry.
My units (infantry battalions / cavalry regiments and gun batteries) are each comprised of 2 bases (2 x 60mm), so with frontages at 120mm per unit, I am converting all game measurements (inches) into half inches. Centimetres would be more sensible, but I find Centimetres a little mean looking.

Above - the French positions as seen by the Prussian commander.
The table is 4' x 4' and in truth, bigger than we need for this. I am starting the forces set apart at just within max artillery range, 48" in the rules, but just 24" to us, using our half measurement.
Of significance is that the Brigade Commander can automatically command brigade units within 12" (6" to us) of his position. If the unit is further away than that, then it must take a test to see if messengers get through (need 4+), so there is an even chance of failure and if it fails, the unit cannot act in the Action Phase, so there is some good discipline here to encourage the brigade to keep together.
Of note, the Prussian Uhlans are light cavalry and when they take this messenger test, they get +2 to their die roll, so they have more latitude in doing a bit of roaming .... unlike the French cuirassier, heavy cavalry, who need to stay more tightly within brigade confines - which curtails them and is why, cavalry would be best put into a separate brigade with their own brigade commander.
Anyway today, we are combined arms within the same brigade and that's just how it is :-)
At the start of play, each side gets a FATE DECK, each comprising of 13 cards of one suit from a pack of playing cards. I am giving the French hearts and the Prussians spades.
Now follows an exploded view of turn 1 to demonstrate system and Sequence of Play and then after that, just the odd highlight is mentioned as they happen, to further highlight system.
I roll and the Prussians become player 1, this is normally determined in the scenario notes, but we are just doing a throw down exercise here, so it is a dice-off.
So we start with the FATE PHASE.
The Prussians draw the top card from their deck of 13 spades (I have a rather nice napoleonic themed pack of cards).

They get 7 of Spades. Each card has a listed 'ability'.
This one is described as "Directed Fire - Play this card when an enemy unit is chosen as a target in the fire phase. Add 1 to the fire value of the unit attacking that target. In addition, artillery units on a hill can trace a line of sight to the target across units that are not on a hill".
These cards can be saved in the hand for play later in the game and just used when needed, but the Prussians will want to use this in the current turn as they will be firing artillery at the approaching French.
FIRE PHASE - Infantry can fire at up to 12" (6" to us), so nothing is in range yet, but the artillery can fire and does. Artillery is quite low powered, getting 1D6 and needing 4+ to hit.
It selects an advancing infantry assault column. It must choose the nearest target that has not already been fired upon this turn. It takes 1D6.
To this it adds another D6 because the target is massed (assault column). They also play their 7 of Spades Fate Card and get another D6, so their opening fire in the game has 3D6.
They roll 6,6,2 getting 2 hits. The French column is marked with 2 hits.
Every unit has a Tenacity value and once it accumulates hits equal to that value, it is shaken and any further hits are instead taken as Valour Tests, if failed the unit routs instantly off the table! The French line infantry Tenacity value is 4.
ACTION PHASE - A players brigades attempt to activate. They need to each roll 2 - 6 to do so. A '1' is a fail and the brigade will not be able to take any actions this phase (ouch! You just know that will happen at the most critical moments).
The first brigade that tests, can automatically activate if the Army Commander is within 18", so this helps gives player focus to the most important part of the battle - but today, our Army Commander is off table, fighting on another part of the battlefield (imagining a bigger table or more brigades), with an eye on other brigades - perhaps to take that important bridge or village or to get a reserve into action.
Brigades act one at a time, each of their units can choose one (only) of these actions .... do nothing, move, retreat, assault, double move or rally.
The Prussians want to bring the lancers up on their right. They are more than 12" from the Brigade Commander, so must test for messengers. They only roll a '2'. This would normally be a fail, but being light cavalry, they get +2 to that test and pass.
Cavalry move 18" (9" to us). A unit that just moves normally (not double move or assault) can change formation at the start or end of movement - so after moving they decide to go into line.
The two Prussian infantry columns on the hill in reserve choose to move up, placing themselves either side of the gun battery.
MELEE PHASE - Melee is fought between all units presently in contact, but we are not there yet, so nothing happens.
That is the Prussian part of the turn concluded. The French player follows the same sequence.
The French introduce us to two new things. In the Action Phase, they attempt to rally off one hit from the French battalion that took artillery fire. They need 4+ (or 5+ if 12" or closer to an enemy), but fail!
They want to cover ground to get to the Prussians quickly, so they use Double Movement (not the unit that attempted rally, that has already been used). This allows them to cover twice the distance, but they must remain at least 18" (9" to us) from an enemy and cannot change formation.
The French infantry are happy to remain in their faster moving column formation, with a movement allowance of 12" (6" to us), so this restriction suits them.

Above - the situation at the end of turn 1. The French are closing but the brigade commander’s command span is getting stretched. The unit at the back with the small white dice did not move because it took a rally action.
Above - the Uhlans have compelled a leading French battalion to go into square.
Here are some things that happened during play that highlight some more system.
The Cuirassiers on the French right, want to charge Prussian infantry in front of them, but they are beyond command range, so test for messengers and only roll a '1', failing .... so can't move or take any other action this phase!
Charging a square is not impossible ... a 1 in 6 chance in fact. When cavalry contact a square, they must first make a contact test. On a D6, rolling a ‘6’ allows the charge to go ahead, but on 1 - 5, it will bounce off, perhaps with casualties.
Our Uhlans roll a '3' so of assaulting to contact, they instead retreat (think bounce off) and take one hit.
The cavalry would get a dice uplift when testing, increasing the chance of a successful charge if the square is shaken, encouraging some pre-charge fire to wear down the square, rather than relying on a reckless charge (Hello Mr. Ney).
The Landwehr battalion in assault column (the unit in raw black plastic in the below photo) uses an assault action to make contact with a French line infantry unit.

This is how melee works; It is in effect a simultaneous combat. Taking the Prussian assault column first, the Melee attack value of Landwehr is 4D6. They have no modifiers to hit and need 4+ on a dice to hit .... they score an impressive 4 hits.
Before taking those losses, the French 'fight back'. They too have a melee value of 4D6. They get an uplift of 1D6 for being in line (the effect of their fire). The infantry battalion to their rear is too far away to offer support, so the 5D6 are rolled. They only score 1 hit.
Since the Prussians inflict the most losses in the combat, they win the melee. The loser must take a Valour Test (the winner does not), but first the losses just made are added to the existing losses.
The French now have a horrible total of 6 hits, so they are Shaken (4 hits) and the 2 extra hits are converted over to Valour Tests - which are passed on a 4+. If any die roll fails, the tester will rout off the table!
So rather than just taking a single test for losing the melee, their high casualties result in them taking two tests … and both must pass.
They roll 5 and 5 and pass. The two units will stay in contact into the next players turn, but the French are now marked as shaken, with 4 hits.
A turn passes and the fight between these two units intensifies, an infantry battalion moves up to support the French. Ultimately it is of no consequence, the French unit loses another melee, take a Valour Test, fail and rout immediately off the table.
Example of Fortitude - When one or more units in a brigade rout, at the end of that phase, the Brigade commander takes a Fortitude test for each routed unit. A fail makes the brigade waver.
If it wavers, all remaining shaken units within the brigade immediately rout (removed). Then all units of the brigade within 6" (3" to us) of an enemy take 1 hit each.
Unfortunately for the French player, the brigade commander fails the Fortitude Test. The Prussian claim 1 'Defeat Point', which gets added to victory points at the end of play and then the French brigade resets itself automatically back from waver status to normal, but each time it wavers again, the chances of destruction get higher.
The Brigade does not have any shaken units at the moment, so nothing routs from the table, but two units are in proximity of the enemy, so each take 1 hit.

Above - a deciding moment.
The French square near the Uhlan cavalry have been taking musket fire from a Prussian infantry battalion over recent turns and have accumulated 4 hits and are now shaken.
The Prussians decide that this is the moment to attack the square. The infantry advance to contact (assault) and the Uhlan cavalry do the same. Only one unit in a combat attacks, the other(s) give a dice uplift for support.
First though the cavalry must test for making contact with a square, they fail and retreat. This will now be a melee just between the infantry units.
The French square loses the melee and the rules for square state that if a unit in a square loses a melee, it automatically routs (i.e. it does not get the chance to take a Valour Test).
The unit is simply removed from play and now, with that loss, the French brigade commander must take another Fortitude Test, which this time is passed, but with two units now routed and the Uhlans having gained the flank, the French side feel that the battle has been lost and they concede, retiring from the field.
Conclusion
I really like the updated rules. Awkward language has disappeared and the more streamlined way that damage / rally / valour and fortitude tests are now made, makes for a more streamlined process and overall, I think the rules are easier to hold in your head.
A consequence of all of this is that the system is naturally more flexible to fit various table and force sizes.

Above - Jäger's in a quiet part of the battlefield!
This small action took me a couple of hours, but I was re-familiarising myself with V2. There was enough of a game here and situations created, that the game was as good as any other system could do with six units per side.
Next up, I will go to a 6’ table and have two infantry brigades and a cavalry brigade, take on a single infantry brigade defending a village, just to see how those dynamics play out.
Anyway, this has been an excellent collaboration between the author, the Perry’s and Wargames Illustrated.
However you choose to get hold of the rules (hard copy from the WI magazine or digital download), there is a lot of goodness here for free and that only comes from the goodwill and hard work of all those key people involved who have a strong sense of wargame community - thank you to all who played a part in putting this into our hands.
Resource Section.
My sister webspace ‘COMMANDERS’ is being re-configured to showcase various figure and boardgame systems that I am enjoying and gives a flavour of where current projects are up to. Link.
Thank you for posting this review, Norm. I was wondering about the second edition's changes in practice and how they actually work on the table. The most impactful changes look like a revamp of the Actions, and the Fortitude test.
ReplyDeleteThe new rules around the Fortitude test seem a bit more forgiving, vrs the entire brigade leaving the field in 1st ed.
I have to admit I did like the concept of "setbacks" but it seemed silly for say a big brigade with lots of fresh units remaining to just pack up and go home.
I am looking forward to the next playtest with more units! And will likely put my own playtest on the table soon. At any rate, you have just cost me some money as I'm going to purchase the hard copy from WI :)
I wonder if the OOBs / Army lists have changed a great deal? I have not checked them yet but had all the stats memorized for the French and Russians from the 1st edition!
Hi Steve, yes the differences around the Valour & Fortitude tests are more intuitive and more forgiving.
DeleteBig brigades of course get that +1 to Fortitude Tests if they still have 5 or more units operating.
Apparently the WI also has some content concerning a campaign game and something else that I can’t remember, so the mag as a whole is a good buy if the rules interest.
The army lists have been evolving ever since the V1 came out, as the author pushed more new ideas into them, so they are now very complete and ‘fuller’.
I will be interested to hear of your views on the impact that the changes make for your bigger games.
Meant to also say that if you go to the WI website, there are a couple of interesting vids that involved the author.
DeleteNot my period - but some very sound mechanisms in this rule set. I likes ‘em.
ReplyDeleteHi JB, I may be wrong, but the real importance of these rules are that the author sees them being useful for other periods, with just the army lists bringing the historical flavour into play. If they ever take them to Wars of the Roses, which is a strong area for the Perry’s, then that would grab my interest.
DeleteVery thoughtful look at the second edition of this rules set. I will attempt to try these out for our group.
ReplyDeleteHi, definitely worth an initial spin.
ReplyDeleteWasn’t sure if I was going to pick up a copy but after your review I will
ReplyDeleteHi Nick, I think in the October issue the combo of rules and articles, particularly the campaign game, should make for an interesting package.
ReplyDeleteVery interesting to see Norm, I’m looking to get a copy of the newer version when it comes with WI. Even if I already have too many Napoleonic rulesets !
ReplyDeleteHi Matt, for the individual, there is a lower investment point in terms of cost (free) and learning (5 - 5 pages of actual rules) and playing (you can just set a game length to suit, say 2 hours etc), so it becomes easier to see if these rules are a good fit. Those who have been generally interest in V1 with certainly warm to these. I will be interested in your thoughts once you have had a chance to browse them.
ReplyDeleteSounds like a good system, a cousin of Blackpowder, I like the possibility of breaking squares to be honest, I'd better pick up Octobers WI! Thanks Norm!
ReplyDeleteBest Iain
Hi Iain, a ‘relative’ is a good description. It is minus saving throws, units fire or move, not both and ability to move cannot be cancelled for several turns in a row … for those who are unhappy with BP, these basic differences would likely sway them.
ReplyDeletePS really liked your Napoleonic cards, must look out for some of those!
DeleteBest Iain
Iain, look up Waterloo 200 at www.piatnik.com
DeleteThanks for doing this Norm, very interesting as always. I will get the new version of the rules tomorrow, but now you have got me wondering where the original free set is on my shelf, I must admit I never even looked at it (my bad)
ReplyDeleteThanks, it will be interesting to see where the author / Perry’s take this next. The magazine WI issue of the 1st set is the thing to look for, as that had an interesting article on campaigning in 1813.
DeleteInteresting post Norm, it made a lot more sense to me than the video which left me totally confusticated. Perhaps I am just getting too old for learning new rules on top of the others I have to remember.
ReplyDeleteHi Phil - yes, so many rules. I think the things with these is that the 4-5 pages will quickly reveal whether they suit or not. The video does show a lovely table - worth the entry price alone :-)
DeleteA useful review covering the different aspects of the new rules version. One of your concluding notes that the rules can be held in one’s head has become more important as I have got older.
ReplyDeleteHi Peter, this is more true of version 2 than of version 1, yet they are both the same length, so that just goes to show that it is not necessarily short rules that we need, but clear rules as well. V2 benefits from a further year of play tester input and I think the more ‘mature’ gamer will appreciate their straightforwardness :-)
ReplyDeleteInteresting stuff Norm and the blow by blow account of the first turn was particularly helpful as I may end up playing these rules at some point...a mate has invested in a large Epic collection and likely to try these rules out with them!
ReplyDeleteHi Keith, a core principle is to get through a larger game in a reasonable time and that alone may become attractive when a large collection is on the table.
ReplyDeleteNorm, thanks for this. I haven’t downloaded my copy yet seems the refinements have improved it. What about the fate cards ? Did they have a big impact on the game?
ReplyDeleteWith reference to your comment on my blog I used a junior hacksaw 🤣 for some reason I can’t respond to individual comments on there!
Hi Graham, re comments, make 4 attempts at replying, it may go through on the 4th attempt, that is what has been happening to me …. Random!
ReplyDeleteI picked up the WI today and so have the printed rules now, plus the mag has a couple of interesting article. It looks like they are taking the rules the Franco-Prussia next, but they also mention other periods of (long term) interest.
Overall, I feel the fate cards are gentle enough, but there are a few there that can make a real difference, such as increasing attack value of units in a fight etc. in truth, I find them a bit of a bother in solo play, as both sides end up with a few and I keep forgetting to look up what the various attributes are or if a situation arises that could use a card, `i just don’t have that recall that says ‘Oh good, I have a card that will help here’ and in that regard, they didn’t really have a big impact on my game :-) I will try harder next time to nail this.
Norm, you produce another excellent rules' playthrough. Well done. Can you list a summary of the changes between the versions so that readers can compare? For me, that would be useful.
ReplyDeleteI know you tend to write about and review only those products you like but I think it helpful to mention that you are listed as a playtester for these rules.
Hi Jonathan, I suppose I haven’t thought of myself as a playtester in the traditional sense.
DeleteI can’t really list differences accurately because ….. A long, long time ago! (Last year) V1 came out and I was playing them and gave some feedback to the author, that put me on the authors e-mail list for play testing the various drafts.
I threw the V1 away as the revised drafts started to drift in. I am just one of those people who need to clear the decks and have the one version in front of me. Those involved will know that revisions came quite thick and fast, no sooner was one revision off the printer and on the table, that another would follow, sometimes without me even having played the revision being replaced.
Sometimes decisions were reversed and an earlier concept was returned to and so the ‘evolution’ of the rules took a path that quickly disconnected me from V1 and earlier revisions.
My own two areas of contribution (I think) were technical / administrative rather than design / knowledge based, I tend to game with low numbers on small tables, so I was feeding back results of how the system operated at that level and that was putting pressure on the system.
(2) perhaps more importantly, the Author was pretty much committed to a 4 page set of rules and a lot of Q&A and design notes were building up, to A 2 - 3 page document, but often these simply just had to be referenced to make full sense of the initial rule intent and to smooth play and it felt like managing a 2 volume rule set, a part a and a part b - so my view was that as much of the Q&A document as possible should be pushed back into the rules - and then some more!
Jervis has done that, while managing to keep the rule page count down, so some clever re-structuring went on to do that.
The most obvious differences in the versions that strike me are that the brigade(s) now degrades more slowly, less of a sudden death type ending and this in turn has helped the smaller game become a viable thing.
More appropriate wording is used, particularly in the terrain section, so that the impact of terrain is more intuitive. Some examples are now given, which was another way of killing off some of the Q&A.
V1 did favour attack columns in attack, but now line gets the upper hand because in melee the unit in line has a melee value, but it also enhances that by adding half of its fire value - a clever way of removing a complete melee step in many rules, of when a target unit gets what is in effect a chance to defensive fire first - before contact.
The overall structure of the rules between V1 and V2 look the same, the same sort of paragraph headings, but I feel that V2 is the better beast, because the V1 came from inwardly playing within their group (which of itself leads to many questions by the outside world), while V2 resulted from opening up consultation with the wider gaming community and seeing units do things that the original group hadn’t been exposed to.
It is also the case that the army lists have morphed from V1 to V2. The rules are somewhat a generic engine to what the author wants to do in the future with regards to other periods, but the army lists are where the period and force flavour are and such lists will allow the rules to cover other conflicts in the future (Franco-Prussian is being played around with at the moment).
So for example in the army lists, the Prussians have a Landwehr rule that prevents units moving and reforming in the same turn, In the French army list there is an Elan rule. In both lists there are identical rules for square, canister and carbines for example.
This also highlights that the rules are not really 4 pages long, because there are more necessary rules in the army lists - but technicality the ethos is essentially the same, keeping the game to a short body of rules, making them streamlined and easier to commit to memory.
Who knows, in 5 years time, we might find that many of us are fighting our favourite periods with V&F :-)
Thank you, Norm. Very helpful response.
DeleteThanks Norm for the review and your replies to all the comments. An interesting set of rules and the price can't be beaten. I will download a copy for when I have some Napoleonic armies.
ReplyDeleteHi Ben, there is also the prospect that the rules will move to another period that you currently own. Just because I like tinkering, I am thinking about doing an ACW variation, just to explore that possibility.
ReplyDeleteI played it once before when they initially came out. They seemed good, but I was still stuck with Black Powder at the time. I'm willing to try these updated rules.
ReplyDeleteHi Dean, I think there will be across-over interest between V&F and BP, the same sort of ethos is behind them, but the process and application is quite different.
ReplyDeleteAn excellent review and one that you posted just after I had watched the Wargames Illustrated interview with Jervis Johnson and the Perrys on Youtube. The v2 rules do sound a lot better and have greatly benefitted from a year of being out, being tweaked and also 'playtested' by the wider community. I see them as BPII but without the chrome in the text and the 'fire first and then move' mechanic being the major difference. Of course there is more than that, such as the Fate cards, which could easily be morphed over to BPII or many rulesets, as it is an 'old idea' from Featherstone et al. I like the idea of the core rules staying the same, with any additions being army specific, which is good and helps keep things simple. Will I ever give these a go? Maybe one day if they do move away from the Napoleonic period, which I'm not that familiar with. Still good to see a considered set of rules being given away free which will certainly mkae them very popular I'm sure.
ReplyDeleteHi Steve, also ‘no saves’ make this feel different to BP, though hits are still basically on 4+. There is much to like here and like you say, one could morph the fate deck into BP.
ReplyDeleteI see they are at Newark this weekend with a Franco-Prussian game and I fancy they will be using V&F there to do a test game.
Thanks for a useful review of V&F Norm. Have only played a rushed and slightly confusing game of the earlier version, so this post, and the recently released 'how to' video from Jervis, have restored my confidence. Love your fate card deck - jealous!
ReplyDeleteHi Ralph, the thematic cards are certainly a nice thing to have. V2 is cohesively an improvement over V1 and deserving of another chance.
ReplyDelete