The previous post (link below in the Resource Section) described the plan for building two napoleonic Epic armies in a three staged process.
I mentioned that I was going to build a scenario that would work with the starter forces of 6 units per side and then the same scenario would expand in scope as the figure collection increased in size.
A few candidates presented themselves, but I have become quite taken by the action at the village of St. Amand between French and Prussian forces during the Battle of Ligny 1815 and so with that decided, the scenarios have been sketched out and the first played twice.
Please use the ‘read more’ tab for the scenario descriptions and a project update.
On 16th June 1815, a pair of significant battles from the Waterloo campaign were being fought. Wellington was fighting the French (under Ney) at Quatre Bras and Blücher, just a few miles away, was fighting the French (under Napoleon) at Ligny.
On the Ligny battlefield, St. Amand is a small village, set amongst other villages and hamlets and is in close proximity to Ligny. As the struggle for Ligny in the French centre escalated, St. Amand on the French left became increasingly significant.
We can isolate this village from what else was going on in the immediate vicinity and just look at Lefol’s assault (French 8th Division) against Steinmetz’ Brigade (note a Prussian brigade is roughly the same sized organisation as a French division and a Prussian regiment is much like a French brigade).
As I paint each of the armies up, they will each be of a similar size and construction, so throughout the scenarios we will see fairly evenly matched forces fight, but with the Prussians in defence amongst buildings, this might prove a tougher ask of the French, but my two games have given one victory aside so far …. though I am following historical boundaries and if we worry too much about balance, we may as well be playing Ludo :-)
I will be using my own rules for this, but Black Powder (which comes with the Epic starter set) would work fine, though I would reduce the value of the buildings from their standard rating of 3 to probably as low as 1, as buildings in Black Powder are very tough and here we are trying to gently pitch our newly formed and fairly equally sized starter armies against each other and also see that too and fro occupation of parts of villages pass back and forth between the two sides.
Also with BP, using half measurements (inches become half inches) will help. I quite like their unadopted rule that anything that makes more than one move in a turn, can’t then fire in the subsequent Shooting Phase, overall it makes movement much more conservative on the smaller table.
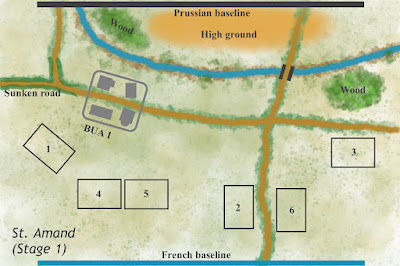
Stage 1 of the project gives each army 4 infantry battalions, 1 cavalry regiment, 1 artillery battery, a couple of commanders and some skirmishing bases. A Built Up Area is also included and so it is with these forces that Scenario 1 takes a limited and minimalist view of the battlefield, though with the charm of a fast play game for those preferring that anyway.
The main features of the battlefield are; a single block of buildings representing the western end of the village, a sunken lane (which I will emphasise in play by marking it with hedges), a fordable brook behind the hamlet and high ground behind the brook. The banks of the brook are lined with willow tree. There are also a couple of woods.
It is June and rye is the predominant crop, it is already the same height as a man. Randomly select the placement of three such fields, each measuring around 5´´ x 7´´ or whatever your collection allows, from the 6 locations shown on the map.
Rye will count as difficult terrain and be a line of sight block to everything on the same level. The high ground is sufficiently high for the Prussian artillery unlimbered there to see beyond all obstacles - though in my rules, it cannot target an enemy if a friendly unit is within 8” of the target AND in the firer’s line of sight.
For our Epic scale figures (a tad short of 15mm) a 5´ x 3´ table will work with units formed from two bases on a 120mm frontage.
All troops are rated regular (average, seasoned or whatever terminology your rules use), except von Kleist’s Landwehr are rated inferior.
Forces:
French - Lefol’s 8th Division - 1st Brigade, commanded by Colonel Vernier
15th Light Infantry Regiment (2 battalions)
23rd Line Infantry Regiment (2 battalions)
4th Chasseurs-à-Cheval Cavalry Regiment - Light Cavalry under Colonel Desmichels
7th Foot Artillery, a 6pr battery (Captain Chauveau)
All French forces start within 3´´of their baseline. The infantry are in assault column, the cavalry in line and the artillery can either be limbered or unlimbered.
(Note - Only two commanders are actually used, Vernier for 1st Brigade and Desmichels with the cavalry - rate them a straight 8 in Black Powder)
Prussian - Steinmetz 1st Brigade
24th Infantry Regiment under Major von Laurons
Containing 2 battalions of Musketeers and 1 battalion of Fusiliers
Silesian Schützen under Von Rüdorf, these are represented by 1 company of Jäger skirmishers with rifles (formed from 2 skirmish bases), which are independent (i.e. no leader needed). They would be classed as a small unit in Black Powder.
1st Westphalian Landwehr under von Kleist
With 1 battalion of Landwehr infantry (Inferior)
6th Uhlan cavalry regiment under Rittmeister Stranz, they are lancer armed.
7th foot artillery - 6pdrs (Kapitän Schaale)
(Note - the Prussians need 3 commanders, von Laurons, von Kleist and Stranz. Rate Laurons and Stranz an 8 in Black Powder, Kleist will be rated 7)
The Prussian army sets up first as follows;
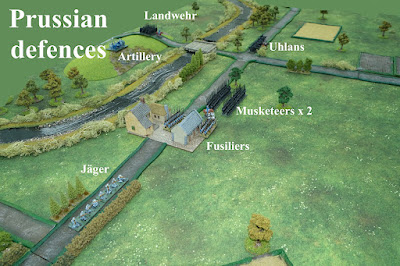
The fusiliers must be placed in the St. Amand BUA, with the two musketeer battalions within 8” of them. The artillery is placed unlimbered on the high ground, together with Kleist’s Landwehr. The Jäger company starts anywhere along the lateral road and the Uhlan cavalry start anywhere within 8” of the bridge. The Prussians can choose whatever formations they care for.
Victory Conditions.
Initially, the number of turns being played doesn’t matter. At the moment that one of the players loses 50% of their force (any 3 units except Jägers), two more full turns will be played. At the conclusion of those two turns, the side presently holding the St. Amand Built Up Area or who was the last to hold it, wins.
Special Rules
The Prussian artillery cannot fire on the first turn of each scenario.
The French will be Player 1 in all three scenarios.
If using Black Powder rules, for each scenario, ignore the usual ‘brigade breaks with 50% losses / shaken status’ and instead just rely on the method outline in the victory conditions.
A BUA can hold one infantry unit.
The Stage Two game.
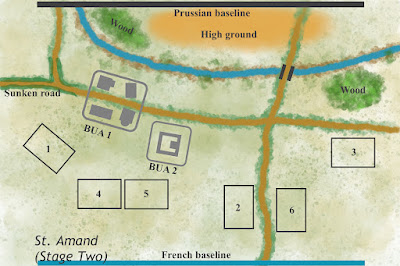
At stage 2, there will be enough bases in the growing army to be able to flesh out the forces as listed in the first scenario and in essence, we are replaying scenario 1, only with a bigger area of village and more accurately represented forces, but we will still use 2 bases per unit when representing the battalion etc.
Additions to Scenario 1’s order-of-battle;
French - 15th Light Infantry and 23rd Line Infantry will each grow to their historical compliment of 3 battalions each instead of 2.
Prussian - 1st Westphalian Landwehr (Kleist) will grow to their historical size of 3 battalions instead of 1.
We are also adding another Built Up Area. This is a farm that is treated as being a stronghold (not a fortress, just something that is part of a determined defence). If using Black Powder rules, I would suggest a value of 2. You may wish to re-roll the random location of the 3 rye fields, or keep them in the same positions as in the first game.
The armies set up as per scenario 1, except that the Prussians will deploy one of the musketeer infantry battalions to the extra BUA.
The Victory conditions are the same as in Scenario 1, with the only difference being that a winner needs to occupy both BUA’s. To occupy only one each is a draw.
The restriction for Prussian artillery not being able to fire on turn 1 remains.
The Stage Three game.
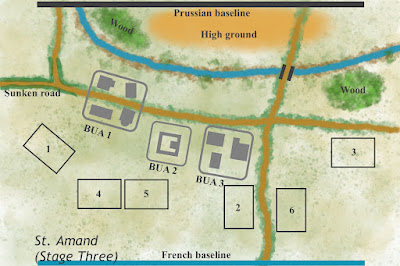
As the battle progressed, both sides fed additional troops into the fray. There should now be enough bases in the collection to represent this and enough buildings to form a third BUA.
I would suggest that we stick to 2 bases forming the unit, unless you have sufficient space and bases to have bigger units on the table.
A third BUA is added to the table as shown on the map, better representing St. Amand in its entirety. The remaining original musketeer battalion from 24th Infantry Regiment sets up in the village. This means that all of von Laurons battalions start the game split amongst the three BUA’s.
In addition to the forces of scenarios 1 & 2, we now add the following.
French additions for scenario 3.
Lefol’s 2nd Brigade is now available to move up to support the assault. The following force will arrive on the French baseline on turn 4. A Divisional Commander (Lefol) also becomes available at this time;
Lefol’s 8th Division, 2nd Brigade commanded by GdB Corsin.
37th Line Infantry (Colonel Thibault) - 3 battalions of line infantry.
64th Line Infantry (Colonel Higonet) - 3 battalions of line infantry.
This means that 6 French infantry battalions and one Brigade Comander (Corsin) will enter this new scenario, together with the Divisional Commander Lefol.
Prussian additions for scenario 3.
12th Infantry Regiment is now available to support the Prussians. The following forces will arrive on the Prussian baseline on turn 4. A Divisional Commander (though for correct terminology the Prussians used brigades and not divisions, but they are equivalent) also becomes available at this time;
12th (2nd Brandenburg) Infantry Regiment commanded by Oberstleutnant Othergraven, with;
Musketeers - 2 battalions of infantry
Fusiliers - 1 battalion of fusiliers
Westphalian Landwehr Jäger company - 1 independent company (2 bases) (classed as a small unit in BP)
This means that 3 infantry battalions and one Brigade Commander (Othergraven), plus 1 company of Jägers will enter the game, together with the Brigade Commander (acts like a divisional commander in my rules) Generalmajor von Steinmetz.
Use the new scenario 3 map. Victory conditions remain the same, other than with 3 BUA’s existing, the side controlling at least two of them at the game’s end will win.
Again the Prussians cannot fire their artillery on turn 1
Discussion
As discussed in the first post, I want to be able to play games during this project build, while units are getting painted. As this post is being written, I only have one unit painted, a Prussian infantry unit. A couple of others are primed or have a few dabs of paint on them, but they will continue to cycle across the painting table, with hopefully the proportion of painted troops getting bigger all of the time.
It is of course the case that these Epic figures are conveniently sold with colour coded plastic. Blue for French, Black for Prussian and Red for British, so they are ready to be played out of the box without painting, which I am sure for many, will allow early enjoyment at the gaming table.
I first played Scenario 1 a couple of weeks ago as a face-to-face game and some lessons fell from that, resulting in scenario and rule tweaks. So for a second attempt - here we go!
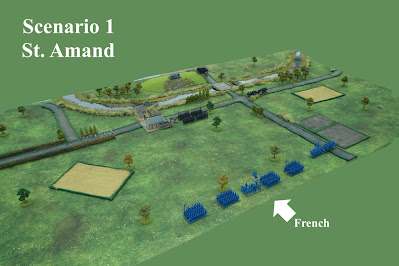
Above - The ‘at start’ situation. This is a 6’ table and in truth, we could trim this and lose close to a foot at either end.
Above - The Prussian positions, all the images are clickable to get a closer look.
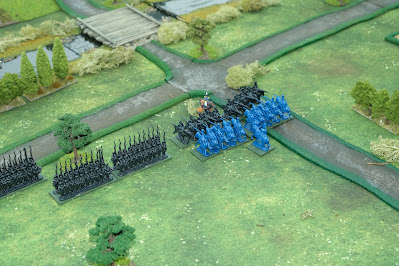
The French advance in confident style, the nicely painted Fusiliers at St. Amand not scaring them one bit!
Above - First contact comes when the French light cavalry charge the lance armed Uhlans. The Uhlans fail their Capability Test, so don’t get to make a counter-charge. Never-the-less, they stand their ground and the French are repulsed. Leaving both units disordered and the French cavalry ‘blown’.
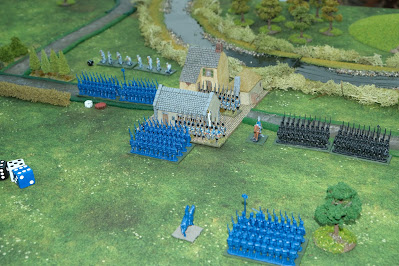
Above - French artillery (off picture) fires upon the St. Amand BUA, inflicting a couple of casualties, followed by a column of Light Infantry assaulting the town. The Fusiliers take very heavy loses and abandon the village, crossing the brook to their rear. They are close to collapse!
A random event occurs - one artillery unit goes out of ammunition for the rest of the game. The dice is rolled and it is the Prussians who are unfortunate. The French light infantry at St. Amand, are greatly relieved, as they have been under bombardment from the guns, though their losses are already so high that Colonel Vernier has no choice but to recall the lights from the village and replace them with his 2nd battalion of light infantry.
Things mostly continue to go the French way. The Uhlans take further loss and a last minute charge by the Landwehr in assault column trying to rescue the situation in the centre, fails.
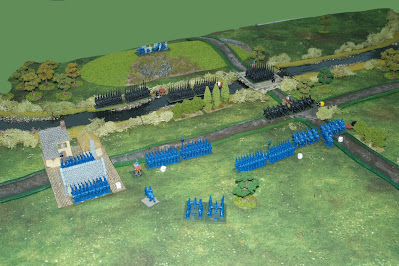
As the French bring up their artillery, the Prussians, being too close to totally collapsing from casualties, start a voluntary retreat, falling back across the brook and leaving the table before their force is further harmed.
Above - the closing moments. The Prussians cross back across the brook, but they will lose their Uhlans, who are providing the rearguard. The French infantry will pull back to give their artillery open views of the withdrawing enemy
The victory condition of invoking 50% losses was not necessary in this instance, the Prussians knew they should retreat and just did the right thing. I played the game until they left the table, rather than simply calling it, so that the retreat and associated losses were represented.
Actual losses were 1 x Fusilier, 1 x Uhlan and 1 x Jäger for the Prussians and 1 x Light Infantry for the French, though the actual condition of the surviving Prussian units was, shall we say …. shaky!
The French had taken St. Amand. The Prussian artillery going out of ammo gives them a convenient focus of blame! But in truth, they were not helped by the atrocious shooting from their two musketeer battalions and that was the cause of most of their undoing. On a better day, they might have sent a couple of French columns tumbling backwards.
Overall, that all seemed to work quite well. It is a short and straightforward scenario, with each unit only likely having one worthwhile attack in them (even though that may last across several turns) and for the battle to be quickly over, decisively, one way or the other.
The next scenario adds another BUA and a few extra troops and should give a more interesting game and likewise, I have strong hopes for the much more substantial 3rd Scenario, all of course to be tested in due course …. and with better dressed battalions one hopes!
EDIT - if you get error messages while trying to reply, it seems that if you press the publish tab 4 times, it does go through - no idea why, I thought this problem had gone away, but it is back. It probably just needs the next update of blogger / Apple systems (I am using an iPad).
Resource Section.
Initial Epic Project post for two pocket armies. LINK
https://battlefieldswarriors.blogspot.com/2023/08/creating-pair-of-epic-pocket-armies-new.html
My sister webspace ‘COMMANDERS’ is being re-configured to showcase various figure and boardgame systems that I am enjoying and gives a flavour of where current projects are up to. Link.


Nice work
ReplyDeleteThanks Charles.
ReplyDeleteA great post Norm. The scenario looks well put together.
ReplyDeleteThanks Ray, I am keen now to crack on with the other two scenarios.
ReplyDeleteQuite a bit of tough-luck for the Prussians! Or was it good luck for the French? Really appreciate the break down of the step-wise size increase of the scenario - well done!
ReplyDeleteHi John, with two games played, I suppose the lick balanced out but in this game Lady Luck did play a part. When the french assaulted the town in close combat, they inflicted 4 hits, which is huge, especially added to the 2 hits that the Fusiliers already had - they could easily have scored no hits!
ReplyDeleteThe guns going out of ammo obviously was always going to please one side and annoy the other :-) then the Prussian musketeers firing with 4 dice needing 6’ or 5’s, kept on rolling 4’s and below! - though in truth the French had their fair bit of that. Finally the Prussian Landwehr assault column, put in a half-hearted assault (failed charge Capability Test) didn’t get a single hit!
So on another day, there is scope for different outcomes.
The scenario construct seems like it might be successful ….. but I caution myself until the next two games are played.
I cannot recall the last time my 15mm Prussian Napoleonics have seen battle. Perhaps I ought to pull them out and give your small scenario a test drive? I bet I can squeeze it in alongside Ilipa.
ReplyDeleteHi Jonathan, that would be fun. I know you prefer something with 12 elements or so, finding 6 to be a bit prone to sudden shock from a bad roll or so, but I think the scenario would be a fun challenge, a primer to get back into a set of rules and a taster to the two scenarios that follow - perhaps the most interesting would be how different rules compare.
DeleteI constructed it with my own rules in mind and an eye to Black Powder, how it might stand up to the rigours of other systems would be interesting and that thought has me considering throwing down another game with a very simple set such as Neil Thomas …. who has come to ‘own’ the sphere of 6 element armies .
Great idea to research, paint and play. After all, the game's afoot!
ReplyDeleteHi, it is a project that has captured my imagination and caused a bit of excitement here and it is good that wargaming can still do that after several decades and as you say, there are troops that need marching across the table.
ReplyDeleteAn excellent project there Norm and nice to scale it up as both sides get more units painted up. Keith did something similar with his HoW scenarios, which allowed you to play larger games as you got more units and became more au fait with the rules.
ReplyDeleteI find with my 10mm figures and 4"/10cm unit frontage, that 3' x 2' table area equates to a 6' x 4' one when using half measurements, so plenty of space on the dining table for both the game and all the accoutrements that go with it, plus easy on the back, which is of course a good thing as we both know!
easy on the back is a definite plus :-) It’s funny you mention HoW, because when I look at both that and Shadow of the Eagles, it is the initial ‘easy’ scenario that tends to make it to the table, probably reflecting that I don’t particularly want to collect ‘big’ armies and that the 12 element and lower are fine for me.
ReplyDeleteEpic in every way there Norm.
ReplyDeleteHi Phil, I am hoping that with the ground work done, there is a good bit of replay in the set.
DeleteAs always a very well structured approach especially finding a scenario that can be used and refought with each expansion of the armies, it certainly helps to focus the mind and keep the motivation going.
ReplyDeleteHi Graham, I am hoping that for some readers who feel a little overwhelmed by product, it shines a light on a more gentle path of involvement and advancement. With my big WWII game begind me, the paint brushes are out again!
ReplyDeleteThanks Norm I’m coming back to read this post when I have a bit more time 👍
ReplyDeleteHi Matt, it will do for a coffee moment 🙂
ReplyDeleteNice! I like posts about scenario construction and reading the reasoning behind the set up. Even if this one is about Naps. 😀
ReplyDeleteGood luck painting up the units. 😀
Thanks Stew, I will convert you yet. :-). I noted a post yesterday where the blogger had just come back from a Con and was singing your praises re the McPherson Ridge scenario that you had put on there.
ReplyDeleteGreat work on the scenario Norm. I appreciate the work you do on writing these and the background research you must do!
ReplyDeleteI know it is heresy, but the unpainted figures stand out better than the painted ones on the game board 😊
Thanks Ben. Yes, the colour coded figures have that advantage. My surprise and disappointment was that when painted Prussian and French faced each other ….. they were hard to tell apart until you look closely !
ReplyDeleteI'm late to the party here Norm, but wanted to say the table looks excellent. The unpainted blocks of troops give it an almost kriegspiel look to it which I think is neat. It doesn't detract from the game at all, IMHO. Like others here, I am tempted to give your scenario a go, albeit with Russians instead of Prussians :)
ReplyDeleteHi Steve, once play starts, I have to say that other than plastic colour coding defining the lines, the fact they are unpainted largely disappears as a visual thing. I think that would be much less so with 28’s.
ReplyDeleteThe scenario should provide a good basis for proxy units.
Nice scenario and a smart way of escalating as you build your forces, you are much better at planning than me, I just paint what I fancy which means I have too much cavalry!
ReplyDeleteBest Iain
Hi Iain, I am increasingly pleased with the St. Amand project. Can you have too much cavalry :-)
ReplyDeleteIf you want a reasonable ratio to infantry and artillery, I think you can have too much cavalry!
DeleteBest Iain
Surprised to see I have not commented previously...although I have been having some issues with posting comments recently, depending on what device I am on...they always seem to work OK from my phone!
ReplyDeleteA very nice little action Norm and the rules etc seem to work well.
Thanks Keith, if it is the same problem that I have and the post refuses to publish, make four attempts and for whatever reason, it does publish on the 4th attempt. I can have this problem even when commenting on my own blog.
ReplyDelete