

Red Blitz is the East Front 1944 module for Old School Tactical, a WWII tactical system published by Flying Pig Games and designed by Shayne Logan.
The module gives us some ‘pocket’ sized maps, some late war kit, 6 single scenarios to use with the pocket maps plus a four linked scenario game in which the gains and losses of each scenario feed into the next scenario, when fixed reinforcements will be received, plus any victory points earned can be spent on some new units for the next battle - available on a shopping list of units / assets!
This post is all about the playing of the 4 linked scenarios. I was very keen to get this to the table and was not disappointed - what a corker of an OST experience.
I shall start with my conclusions …. If you own the core East Front Module (Vol I) and are financially able to do it, then buy this module before it goes out of print. It is very good and will be much sought after once it disappears from stock.
The following post will describe the bare bones of the linked game system and then offer some highlights from the four game replay.
As I start this, I am conscious that there is potential to write a ton of narrative … as that is what this system delivers, but ‘dear reader’, knowing my propensity for being wordy, please be heartened that I will keep things as tight as I can and you will get through this before bedtime :-).
Please use the ‘read more’ tab for the rest of this post.
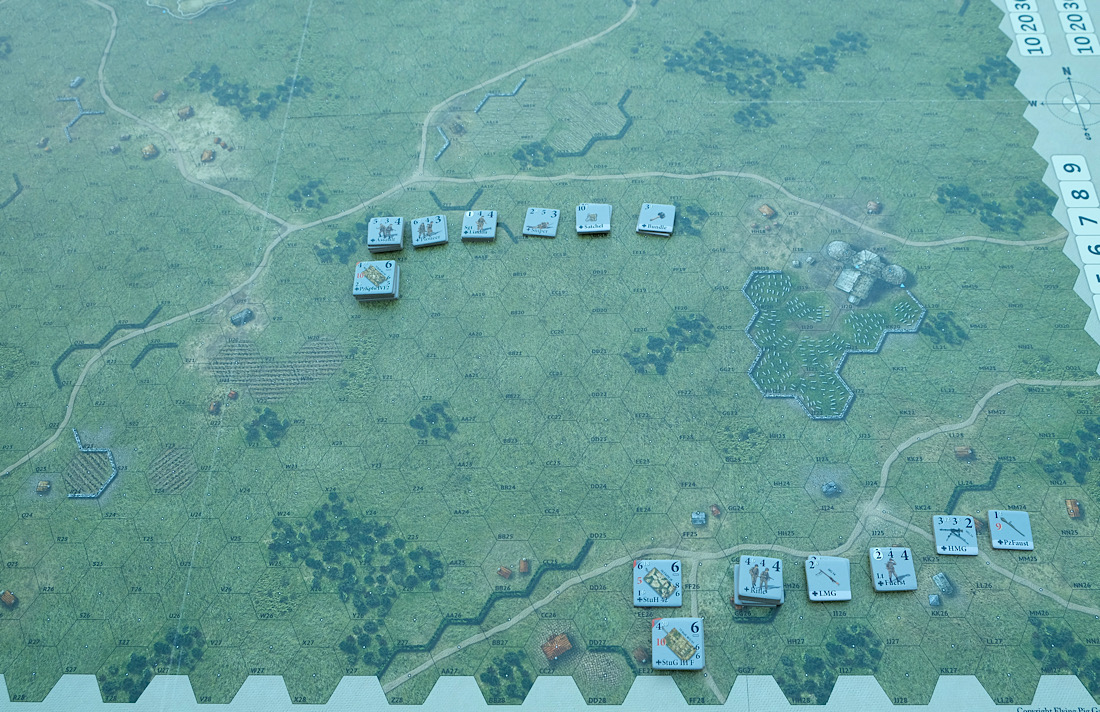
A Hard Bargain, July 2 - 3 1944 in the Minsk area.
‘This 2 day battle offers a glimpse of the many battles fought near Minsk. units of the Soviet 11th Guards Army scrapping with units of the reinforcing 5th Panzer Division.’
It is tempting to think of this as a mini campaign, but the designer has chosen to call this 4 battle collection simply ‘Battleground’. In effect, it is the Battleground chapter of the module, I rather like that.
The game uses the entire area of Map 1. This is a large mounted board that comes with Volume 1 (east Front summer board).
 |
| Viewed from the German player side of the table |
They simply use the road net on the board to divide the board into zones A - E. In each zone there are 2 objective hexes, which garner victory points. These 5 zones start the game as neutral.
In addition, there are two German zones (G1 and G2) in the bottom right corner of the board and two Soviet zones (R1 and R2) in the opposite corner of the board (upper left).
In Scenario 1, these German / Soviet zones are jump off points for the respective forces.

Above - Rather like boxers at the boxing ring, in the red corner we have the ‘at-start’ Soviet forces in the R1 and R2 zones ….
Above - and in the Grey corner, we have the ‘at start’ German forces in the G1 and G2 zones.
Each force will be scrambling to get forwards and start to capture / control the objective hexes of zones A - E and and escalating battle quickly ensues, with a lot of local friction points developing right across this big play area.
The player controls an objective by capturing it, but can only claim control of the whole zone if both objectives within that zone are controlled by them. The objectives are worth more VP’s if the full zone is controlled.
VP’s not only establish a winner at the end of the 4th scenario, but along the way, between scenarios, they can be used to buy in additional units from a list. For example, the Germans might feel a need for additional leadership, or entrenchments, perhaps a tank or two or to bolster their depleted infantry etc.
In any case, each new scenario also list some automatic reinforcements. So for example, we know that in scenario 2, the Germans will be getting some Panther tanks and the Soviets some IS 2’s, plus other units of course.
Importantly, those units that survived scenario 1, stay in place on the board and will be fighting in scenario 2 and so on until the end of the four battles.
This and more is all explained in a couple of pages of text. There are no new rules, if you know how to play OST, then you know how to play this. It is very straight forward - thank you.
Scenario 1 (8 turns) morning July 2nd.
The Germans set up the bulk of their forces on their left to get early occupation of zones A and B and deny the Soviets the chance to squeeze them there. The Soviets, who set up first, have decided to put most force to the centre, hoping to close down German movement and in particular to occupy the high ground for its observational advantage.

ABOVE - The church is being used by the Germans as their HQ. They take the precaution of putting a sniper in the spire. A StuH 42 moves forward, intending to advance into the next zone.
We might best describe this scenario as ‘land grab’. Both sides spread out to try and get early control of objectives and especially look to those zones that might yield them quick control of both objectives in that zone.
This instantly becomes an interesting phase as the threats and advances of one, forces the other to move and counter, even if they might really prefer to stand still and get out some extra fire. It opens as a manoeuvre game.
The middle of the board is fairly open, so the movement of tanks and self propelled guns typically attracts fire from capable gun tubes and its not long before there are smoking wrecks everywhere.

Above - Well armed German ‘Assault’ teams have captured an objective in the woods. An air strike is called in before Sgt. Vyatkin assaults with his platoon. It of course goes horribly wrong and Vyatkin is killed in the attempt.
Overall the Soviets got the better game, but towards the end of the scenario, the dash for objectives in no-mans-land slowed as casualties mounted on both sides and the front started to solidify with units starting to spend their Impulse Points on seeking additional ‘in hex’ cover ….. digging in!
The Soviets had managed to fully control two zones and inflict more casualties. This made a big difference to the Victory Points, 12 Vs 3 in favour of them. This would matter a lot when buying reinforcements.
Even though we are at the start of the Battleground quad, the Germans are already in a serious pickle! They must make a real effort to re-capture ground, but they are already the weaker force and on the back foot. Is the series about to end too soon!

Above - the battle lines at the end of Scenario 1. The German defence is left holding just three hubs, the centre is an area of weakness to both sides - will they make it beyond todays fight … yes it is that serious!
Scenario 2 (10 turns) later on July 2nd.
Fighting resumes. The Soviets have the advantage in armour, further strengthened by three IS 2’s arriving and a platoon of early T-34/76’s joining the T34/85’s. The Germans only counter to enemy armour are the three new Panthers arriving … they must be handled with great care, giving a good account of themselves. Both sides invest their VP spend on more infantry.
The Soviet plan is to ruthlessly prosecute the attack while the Germans are on the ropes.
The German plan is to defend what they have and to preserve forces, but also recapture two objectives that would prevent the Soviets from claiming full control of zones D & C and thereby reducing Soviet VP’s for when reinforcements are bought. Can they manage to pull off those competing demands!

German reinforcements were moving to Zone A (bottom left), to keep the best hold on it that they could, while Soviet IS 2’s carrying shock troops were moving up for a determined attack.
Above - Both sides fired rockets into the area to break up the packed enemy formations. The strike markers (orange counters above) show each main target hex, plus all 6 adjacent hexes are hit, so 14 hexes impacted altogether, resulting in surprisingly few casualties, but closing the area down to further movement for the turn.

As the day moved on, the shock troops, took the zone and German infantry retreated into the woods for cover. The IS 2’s started to move towards the centre of the battlefield, hearing reports of enemy Panther tanks. One IS 2 without infantry support, got too close to a German infantry section and was hit by a panzerfaust, causing the machine guns to jam and the crew to become shaken - it was lucky!
Somehow, the Germans not only managed to hold out, but they also inflicted very heavy casualties on the Soviets, who had thrown themselves along the line with great ferocity.
In the Centre the Germans took control of the zone, though they did lose ‘A’ zone on their left.
The battle bogged down, until through loss, the Soviets had to call the attack off and fall back in some places to local cover. Both sides were exhausted, but in just a few hours, the significant Soviet advantage in numbers had been largely negated and end of game victory points were a much more balanced German 8, Soviet 10.

Above - the frontline at the end of Scenario 2. I think I would call this scenario ‘Soviet high hopes dashed’.
Scenario 3 ( 10 turns) early July 3rd.
The sides had fought so hard in the previous day, losing many men and vehicles that the new reinforcements arriving would barely be enough to hold the line, never mind resuming an offensive.
However, the Soviets are promised a platoon of three SU 152. Known as ‘the beast’, wherever they arrive, that will signal where the main Soviet action will fall.
My luck with SU 152’s has never been good, they don’t seem to last long! It seems that once they arrive, all German gun tubes get distracted by the threat.
For the Germans, a couple of Nashorns join the intact Panther platoon. They will be formidable with their high velocity 88’s, as long as they can stay back and allow distance to be their friend.
Soviet plans - needing to be decisive, the 152’s will arrive at zone A (bottom left), joining shock troops already there and (a) break into the German rear (b) eradicate that salient.
German plans - block the left with a platoon of rifles and tie the enemy down, but mainly reinforce the centre to (a) respond to the main enemy assault, wherever that may come from (b) and then as soon as possible put pressure on the Soviet centre.

Above - An isolated German infantry section with a LMG has been desperately holding onto a hedge lined stone building (now marked with a melee counter). It is an objective hex out on the top right side of the map, but they have not seen any support moving up towards them. Has the German commander taken their eye of this ball … no there are just not enough troops to go around!
A Soviet infantry platoon with tank support had advanced to capture the objective, but despite being blasted by tank fire, the defenders held out, inflicting heavy casualties on the approaching Soviets, who were then ordered to make a dash for the building across open ground to overwhelm the Germans.
That ‘dash’ proved expensive, as not only did the German defenders lay down deadly fire, but the Luftwaffe turned up and added to the attackers misery. But it was only a matter of time and one Soviet rifle section managed to break into the house and in room to room fighting, the German section were eventually expelled and the Soviets took the prized objective hex.
As to the ISU 152’s, they would have played to their strengths had their huge guns just been used to batter the infantry positions, but you know how it is … they flirted with and then totally became embroiled with the Panthers!
The advantage for the Panthers is that they fire twice as fast. One ISU 152 turned to cross a wall for a better defensive position, it failed the bog check as it crossed the wall …. leaving it side-on to the Panthers, but the Panthers were already spent, so the order of activation in the next turn would be crucial.
The SPG passed the bog check phase at the start of the next turn and then the Soviets won the initiative, allowing them them to go first, but instead of shooting, the 152 now had to spend it’s action turning to face the Panther. The Panther then fire and neither wall or the decent armour on the 152 could save it.
As the battle concluded, the lines had shifted a bit. The Soviets had marginally compressed the German flanks, While the Germans had moved the centre forward and straightened that salient out - though in truth they had been pressing against an open door.
Casualties had been very heavy and yet in terms of objectives achieved, little had changed and now both sides were pretty exhausted. For the third consecutive time, the Soviets have the better of the victory point spread with 11 VP’s to 5 in their favour.

Above - The frontline at the end of Scenario 3. I think I would call this scenario ‘Getting Nowhere Fast’!
Scenario 4. (12 turns) later on on July 3rd.
Both sides are so worn that they are pretty much reliant on their reinforcements to carry the battle on into the afternoon.
Both sides get their higher valued troops. SS and Tigers for the Germans, Guards and T34/85. I think this has more to with the designer exploiting those parts of the modules that will not have already been churned through games 1 - 3, as reinforcements & replacements are limited to the counter mix.
Soviet plans. In the last two games, the Soviets have simply lost too much of their force. The battlefield is strewn with wrecks. They already have a good victory point score, so will seek to consolidate their gains, but put pressure on the centre to draw the Germans in.
German plans. The Germans NEED victory points. To that end they will press the centre and the far right to take two zones into full control (double VP’s for them).
As the game opened, a pair of German Tigers, together with the remaining two Panthers, took up a central position and started to fire at a platoon of four T34/85’s that were just 800 yards away. Fortunately for them, the tankers aim was embarrassingly bad (rolling 3’s and 4’s on 2D6!) giving the T34’s chance to scarper amongst and behind local woods.
As German infantry slowly advanced, with the big cats giving direct support, the Soviet line in the centre started to thicken and deepen in readiness to absorb the attack. Their political orders were ‘Not one step back’.

Above - Three of the T34/85’s (marked by the blue dice) took the opportunity to circle around the high ground and appear on the Tiger’s flank (The fourth T34 had become bogged down in woodland). They managed to damage the gun on one Tiger (marked lower right by the counter with the red slash). But it was a painful exchange for the Soviet tanks, who lost two machines and a third pulled back, also with a damaged gun.

Above - As a lone panther climbed up the low rise (they have infantry support ….. rather too far away, off picture to the left and below), a Soviet section of shock troops braved the perils of a being a Tank Hunter team and ran up to the tank and attempted to place a magnetic mine. They failed and paid a high price (flipped to half casualties).
The real danger for the Germans had been that they might possibly break themselves on the attack and then possibly be overwhelmed by a counter-attack, but surprisingly it all went the German way.
The German heavy tanks were able to pump high explosive shells in to key positions. Troops fell and the Soviets pushed fresh unit up to replace the fallen, but the rate of attrition was so great that the Soviet positions began to thin and then collapse.
The Germans ended up taking three objective hexes, taking two zones back from the Soviets and reducing Soviet sole possession of a third to joint contested ownership …. quite an achievement by any standard.
For the first time in the four games, the Germans got the advantage in victory points, 12 to 6, but would that be enough?

Above - The frontline at the end of Scenario 4 and of the Battleground series. I think I would call this scenario ‘The Exhaustion of 11th Guards Army’.
Winning.
When we add up all of the victory points earned across the 4 games, the Soviets have 39 to the German 28, giving a difference of 11, which in game terms give the Soviets a ‘Capable Victory’.
That feels a little at odds with what the eye is seeing in the last game. The Germans have made strong gains across the table and Soviet losses, frankly have been horrendous - though if the Germans have used the last of their reserves, then they too, would need to halt the offensive.
However, the VP’s do take into account that at the end of games 1 and 3, little hope could be held out for the Germans. Indeed, after such a bad Game 1, I thought the Germans would likely bow out in game 2.
Lessons.
If I could change anything for the Soviets, I would do two things differently. Bring on the ISU 152’s in the centre and use their guns to smash enemy positions, this is what they should do and would also have had the effect of pulling the Panthers out of position to deal with them instead of the 152’s walking into their arms!
Secondly, in the last game, the Soviets should have ‘bought’ some anti-tank gun reinforcements, to help deal with the German heavies from a defensive perspective.
For the Germans, I would do two things. Firstly just select one zone per game to go for and hit it properly with sufficient strength to take both objective hexes in that single game, while defending elsewhere adequately to prevent Soviet penetration. In our games, their strength was too dissipated across all objectives.
Secondly, their Nashorns should have done what they are meant to do, stay back and ambush from cover, instead they got drawn into open battle to help the Panthers deal with the ISU 152’s and remnant SU 85’s ….. and that was the end of them and their superb 88/71 guns!
Conclusion.
There are some headlines comments with this 4 scenario battle. Firstly surviving units remain on the board from scenario to scenario, so unless you are prepared to record positions between battles, then you will need a space where you can leave this set up until concluded.
I played one game per day over a long Public Holiday weekend, probably about 16 hours in total. I stand at my table because of the size of this board, so I must admit to a bit of gaming fatigue (mainly aches), but that said, I enjoyed the games and am really glad to have played this. Oddly my back picked up on day 4 and I enjoyed that last game more because of that.
Having already done the first 6 stand alone scenarios in the module earlier in the year, doing these 4 linked games was the cherry on the cake.
Secondly, there really are no extra rules, this is such an easy thing to get into. It is all game, the rulebook was barely in my hands.
Thirdly, you will get a different perspective of play than stand alone scenarios provide. There are ongoing consequences to everything you do. You can’t afford to be careless with units and there will be no last turn dash, because you are continually investing in the future of the battle. In fact the last turn of each game sees a lot of digging in (seeking greater cover is the system mechanic) and consolidating rather than dashing, becomes a thing.
Thoughts go to preserving units, setting up fields of fire that may be in effect exist over more than just the present scenario and even slowly developing attacks, because you have time to do that - but perhaps not always too much time as the enemy might reinforce the sector in the next game, either defensively with troops and wire etc, or offensively with more ground forces, artillery or air support.
Tanks like the Panther or the SPG Nashorn, can be used more historically, because the big board gives the space and scope for these vehicles to stand back and fire from safer positions / distances.
Overall, this has been a very good OST gaming experience and one that I will get back to at some point. The Red Blitz module just doesn’t put a foot wrong, it deserves a place on the OST gamers shelf.
We are quite a niche hobby, with niches within the niche, so we are lucky that there are individual designers prepared to invest so much of their time perfecting these games for us and publishers who are willing to support such designs - thank you.
Resource Section.
If you have not come across an OST game before, here is an ARR from the same module that will give you a flavour of the game. LINK
https://battlefieldswarriors.blogspot.com/2023/06/red-blitz-ost-fighting-tactical-1944.html
My sister webspace ‘COMMANDERS’ is being re-configured to showcase various figure and boardgame systems that I am enjoying and gives a flavour of where current projects are up to. Link.
Well I've read this through three times to make sure I was taking it all in Norm, as there was a lot to digest, but in a very pleasant way! A really cracking game/campaign that does feel that it captures the bloody and hectic nature of the fighting on the Eastern Front. I too thought that the Germans were in for a beating after Day 1, but an excellent counter attack as it were kept them in the game.
ReplyDeleteHaving just finished 'When Titan's Clashed' the losses incured by the Soviets seemed right, as they did lose 50% of their forces (or more on occasions) when attacking. Again the ability of the Germans to counter attack felt right, but costly at the same time. I agree that the Soviets might have been better to bring on some ATG's to provide protection from the German armour, which is what they did historically. I only learnt from the aforementioned book that the Soviet tanks in initial attacks were used for infantry support, not in AT roles. Always good to learn new things:).
I can see plenty of replay value in this module and options to vary what reinforcements arrive and when. Nice that you were able to leave everything set up so you could hit the ground running each day and hope your back has fully recovered now.
Hi Steve, thanks for spending the time on reading the post, it is a bit of a mountain. I actually wrote each section up as each scenario was played, so being written in the ‘here and now’, stopped any hindsight being injected into the narrative, so for example, at the end of scenario 1 / start of scenario 2, I was in the absolute belief that it was curtains for the Germans and that the whole thing would end.
ReplyDeleteThe game did have the right feel to it. In the final battle, with the Germans pushing on to the two heights to get objectives, at several points, my imagination was drawn to the battles for the Seelow Heights …. roles reversed of course, but never-the-less, I felt that later war flavour and desperation was definitely there.
It has been a long time since I have dedicated so many hours to a series of sessions for one game, so as a ‘game fest’ it will remain a memorable experience. I suspect Mrs. Wargamer is happy to have her space back :-)
Thank you for taking the time and making the effort to publish this post. I thoroughly enjoyed reading it. It's apparent you had a good time and the system delivers a really good playing experience. I don't want to get into another tactical scale system, but material like this makes it hard to resist.
ReplyDeleteThanks Ellis, good to hear from you and glad you enjoyed the post. Knowing the systems that you like, this system would tick a lot of boxes for you. If ever you do make contact with the system, I would be interested in your views on the differential table used in combat, set against the bell curve of the 2D6. I feel that that is the area that you will either like or not.
DeleteEllis, found this YouTube review, which may interest. Link
Deletehttps://youtu.be/_LfCo1yHdZ8?si=SqXEoyD--yL7Kf_j
Whilst the Eastern Front is not ‘my thing’ your report was most engaging and I think there’s nothing better than finding a game system you enjoy and being able to get the maximum playability from it. It seems clear that the designers have put a lot of effort into this system.
ReplyDeleteI’m so pleased the four games played through, like you after reading the first game I didn’t really see how the Germans would see it through the second. Thanks for this report
Hi Graham, I really like the system, it is the closest thing I have to what I would call good old ‘basic’ Squad Leader (4th Edition 1977). Though I do need to get more ‘Panzer’ (GMT) to the table, which I know you have been dabbling with.
ReplyDeleteLooks brilliant on the first scan through, I shall return to it later to read in a bigger screen.
ReplyDeleteThanks Phil, it is a two coffee read🙂 there were a good few moments that would have nicely transferred to the table-top.
ReplyDeleteReally apparent that you enjoyed the 4 linked games. It is somewhat of a novel concept for us gamers to introduce long term consequences for the decisions: which really changes the nature of the game. As you say; everyone digs in versus wild advances.
ReplyDeleteI think anyone who plays OST will be swayed by this post to get this expansion. 😀
Hi Stew, agree, knowing the game well, I was pleased that palying linked games offered a new perspective.
ReplyDeleteGreat review, thought I'd already written about it, certainly gave the feel of the grinding Eastern front battles!
ReplyDeleteBest Iain
Thanks Iain, I have always enjoyed WWII tactical boardgames and this one just keeps giving!
ReplyDeleteWhat a great read Norm! On your recommendation I purchased the module recently. I am really getting into OST. When I get these linked scenarios I am sure it with be the cherry on the top. The usual sized scenarios create good narrative without being rules heavy so I expect this to do the same on a grander scale.
ReplyDeleteThanks for the write up!
Dave
Thanks Dave, happy to spend your money 🙂 on the Consimworld forum, one player who has a lot of play experience, today said that he thought that scenario 4 (No Way Out) did a better job because while still a big scenario, it sat in a small space with 3 pocket maps and was a single scenario, though still had the ‘monster’ element with 14 turns and a big order of battle.
DeleteFor anyone who cannot keep the game up for a few days - that would be a similar grand affair, but I feel the 4 linked games just goes the extra mile to bring a different dimension to play.
Great game and report Norm. Thank you for taking the time to write it.
ReplyDeleteA very interesting looking system and certainly thought provoking.
Hi Ben, thanks for the appreciative note. I hope the company include something similar in some future modules.
ReplyDeleteWell that was a cracking read Norm, great scenarios that could be adapted for tabletop play. Your lessons learned was well observed.
ReplyDeleteThanks Phil, glad the content pleased. Yes, some very good moments to bring to the tabletop, easily broken down into smaller sections by just dividing things into platoons and then into company activity.
ReplyDeleteHello Norm,
ReplyDeleteThank you for such a detailed 4 scenario report. A cracking great read! Although I have done quite a few boardgames in the past, the multiday (mini-campaign) linked scenarios on the same map is a new thing to me. I have done a couple with minis, but never on a paper map. The concept and the actual execution is intriguing and you managed to capture and document the decisions to be made very well. Thanks again!
Hi Shaun, thanks, the linked scenarios definitely brings a different perspective / experience to play, especially in stopping that last turn dash that stand alone scenarios can generate.
DeleteAlso, this is a big game board and so a lot of different things are going on right across the board at the local level, plenty of nuance, sometimes with single hexes holding out for ages and other times those hexes becoming unhinged as the enemy has space to manoeuvre around them ….. all good :-)
Tempting to dive into the Eastern Front module but first I must get the Pacific War module out and onto the table to assess whether or not I like the system.
ReplyDeleteHi Jonathan - so much goodness :-)
ReplyDeleteA pretty wordy report Norm, but justifiably so! The linked scenario mini campaign format provides a really satisfying result, even for those if us just reading about it!
ReplyDeleteIt did seem like Germans git back into it in games three and four, but I still think the overall outcome was fair, the Russians hammered the Germans in the first two games.
One minor drawback I guess is, you have to stop somewhere....you feel, looking at the board, that the result was harsh on the Germans....but to know for sure, you would need to play games 5 to 8....the German advance in the centre may lead to attacks from both flanks and the salient being cut off....a mini Kursk result?
Hi Keith, I agree and if one takes the view that both sides have perhaps used the last of their reserves, so that there isn’t a game 5 etc, then from what we understand, the Soviets were better placed to absorb such losses and would likely get back on their feet faster. In the bigger picture, if the Germans had won, that could be simply translated to that they had bought themselves some more time.
ReplyDeleteWhat did surprise me was that it did play the full 4 games, I thought it was a wrap after game one and who knows perhaps on another day it might have been.
Great reports and puts OST in a favourable light (I never took to system for reasons not now recalled)
ReplyDeleteHi, it has become my ‘go to’ tactical system. It’s a shame they don’t do a low price starter / taster set for people to dip their toe into and see if the system is for them.
ReplyDeleteThanks for the excellent write up Norm. It felt very Eastern Front, with the high Soviet casualties and desperate German defence leading to an eventual Soviet victory of sorts. Also, every time you write about OST I have to remind myself very firmly that I don't really like tactical games, less I end up spending huge amounts on the system...
ReplyDeleteHi Gareth, the water’s warm …. Come on in :-)
ReplyDeleteI liked that with a game of this size and scope, there were moments of high drama breaking out here and there, each giving their own story. There is another ‘biggie’ Red Blitz scenario that I hope to get to soon,.