
Invasion 1066 - Stamford Bridge
Stamford Bridge is the second 1066 game produced by Revolution Games, the first covering Hastings.

The games share the same system, but produce quite different gaming experiences.
This post gives an overview of the game, combined with an After Action Report.
Please press the 'read more' tab for the rest of this post
Before proceeding, I should make it clear that both this and the Hastings games are my designs, kindly taken on by Revolution Games, so I will ramble gently and aim to keep this post somewhat neutral in its content. Also, sorry about the picture quality, the combination of settings and a hand held lighting source, left me with a quality issue that I did not notice until post processing.
The system and the Hastings game are covered in some detail elsewhere on this blog (see Resource section at the foot of this post).

Gamers who have played the Hastings game will be versed in a situation that reflects a tough and relentless fight uphill that yields ground and casualties slowly. Gamers that come to Stamford Bridge after playing Hastings may be shocked by the severity of casualties and the fragility of the forces. It is a wild hack and slash affair - it is the same basic system, but the situation gives a very different feel.
The overall situation is that part of the Viking army (Under Hardrada) has been caught unprepared by the full Anglo-Saxon army under Harold. The remaining part of the Viking army are at their base near Riccall and they are making best speed to reach the battlefield and support their King. Historically they arrived on the battlefield with such ferocity that Harold's army almost broke, but their own exhaustion after running 10 miles to reach the battlefield, began to tell and eventually victory went to Harold.
There are two particular aspects to this design that I really like;
Firstly, A Stamford specific rule. The weather had been really warm and some of the Vikings had left their armour back at their base at Riccall (they did not know that an enemy army was nearby). To reflect this, some of the Viking force are set up face down, with neither player knowing whether a unit is armoured or not. They are only revealed at the point of fighting. This in essence is the same as the 'untried unit' mechanic that has appeared in some older WWII designs. It has long been a favourite rule and I was pleased to be able to bring it into this Dark Ages setting with such good effect. It adds uncertainty to the first turn of contact.
Secondly, the series rules divide soldiers roughly by type into either a warrior class or nationality. When a friendly unit is eliminated, each friendly class that is adjacent to the eliminated unit must take a single rout test (for the class) and if the test fails, then all units of THAT class ADJACENT to the eliminate unit will rout. The significance of this is that as each class nears it's break level through increasing casualties, it will have a greater chance of routing. On the battlefield this translates into very local routs initially, that gain momentum, until at some point the army generally breaks down and large portions of the army are routing. This fits in with how forces slowly disintegrated as cohesion broke down. In the Hastings game, the Norman army was divided on the basis of nationality (Norman, Breton and Franco-Flemish), whilst the Anglo-Saxons were divided by warrior class between Housecarl (including Thegn) and the General Fyrd.

It is also worth pointing out (to help reading the AAR) that units have a facing and can only attack out of their two frontal hexes. If successful, advance after combat is mandatory and as it advances, the unit must keep its original facing. This may expose the flanks of the advancing unit, the enemy will turn to attack such flanks and in doing so, expose their own flank and so organised fronts break down into a series of local fights.
Anyway .... Enough with this liking of rules! on with the AAR.

Setting up - The set-up (above) is largely fixed, but there are also 12 gaming options that allow the players to explore wider considerations (such as allowing some Housecarls to be mounted or asking what if Hardrada had been aware of the approaching enemy and had more time to prepare?). For our game today, we will restrict ourselves to the straight historical scenario.

If the Anglo-Saxon force reaches the crossing over Millsike Beck (the opposite map edge shown above), it gets additional victory points, as do the Vikings if they reach the crossing over the River Derwent (behind Harold's line). Outside of this, VP's are awarded for causing casualties.
Creating casualties and taking the enemy to their break levels can only be done by attacking, so despite the apparent defensive situation that the Vikings find themselves in, they cannot afford to just sit back on their hands, giving the initiative to the other player. Once the initial clash occurs, they too must make attacks and will likely expose their flanks in doing so (remember - mandatory advance after successful combat) and so the terrible carnage of a hack and slash type battle begins.
Turn 1 - On turn 1, only mounted Housecarls (that optional rule is not used here) and leaders can move on the Anglo-Saxon side and leaders and archers on the Viking side. Neither side wanted to move. The turn was not totally wasted as both sides were able to hurl abuse at each other, bang their shields with their swords, with the more vulgar elements choosing to show the enemy their bare backsides, encouraged no doubt by a distinct lack of archers at this battle, but it did all help both armies get into the mood for battle.

Turn 2 - Harold's Housecarls advanced to contact, engaging the entire Viking front. These are the untried Viking units that may or may not have brought their armour. The first attack went in on the far right, the Viking unit was turned over to reveal that it did have armour and the attacker rolled a '1' .... Oh dear, an Attacker Eliminated result. Indeed as the attacks ran down the line, the Housecarls were to roll three more '1's. Luckily each subsequent time it was against an unarmoured Hirdmenn unit, so the attackers got away with disrupting themselves. But a '1' against a good ordered Hirdmenn unit invites an immediate counter-attack by that unit with a modifier for going berserk. Fortunately for the Anglo-Saxons, the Vikings were also rolling badly.

For their part, the Vikings pulled as many disordered units out of the line as they could, replacing them with levy and also hooked around both Anglo-Saxon flanks, who replied with archer fire, but they did not have any effect and one of the archer units went 'out of arrows'. That unit was removed and transferred to the out of arrows box'.
Turn 3 - The General Fyrd get released on this turn. They started to move out towards the flanks to broaden Harold's line. Both Gyrth and Waltheof lead attacks, contributing towards five Viking units being removed from play.

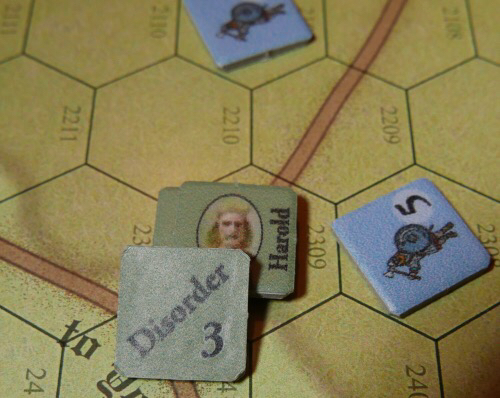
Turn 4 (above photo) - Disordered units attempted to rally around the King's Standard. Gyrth's attacks caused the first Viking routs, but a serious turn of events saw both Anglo-Saxon leaders (Gyrth and Waltheof) die during their attacks. Without them, it was going to be a bit harder for Harold's army to reorganise (rally) disordered units.

The Orri reinforcements were due to arrive on the next turn - what should Harold do? Pull back and organise or press on? They chose to stabilise the front as best they could and target the exposed flanks of some enemy units that were awkwardly situated. All morale classes were now potentially able to rout if they got high die rolls when testing and so routs would become increasingly common. Which side will push the other over the edge first?

Turn 5 - (casualty and out of arrows boxes above) Harold had been holding his back line of four Fyrd units in reserve. He ordered them to move across to his right. The whole front line was quite ragged, so in places his troops couldn't get past some zones of control, units blocking their path or other nuances of movement that hampered an all out assault. So they spent the turn making some local attacks and organising the line.

Orri burst onto the scene (above) with his reinforcements, crossing the ford at Millsike Beck. A levy unit attacked into the exposed flank of a Housecarl unit, removing it from play, adjacent Housecarls had to take a morale test, they failed and both routed. Then two more Housecarls routed on the far left. The Housecarl force was now becoming fragile and increasingly likely to rout. (The morale test is the number of casualties taken so far plus a die roll - if this equal or exceeds the break level of that class then all members of that class adjacent to the eliminated unit will rout).

Turn 6 - Harold decided his right should fall back, keeping Orri at a distance (from turn 7 onwards, the Orri reinforcements will face fatigue rules in which they will not be able to recover from Disorder status), while still attacking on his left, as the Vikings looked ready to collapse on that side of the battlefield. The four routing Housecarls left the map and their loss (combined with all the previous losses) ensured that all future Housecarl morale checks would fail.

As grim as all that looked from the Anglo-Saxon side of the table, all of a sudden, the Viking centre collapsed as five units routed (see above) - Harold was back in the game!
Orri broadened his front to keep pressure on Harold's right, while also trying to negate that gap in the centre. This is was a distraction. Once per game, Orri gets a turn of Berserker Rage benefits when his Hirdmenn attack, giving a +1 on the dice. Really they could have done with just getting on with attacking down the flank and using that attack benefit before the fatigue rules start working against them.

Turn 7 - Harold continued to trade space on his right, while attacking on the left - though his left by this time was mostly made up of Fyrd units and they were making hard work of gaining a victory. Orri started to get his forces ready for an assault in the next turn.
Turn 8 - Harold pulled back slowly towards the river crossing (geographical Viking objective), but kept attacking on the left. Tostig was lucky to survive a flank attack by a Fyrd unit, but the unit he was with was disordered, making it difficult to disengage to safety.
The Viking right flank has collapsed. Tostig and his men were virtually alone, disordered and pinned in place with Fyrd units all around him. On the other flank, Orri made a couple of local attacks, frustrated by some Fyrd units getting in the way, which had been thrown forward to block him.
Turn 9 - Harold continued to fall back, making the odd spoiling attack here and there in an effort to see fatigued enemy units become permanently disordered.
Orri already had three units permanently disordered, so he decided to launch his berserker attack this turn, even though the situation would not allow him to maximise that benefit. The attacks got him closer to Harold, but at this late stage, it looked like Harold and the crossing would remain safe.

Turn 10 - The final turn. Two Fyrd units were in flanking positions, they just saw red and attacked, but their enemy was much stronger and they eliminated themselves in the process ....... stupid decision to attack! ..... they would have been better to have just remained in their blocking positions.
The Vikings put in their final attacks and the ring around Harold got ever smaller. Both kings remained alive and the geographical objectives had not been captured, so the victory point tally was purely casualty based.
Before counting up the VP's (I never do this during the game as it tends to influence when a player feels they have done enough and can sit back) I tried to make a judgement on which side I thought had won (this is just habit from designing the game and trying to get the VP schedule right). It seemed that there was something of a stalemate, but that since the Viking leaders Hardrada, Orri and Tostig were all still (surprisingly) in the field with good units, that they did at least have one additional turn of offensive capability, that perhaps they had the slight edge.
Adding up the VP's that view was confirmed with the Anglo-Saxons getting 77 and the Vikings getting 88. One side needs 5 more points that the other to win, so here we had a clear (but close) Viking victory.
I couldn't help myself playing one more turn just to see how things might have gone and it was significant. King Hardrada died and a Hirdmann unit got through to Harold, who was just outside hex 2410 (Viking objective). They attacked and Harold's Housecarls went disordered but Harold survived his leader check. When this was fed into the final VP totals, it closed the gap to the Anglo-Saxons having 90 VPs and Vikings 94. This is less than a 5 point difference, so the outcome would have been a draw.
It was a good tight game. The initial Housecarl attack was quite weak, leaving too many Vikings on the field and potentially able to unite with the soon to arrive Orri reinforcements. Then suddenly the Viking centre collapsed. Harold could not really exploit this and the Vikings slowly recovered as Harold felt obliged to fall back under the pressure from the Vikings pushing against their right flank.
Of course the death of both of Harold's leaders in the same turn was a major blow. The archers played a minor role (usually they can be expected to disorder an enemy unit or two at a critical moment, or even kill a leader) and by the end of play 3 Anglo-Saxon and 2 Viking archers had gone into the 'out of arrows' box.
For those who own the game in its earlier DTP form (under the name Orri's Storm), there have been changes made to the game, which are fairly subtle and maintain a historical basis, but collectively contribute to improving game balance. Likewise the number of options have been slightly increased to the same end. Both Hastings and Stamford Bridge share exactly the same series rules.

Size - This is a relatively compact game, presented in a folio style package. It is a handy size for the space strapped gamer or for taking away on vacation etc. The map is 11" X 17" and there are 140 counters. Casualties happen very quickly so the counter density does drop after the first few turns.
Complexity - The game was designed to sit at the lower end of the complexity scale. Initial complexity could perhaps be described as 4 out of 10, but dropping to 3 after a game has been played, with players just relying on the single sided play aid card. I think both games (particularly Hastings) need playing 2 or 3 times before the player passes judgment, as there can be a learning process in how to get the best out of the armies.
Time - around 90 minutes is a fair estimate for typical play.
Solitaire - Like many wargames, this is a 2 player game that also plays well solitaire. There isn't anything in the game that undermines solitaire play. The untried units rule is a friend to solitaire play.
Finally, I would like to thank Revolution Games for their friendly support and professionalism in getting the two games into print. It has been a pleasure to work with Roger Miller (Developer), Charles Kibler (Artist) and the playtesters - thank you all and also to those who have bought the game, especialy those who already had a DTP version.
RESOURCES;
An AAR and system notes on the Hastings game. HERE
Revolution Games HERE
Just played this game (without prior Hastings experience) with miniatures and messed some things up from the very beginning. This first one will make you wince. We didn't understand until the game was nearly over that the units should be facing the vertexes instead of the hexsides. DOH! After the inevitable (who the hell does that!) melt down everybody agreed it was actually a really clever innovation and we ought to play it right next time. Also, we forgot the rule that disrupted units in ZOCs couldn't be rallied. One similarity between your AAR and our first effort (mistake prone though it may be) was that both the Anglo-Saxon leaders who are not Harold died attacking on turn 4. All in all we really liked the game and will do better with Hastings as a result of storming through Stamford Bridge.
ReplyDeleteThanks for supporting both games and for posting. It is always nice to hear that someone had fun with the game.
ReplyDeleteConsidering the two games (Hastings and Stamford) share the same system, the difference in play is significant. It can be a grinding struggle for the Norman to get up that hill ..... Just don't give up, it often comes good towards the end and in that fight, expect both William and Harold (sudden death) to be fighting in the last turn, with both players feeling they need all the help they can get.