
Having just played this unusual scenario on an open table with the Black Powder rules, I am taking an opportunity to translate it across to a hexed table top and replay the game with my own hex based Two Flags - One Nation rules.
Again, we can get our action into a 4’ x 3’ space. The first thing to do was to tweak the scenario to fit the different rules and it was really interesting to see how the emphasis of each set of rules changed the subtleties of the game.
For those who have not followed recent posts, this scenario fell out of a local action that developed on a boardgame covering 2nd Bull Run 1862. It was then translated across to an open table for a figures game, with the brigades being broken down into their constituent regimental parts and played with the Black Powder rules and Glory Hallelujah supplement.
Today, we are hexing the table with 4” Kallistra hexes, but still running the game at a more tactical level than the boardgame and using my own rules rather than the boardgame rules. The scenario details are available in full via a link in the Resource Section at the foot of this post.
 |
| a respectable 12 x 9 grid |
The background to the battle - Brigadier General Karl Schurz (Union divisional commander) ordered Schimmelfenning and Krzyzanowski to take their brigades across Ball’s Ford and attack Gregg’s Brigade to draw pressure away from exhausted Union regiments that had already crossed Bull Run higher upstream.
The major differences in this translation compared to Black Powder are;
The boardgame has turns that represent 3 hours each. Two Flags - One Nation has a game clock that marks time, so we can set the scenario game clock to run for 3 hours.
Light woods do not provide cover to fire, but do give cover against a charge attack. The light woods block line of sight. These things come together to change the nature of light woods compared to the Black Powder game. My own rules do not limit the types of units that can move through difficult terrain, it just slows them all down. This would mean that artillery could move through the light woods. That would make a big difference to play, but I am not really happy about the thought of that and may have to put something in the rules to deal with it. In the meantime, the boardgame did not allow artillery in wood hexes, so I will deal with this in the same way as the Black Powder game and have artillery restricted to roads.
I have smoothbore musket at only being able to fire at a range of 1 hex (i.e. adjacent) and rifled muskets 2 hexes. With Bull Run only being crossable at the ford, this means that the smoothbore musket armed units can’t reach units on the other side of Bull Run, because they will be at two hexes away. This caused me to stop in my tracks, was this a problem with my system? Up until now, I had not come up against this as all the water features I had played had been crossable, so the smoothbore armed infantry could still always get adjacent to their target to fire.
I did a search to find the width of Bull Run, but that didn’t help, but I came across some photographs of the nearby Stone Bridge. Accepting that this was probably built at the narrowest point of the waterway, it is helpful to gauge the distance between the two banks. It left me sitting on the fence as the distance looked like it would still be within smoothbore range .... just, but probably not accurate.
Anyway, I decided to go with the rule as written because the range was extreme and the banks had scrub cover. In the game this would at least differentiate between differently armed units and give a clear tactical advantage to rifle muskets, something that did not really happen with the Black Powder rules for this scenario.
The effect on play was immediately different to the Black Powder game, with the Confederates getting 3 out of their 5 regiments rolling on the Arming Table as being smoothbore armed, it was pointless lining the banks of Bull Run with them, so instead, the artillery took the end of the ford (on the road) like last time, but only two regiments (rifled muskets) could line the bank and still fire, so the other three (smoothbores) formed up behind the ford position. This concentration around the ford instead of defending a linear position, encouraged the Union to also bunch up on either side of the road, so the frontage of the armies was pretty much limited to the ford itself and the hexes immediately either side.
The next hurdle was how to represent Schimmelfenning‘s Brigade. My own rules are less subtle than Black Powder in this regard and the best way to handle it was to make the brigade Raw. Whilst raw sounds an unhelpful and probably inaccurate description in relation to this brigade, the impact was that those units would simply find it a tad harder to pass their Capability Tests and hopefully throughout play, this would differentiate them appropriately from Krzyzanowski‘s men.
Liking the ‘Uppity’ rule from Glory Hallelujah which makes inexperienced troops less cautious about charging into good order enemy formations, I decided that when the regiments of both Union brigades wanted to charge, they would get a +1 to their Capability Test, making them less likely to put in a ‘half hearted charge’. This was balanced by allowing the target unit a bonus on their Capability Test for their defensive fire against the charge.
The Victory Point schedule has been changed from the Black Powder game to the following;
The battle starts at 1100 hours and lasts for three hours (will end as soon as 1400 hours passes). Then victory is assessed.
Victory Points are only scored at the end of play. Each side gets 1 Victory Point for each HIT that they inflict of the enemy, plus 2 points if an enemy leader dies. If the Union have one or more infantry regiments actually across the ford at the end of play, then each hit on the Confederate force will count as 2 VP’s rather than 1.
The player with the greater number of victory points is the winner. The Confederates win if the result is a draw.
With all that said ...... let’s get on with the AAR.
 |
| The starting positions. The Union need to advance to Bull Run. |
1100 hours
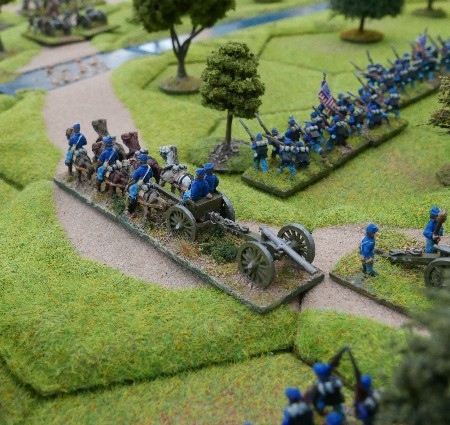
Union forces moved up to the ford and the positions to either side of the road. Roemer’s artillery took up position at the end of ford, but suffered casualties from the waiting Confederate artillery opposite, whilst unlimbering.
 |
| The Confederates are awaitin'. Artillery covers the ford |
1114 hours
Roemer’s artillery continued to take enemy artillery fire and were forced through losses to limber up and pull back disordered. They had absorbed four hits.
1129 hours
Hampton’s artillery moved up along the road to replace Roemer’s positions at the edge of the ford.
1148 hours
The Union left under Schimmelfenning, was beaten back in disorder from rifled musket fire, but had only suffered relatively light casualties. On the right, Krzyzanowski’s Brigade became involved in a lively exchange between the opposing banks of Bull Run that saw both sides pulling back and then re-engaging. Hampton’s artillery, like Roemer, took heavy losses from McIntosh’s artillery. 58th New York (on the Union right) were again forced to fall back from the bank. Overall the Confederate defences were strong and holding well.
1213 hours
In desperation and with acts of personal bravery, Hampton’s artillery intensified their fire against McIntosh’s artillery, the impact was devastating, McIntosh’s position was torn apart, his people limbered up the remaining two guns and retreated rapidly down the road, crashing through two Confederate regiments along the way, who surprisingly remained in good order. The ford lay open, but none of the Union troops were in a position to exploit it. Both Union brigades were ordered to get up onto the road to prepare for pushing across the ford. Confederate efforts to stop McIntosh retreating from the table failed (they had 6 hits when testing in the retreat phase).
 |
| The artillery engagement intensifies |
1227 hours
54th New York, just to the right of the ford, continued to fire, forcing 14th South Carolina to pull back, while the other Union regiments began to form up on and near the road. Hampton’s artillery limbered up and pulled back to make room for the Union infantry assault to cross the ford. Unfortunately for the Union, it was Schimmelfenning‘s weaker brigade that got into position first, but they had taken fewer casualties than Krzyzanowski and were ready to go! Would they withstand the rebel wall of fire as they crossed the ford?
 |
| The Union prepare their first assault |
As fresh Confederate regiments rotated into the forward positions along Bull Run, two out of three of them were smoothbore armed and so only had the range to fire on units that actually entered the ford and not those on the far bank. So far the Confederates had suffered 9 hits to the Union 15, though most of these were largely on the artillery, who had since moved out of the front line.
1244 hours
1st South Carolina with Gregg at their side stood, defending the far side of the ford. 61st Ohio, supported by 74th Pennsylvania charged across the ford and passed their Capability Test, meaning they charged effectively rather than making a ‘half-hearted’ attack. 1st South Carolina took a Capability Test, which if passed, would have allow them to get off a volley at the attackers .... but despite being with the usually effective Gregg, they failed, 61st Ohio were lucky!
Charging infantry units against other infantry will get 5 dice, plus in this instance a +1 for being supported by the 74th to their rear. They inflicted 2 hits and suffered 1 hit themselves, Both sides then took a Capability Test to see how the result affected them. The Confederates passed and stood firm, but 61st Ohio failed by 2, so they had to take an additional hit, retire 1 hex and go disordered for 30 minutes (until 1316 hours). They retreated through 74th Pennsylvania, who being with Schimmelfenning, remain formed. However additional musket fire then hit the 74th, who eventually retired in disorder and in their haste, they got mixed up again with 61st Ohio, causing their disorder status to extend by a further 10 minutes (to 1326 hours) - it was all a bit of mess really.
Grateful of this breathing space, 1st South Carolina pulled back out of the line (had 3 hits) and was replaced at the ford with the fresh 13th South Carolina. It is worth considering that had the seasoned troops of Krzyzanowski attacked first instead, on the same dice rolls, they would have only failed their Capability test by 1, allowing them to stay in contact at the ford, rather than retreating. They would have suffered disorder and an extra casualty, but who knows what that would have opened up.
Charging infantry cannot charge again without a 20 minute rest, so it made better sense for the Union to spend that time wisely and bring up the other brigade (Krzyzanowski) instead. Casualties were now Confederates 12 hits and Union 17 hits. The Confederates were clearly getting the better of it, though their regiments were tiring.
1302 hours
Gregg, who had hung around the ford for too long was mortally wounded by a marksman (Random event). This caused each Confederate regiment to be treated as being disordered until a replacement leader took charge.
Krzyzanowski prepared for the next assault. 54th New York took the lead position at the ford, with 75th Pennsylvania supporting from behind even though they had already taken 3 hits, however, the pressure was on for the Union to break through. Major General McGrady took command of the Confederate brigade and joined 13th South Carolina at the ford - so no lessons learned there then!
1322 hours
This was the last chance that the Union had to crack this position with the forces that they had to hand. 54th New York, with Krzyzanowski on hand, charged across the ford, but they managed to roll a ‘half-hearted’ attack, losing 3 of their attack dice. Even so, the Confederates got the worst of the attack, but both sides bitterly continued the close up fighting, with neither side giving way.
 |
| The second assault, the support are already on three hits. |
1336 hours
The bravery of the Confederate leaders translates into more grief as McGrady is shot dead in the saddle. Again the Confederate brigade became disordered. This was a critically important moment as the deciding point of the battle had been reached.
The Union pressed their charge with increased enthusiasm, but a devastating volley from 13th South Carolina savaged the Union ranks. The 54th broke off and retreated in disorder, running through 75th Pennsylvania and disordering them also. That pretty much looked the end of things. Colonel Barnes took charge of the Confederate brigade and his orders were simply to hold fast.
1352 hours
The Union brigades were ordered to disengage and to pull back into the cover of the woodland. The game would have naturally ended in another 8 minutes (1400 hours) anyway and it seemed appropriate that out three hour action matched the 3 hour game turn from the boardgame.
Conclusions. Well it didn’t need a victory point count to understand that the Union had been ‘whooped’. Final casualties were the Union suffering 23 hits and Confederate 14 hits, plus two leaders lost, but without the Union getting over the ford, the VP escalator of Confederate hits counting double doesn’t need to be taken into consideration.
No doubt the Union will await for reinforcements and try again later in the afternoon, though if the boardgame play is any indicator, by that time, the Confederates will have abandoned Ball’s Ford.
This was a significantly different game than the previous Black Powder affair. Mainly because the limiting range of the smoothbore musket meant that the action had to be concentrated at the ford itself, rather than spreading along the banks of Bull Run. I really didn’t need the width of the table, though the depth remained a necessity.
The differences in unit quality between the brigades of Schimmelfenning and Krzyzanowski brought interest and the flow of play that had one brigade get a bloody nose at the ford, then being replaced with the other brigade to continue the momentum of assault, had a good narrative to it.
I continue to wonder about the number of Capability Tests taken in the game, but when I have tried to reduce them, the play becomes much blander. One thing I didn’t like was that when the melee continued into the next turn (not that common really), the defender got another volley off, as this gave a feel that the charge was re-happening from scratch rather than simply continuing.
I might instead do something with the die rolls for a continuing melee, so that a result of 2 will also hurt the attackers, this will reflect that the initial impetus of the charge has been lost and that hits will be potentially equalised, with the post close combat Capability Test being the main mechanic to determine outcome, which is largely based on unit quality and casualties and therefore is an appropriate measure or I might simply cut down on the number of steps in the charge / melee process, so that the outcome is determined on a single step process that is built around Unit Capability.
For those who have previously downloaded the rulebook, I did find one mistake. On the quick reference play charts, given on page 33, the opening paragraph dealing with Capability Tests should say EQUAL to or higher, to accord with the rulebook on page 15.
Overall, I got an enjoyable game out of the system. The situation looks a tough nut for the Union player to crack with one seasoned and one raw brigade possibly over-tasked, whether the result was fair, I’m not sure, but in any case, it felt like a hard fight, in which anticipation when rolling the dice seemed to matter frequently and that brings the sort of emotional connection to a game that I feel is important. The rules could still stand some tweaking and I will start to give more thought to this and perhaps do a re-fight of this scenario to bench mark the changes.
Resource Section.
The scenario is available as a download document (thank you DropBox) LINK.
The previous Black Powder based post LINK
The initial scenario design post LINK
It has been a long time since I last visited Bull Run/Manassas, but Bull Run isn't all that wide. It is deep in places, hence the bridge. Both sides of the stream are certainly within smoothbore musket range.
ReplyDeleteThanks, gives me more to think about. The hex is 100mm wide, the unit is 80mm wide, but the unit frontage does not really matter as it is one unit per hex, so it is better to think of the unit filling that. Though if a regiments front is I have been calculating accuracy ranges on a rule of thumb that smoothbore range is similar to regimental frontage (i.e. 1 hex in my case) and of course rifled musket has to go further, so they get 2 hexes.
ReplyDeleteIf a regiment has a frontage of around 200 yards and one regiment fits one hex, then we are given the ugly fact that the hex is representing something similar from side to side and front to back and against that background, a smoothbore should be limited to a range of 1 hex.
My problem here is that Bull Run is an 'in hex' feature, so just the run exists in the hex and units can't enter it. So either I am under-estimating the range of smoothbore or need to blur scale restrictions or Bull Run shouldn't fill the hex and I should allow troops to enter the same hex, but show them as being on one bank or the other. Headache time! :-)
Good to see TF-ON back on your gaming table. I agree with vtsaogames regarding Bull Run. It is not that wide and certainly within SB musketry range. The visual realization on the game table is distorted by the width of the river hex. Since the creek is an in-hex feature like other in-hex features (walls, fences, etc.), why not allow one unit to occupy the bank of such a hex? In my games of TF-ON, units were allowed to gain benefit from defending in a hex with a wall or fence. In the case of a creek, the unit could be specified as holding one side or the other. That eliminates the concern about fighting over such features and allows the banks to be defended. Interesting stuff, Norm!
ReplyDeleteThanks Jonathan, good clear thinking. Then I need to think of the Run as being a non-crossable obstacle, but narrow and enough to allow smoothbore ranging and certainly not wide enough to 'fill' a hex at our scale. So occupation of the hex in terms of holding a bank makes total sense and together with the rule of 1 unit per hex (i.e. only one bank is held) accords completely with the game mechanics as given.
DeleteI like all of that as an immediate solution and need to consider whether to bring the ford itself into the same rule regime, there is no reason why not.
I will need to rid my mind of the question I now have as to whether there is justification to allow both banks to be occupied and treat the impassable obstacle as a one hex range feature and how this would impact on other terrain types. That could needlessly complicate the simple solution or it may take me in other directions, but I would like to think about it before discounting it.
A very interesting contrast with the Black Powder version of the scenario. I think that it shows the power of the rules we use to really shape the games we do and how they play out. Which of the games did you prefer?
ReplyDeleteThanks, I know this sort of article runs right up your street of rule comparison :-)
ReplyDeleteGood question, I really want to like the Black Powder rules better and I have spent a ton of time over the past two weeks with the BP rule book and Glory Hallelujah supplement. I really enjoyed that game, but I think I am so at home with hexes, that I have a mindset that just seems to make using them akin to speaking in a mother tongue. I also like some of the mechanics that I have built up, but that is not to say that BP doesn't likewise have interesting and probably more intuitive processes .
I am probably too hung up on hexes to give a proper objective opinion and in truth, that is something I wish I was a little bit more open to.
Another good, interesting post.
ReplyDeleteAs a relatively new convert to gridded games I am still finding their advantages out way the disadvantages but compromises are needed and interpretation important. If it were a map, one would have the option of running a river along the hex lines rather than through the middle but I'm not aware of any commercially made 3d hex system that gives you that choice. (I manage it because I over lay rivers like on a traditional table)
Without having worked out all the ups and downs, on a Hexon system, I would lean towards a unit to assume that a unit is always defending the stream if in the hex and thus always gets a defensive bonus if attacked but not if attacking out. (if the system allows it)
Anyway, one good aspect of the ACW is that there is so much information available including videos of battlefields and or reenactments. Here is a short video of the Run near Ball's Ford. https://youtu.be/UsBRS7pnPLo
Ross, many thanks, what a gem of a video, it answers quite a few questions for me. My boardgame background has rivers on hexsides as second nature and I think most boardgames deal with waterways in this manner, though it is the knowledge of the waterway itself that is needed to properly establish whether they can be attacked across or whether they allow zones of control etc.
ReplyDeleteThere are some good points being raised here that will allow me a more reasoned approach to handling waterways within the hex, with some more fluid thought towards scale management.
A thought; perhaps open woods reduce visibility so that rifled muskets can't exploit their greater range?
ReplyDeleteI have all woodland blocking line of sight beyond the first hex, so any weapon can fire into a woods hex but not beyond it. But for small arms fire, only heavy woods actually gives cover against small arms fire. But since line of sight is block beyond 1 hex, the rifled muskets would not be able to fire beyond that anyway. So the effect is equalised between smoothbore and rifled in this particular situation.
ReplyDeleteLooking at Ross's video, today the woodland looks quite thin and you can see a fair way into it, though I guess the accumulative effect of so much wood between the firer and the target would still provide fairly effective cover against small arms. I would still term what I am looking at in the video as light woodland.
In my rules, the woodland in the scenario was not giving cover against fire (but would against charging units), in the Black Powder rules it did give cover against fire.
After reading the set up and seeing the deployment of the CSA, I thought that was a much better defense than last game. I even skipped ahead to see who won. 😀
ReplyDeleteIt’s funny how game mechanics influence our choices, but even in BP I think that concentrating the smaller force to defend the ford would be a stouter defense.
Anyway, nice post and discussion of game elements. I’m enjoying these posts. 😀
Thanks Stew, I have enjoyed all of this and have been pleased at the amount of discussion / thinking that has fallen out of what essentially is such a simple scenario.
ReplyDeleteMy rules don't allow ganging up of units against one unit .. per phase, so a unit could be fired on by one artillery unit in that phase, then 1 infantry unit in the small arms fire phase and then in a charge phase another regiment could charge it, but say in just the fire phase, two regiments could not fire at the same unit. So to some degree, defenders are helped in defending on a smaller frontage against musket fire - they are of course vulnerable to be being fired on by one unit and THEN later charged by another, which is where over whelming numbers start to work.
Also in this game, there were enough breathing spaces for the Confederates to cycle fresh regiments into the front line, though after 3 hours (the game clock) each of the Confederate regiments had suffered enough hits that we could perhaps kindly call them tired and if the Union had more time or another fresh brigade, they would have likely caused the Confederates to give way. It's all good stuff.
Another enjoyable post and AAR. I've enjoyed reading the thoughts of the others with regards your 'issue' with the river and musket range. Given these thoughts it might be worth re-playing the scenario again.
ReplyDeleteThanks Steve, a replay is on the cards for that reason. The mental space and game time that I have been giving this, is giving me some freedom to tweak other rule sections and hopefully get things a bit more unified / streamlined. I have never quite been able to put my finger on it, but there is some good intention but awkwardness within the rules. I am going to try and lose some of that awkwardness, so this scenario seems a good subject to run for testing.
ReplyDeleteRule tweaks are such a nightmare, because you have to go through everything in one sitting to make sure you have captured everything and not broken something or brought some ambiguity in.
Tonight I have merged the retreat and rout phases into a single phase, which in turn impacts on the rally rules and so it goes on.
If I'm using those wide Hexon river sections I usually let units physically occupy the river banks or you get some odd results.
ReplyDeleteI also made up some river sections from perspex which can go along the hex edges and eliminate the distortion.
Irl it is actually very hard to defend river lines by lining the bank as rivers are winding and often have extensive vegetation along them.
Thanks Martin. Hexon have two river sizes, 1 hex deep and 2 hex deep, but I am coming to the view that with either size, the banks need to open to at least limited occupation. The regulation of the board by hex at least makes rules relatively easy to 'imagine' certainly in terms of mechanics.
ReplyDeleteI know a lot of your games are strategic and rivers on hexsides seems the best way to do that, boardgames don't seem to have found a better way after more than 60 years of replicating rivers and their effects. :-)
Excellent battle report
ReplyDeleteTake care
Andy
Thanks Andy, it has all got me re-interested in my hex / ACW stuff.
ReplyDeleteInteresting post and a nice contrast with the previous black powder game , I like the rebels not being able to line the bank and shoot which they did in the first game and having a contrast between smoothbore and rifled is a worthwhile detail for this period.
ReplyDeleteBest Iain
Thanks Iain, The game took the focus to the ford itself, which is probably no bad thing.
ReplyDeleteProbably the biggest consequence of the changes was that the Confederates could cycle fresh regiments into the front line around the ford. It made their position a tough nut to crack .... but in the background of this action, the Confederate force was slowly getting exhausted, with several units up to 3 hits, it then becomes interesting to see how many resources the Union actually need to crack such a position. In this game, the Confederates were only just holding on ..... but enough that the Union assault fell apart first.
For something that did not seem to hold a lot of promise at the outset, I have got quite a bit out of this.
Strangely I thought I was already following your blog Norm ?🤔 anyway I have rectified that 😀
ReplyDeleteThank you Matt, yours is a top blog, so I am glad that there is stuff here that interests you.
ReplyDelete