

 |
| Starting positions, the French bottom right and the Anglo-Allies mid map and at the crossroads. |
 |
| First clashes |
 |
| End of turn positions, Pierpont (near the dice) is still resisting French intentions |
3pm (Turn 2).
Major General van Merlen (3rd Netherlands Cavalry Brigade), observing from Thyle village, can see enemy cavalry in the far distance, what he doesn’t appreciate is that these are just the lead elements of the Guard Light Cavalry wing and so is taken by surprise a short time later when large numbers the Guard Light Cavalry suddenly appear at the other end of the village and below it.
Guard Lancers and Chasseurs á Cheval move into Thyle, spurring Merlen into an a immediate counter-charge, with 5th Belgian light Dragoons pushing the Guard back out of the village, but the success only briefly gives Merlen’s men some breathing space as other Guard cavalry units are already moving along the village perimeter to envelop his horsemen.
 |
| Merlen’s counter-charge pushes the enemy down the road and out of the village, but already other Guard units are probing his position. |
Aware of that danger, Merlen immediately pulls his cavalry back out of Thyle, down the main road and takes up a position just above the Materne pond, a useful location that also offers the protection of the woods to their left flank.
Merlen’s small cavalry brigade is the only Anglo-Allied force that stands between the guard cavalry and the exposed left flank at Quatre Bras!
The Guard Cavalry follow up and charge Merlen again and for their part, Merlen’s men counter-charge once again, but this time they are badly mauled, though still able to just about hold their ground.
The importance of this little action cannot be under-estimated as Wellington and his aides were just 250 metres to Merlen’s rear when the enemy showed up. The loss of Wellington would no doubt prove to be catastrophic for the Anglo-Allies if it occurred.
Ney sets up his headquarters at Ferme de l’Airalle and directly orders the 72nd and 61st Ligne to attack 2nd Regiment of Orange Nassau and their jäger support. They are protecting the left flank of Gémioncourt. The Netherlanders hold fast, but take heavy losses.
The main French force under Reille moves up to launch a full frontal assault in an effort to rupture the defensive line on the 2nd Netherlands Division, routing 5th, 6th and 7th Dutch Militia and also clearing Pierport, while a particularly poorly supported impromptu attack somehow gets lucky and clears Gémioncourt.
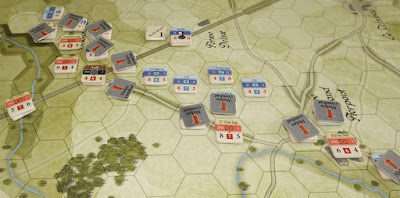 |
| The French make an all-out assault across their front in a single effort to break this defensive position. |
Units of Brunswick’s Corps and Perponcher’s Division have become intermingled and as they try to form up a new defensive line. Reille hits them again, smashing the defenders, causing a stream of 2nd Netherlanders and Brunswickers to rout back towards Quatre Bras.
Fortunately for the Anglo-Allies, Picton’s fresh 5th Division has just arrived at Quatre Bras and is taking up defensive positions, so there is at least a solid second line to fall back to.
[notes - at the start of a turn, each side dice to see how many orders they can change freely. Roll a d6 -3, so changing orders can be quite difficult in this module. During the turn, the army commanders can activate to issue a new order as one of their special abilities, which helps neutralise persistently ‘unlucky dice’, but also distracts from other things that the army commander may wish to do instead.
Range of vision is 6 hexes, artillery has a maximum range of 4 hexes. In the game you can play fog-of-war, with leader counters outside the vision range, flipped to just show the national flag, hiding the identity of the formation. Further confusion is gained from dummy counters - obviously playing solitaire takes that aspect away, but I am still trying to restrain a side from reacting to things they cannot see or fully appreciate, which is why Merlen got caught out at Thyle.
In terms of victory conditions, the loss of Wellington, either killed or captured would instantly end the game and give the French a decisive victory.
The ‘lucky’ attack on Gémioncourt fell out of a miscalculation on my part when allocating attacks, I didn’t notice the farm buildings under the counter and just didn’t give enough attacking strength to this single hex, but the dice were lucky .... or not, depending which side of the table you sit at].
4pm (Turn 3).
With Gémioncourt secure, Ney sends Reille new orders for II Corps to advance at once on Quatre Bras. In this fast moving battle Ney is anxious that momentum should be maintained.
On the lateral road, the French Light Guard Cavalry continue to press Merlen’s cavalry brigade, who are struggling to protect the Anglo-Allied flank.
Wellington moves into Quatre Bras, where his personal presence slows down the stream of routing units, who are then re-directed to fill the gaps around Picton’s defensive line.
 |
| Reille having taken the Gémioncourt position, receives new orders to push towards Quatre Bras. |
In the centre, Reille reaches Ferme de la Bergenie, a collection of farm buildings that stand immediately in front of Quatre Bras, shielding the little hamlet from easy attack. The initial attack on Bergenie causes the defenders very heavy casualties, with elements of 2nd Nassau seen off and Stevenaar losing some of his guns, but despite this, the little artillery unit bravely holds on, denying the farm to the French.
In response, Brunswick pushes his 2nd Light into Bergenie, a much welcome sight to the gunners there. This position is seen as vital to delaying any French advance onto Quatre Bras itself.
Further along the lateral road, Reille’s II Corps take a section of the road, cutting Merlen off from Quatre Bras and directly exposing the left flank of Quatre Bras to what looks to be a determined French effort to envelop the crossroads.
Merlen manages to extract his brigade by making a circuitous route higher up from the road, to re-position his cavalry and screen against any French intentions to make a deeper thrust behind Quatre Bras.
The Anglo-Allied army is now pretty much centred upon Quatre Bras, with Picton providing the essential defence while both the seriously mauled Brunswick and 2nd Netherlanders sort themselves out and extend the frontage of the defence to cover the flank.
 |
| At the end of the turn, there is growing pressure on Wellington’s left flank and also at Bergenie that is shown here with the 3 French stacks adjacent to it. |
There seems to be a renewed confidence amongst the French command, as their envelopment of the hamlet looks to be gathering momentum. Combined with a frontal assault, the Anglo-Allied army might yet collapse.
[notes - When a formation reaches over 50% casualties, measured by the number of units lost (not just flipped), then the force goes Demoralised, suffering penalties in attack and a big +3 penalty to rallying units.
The French have lost relatively few units from the table, but never-the-less, their strength is being slowly sapped as heavy casualties have resulted in a weakening of offensive capability due to the increasing number of units that are being flipped to their weaker sides].
5pm (Turn 4).
Wellington, concerned by the deteriorating situation, sends out aides to get the reinforcing divisions to hurry up. He is greatly relieved to see the reliable Cooke arrive with his well disciplined force that include The Guards. Wellington orders him to go straight off the march and into battle, having him leave the Nevilles road and attack through Bossu Woods towards Gémioncourt. This will have Cooke press into Reille’s left flank and Wellington hopes that this new threat will take the pressure off Quatre Bras.
In truth the first attacks by Cooke are unremarkable. Though surprised by the sudden appearance of the redcoats in the woods, II Corps hold their ground, giving Reille time to redeploy to firm up the flank, though as intended, this does deprive Reille of those extra regiments needed to keep the pressure up at Quatre Bras.
Fearing that the Anglo-Allied army is getting ever stronger and realising that he has a small window to make progress, Reille redoubles his efforts at Bergerie, but the collection of small buildings continue to frustrate him. Without pause, a second attack is launched and this time 2nd Light are ejected and Reille’s light infantry takes Bergerie.
In some respects, the French are making just enough gains to encourage them to engage into what has become a full scale battle. This is not the ‘pinning’ role that Napoleon had envisaged.
To coincide with the Bergerie attack, Reille launches his cavalry, now located on the ground above Quatre Bras. They have limited success, but in the same area, the French Guard Light Cavalry destroy Merlen’s brigade and Kellerman’s heavy cavalry (III Cavalry Corps) are ordered up from Thyle.
Together, the cavalry units are converging to make a significant cavalry wing that posses a threat to the rear area of Quatre Bras. The pressure on the Anglo-Allied left is growing, but just in the nick of time, late arrivals from Brunswick Corps arrive on the Brussels road, marching towards Quatre Bras and these are deployed immediately to screen the left flank.
Wellington breathes a sigh of relief. His position has looked increasingly vulnerable. 2nd Netherlands have just become demoralised and Brunswick is close to that point, but with his two flanks now covered and with Picton in Quatre Bras, the pressure is now on for the French, who have already suffered many casualties, to use the last of their strength to try and crack the Quatre Bras position.
Wellington hopes above all that the French may break off the offensive, but if they don’t, at least now there is a prospect that they may break themselves upon the Anglo-Allied defences.
[notes - reinforcements get a fixed time of entry, but a random system can also bring them on an hour early or an hour late - Cooke and the additional Brunswickers arrived an hour early and that has made a difference here!
Demoralised formations suffer significant rally penalties plus a movement penalty and an attack penalty. This leaves the remnants of Perponcher and Brunswick relegated to a sort of security status.
The French are currently getting 20 victory points at the end of each turn just for being within 3 hexes of the crossroads. Wellington may become compelled at some point to retake ground to stop that happening, but at the moment, he is just trying to hold on.
In this battle, all Anglo-Allied infantry attacks suffer a small +1 penalty when attacking in melee and all English infantry get the light infantry fire bonus. Both these things add a subtle flavour to reflect that this is an army best used defensively].
6pm (Turn 5).
Ney has decided that the cavalry effort on the right wing must be maximised if Quatre Bras is to be successfully enveloped. The furthest point of the Anglo-Allied flank position is held by Heineman’s Horse Artillery. The French need to get behind this point if they are to turn the line and the newly arrived Kellerman’s Heavy Cavalry Corps (8th and 11th Cuirassiers) is ideally placed to do that.
 |
| French heavy cavalry charge the Brunswick Horse Artillery, which is not without danger! |
There are obvious dangers to charging prepared guns, but the French need to act quickly and so Kellerman gives the order to charge. 8th Cuirassier take heavy casualties on the way in, but the charge is hugely successful, the gunners are swept away.
In their exhilaration, control of the horse is lost and they press on to charge nearby units. Brunswick's 1st and 3rd Light, who are understandably taken by surprise, fail to react and suffer very badly.
Wellington observes the collapse of this wing with a sinking heart, only to be instantly cheered by the sight of Altern’s 3rd Division arriving in the opposite direction along the Nevilles Road. He immediately sends orders for Alten to restore the left wing by moving his division towards Ferme de la hautcense.
Ney is not slow in following up Kellerman’s success. He orders the Guard Light Cavalry forward and takes direct control of Reille’s Corps cavalry - throwing them also into the fray. The entire French cavalry wing is now in action. The Guard Cavalry run down the poor hard hit 1st and 3rd Brunswickers and Orange Nassau take heavy casualties, but manage to stand their ground. In a stroke, the entire Anglo-Allied left has been destroyed. Alten is about to become the most important division on the field.
 |
| The French cavalry wing continue to press the fragile Anglo-Allies, to get behind Quatre Bras. |
Cooke’s Guard continue to push through Bossu Wood. Their marksmanship seems to give more consternation to the enemy than their attempt to use cold steel and while French are mostly holding their ground, the continual drip of French casualties is starting to become noticeable.
And now, a moment of potential decisive action! Kellerman spots Wellington’s headquarters alongside the 7th Belgian Line and also sees Altens columns arriving in the distance. With no time to lose, Kellerman makes the snap decision to charge Wellington’s position. 7th Belgian, who are with Wellington, get enough notice to successfully go into square, with Wellington safely in the middle, no doubt capable of inspiring a resolute stand!
 |
| Is this Wellington's 'Last Stand' as Kellerman's heavy cavalry charge home. |
Desperate, inspired, ill-advised, fool-hardy or brave? take your pick, but Kellerman's bold manoeuvre suffers horrendous casualties as the square holds, losing the already worn 8th Cuirassiers and 11th taking heavy casualties. The cavalry has hung around too long and is caught by Altern’s advance, effectively destroying the cavalry brigade.
Ney, disappointed at the delay in the centre, which he feels should have been supporting the cavalry efforts, berates Reille for not having brought up the guns and is told in no uncertain terms to get the guns into place around Bergerie. He then orders more cavalry attacks on the remnants of the Brunswickers, but they too successfully get into square and the cavalry once more suffer heavy casualties.
Ney’s handling of the cavalry as a blunt instrument of opportunity has not paid off - certainly now that Alten is present to restore the Anglo-Allied left wing, while the cost to the French cavalry has been heavy and they are somewhat spent.
At last the French guns are in place, but their bombardment is pretty lack lustre and this just seems to coincide with a realisation by Ney that the Anglo-Allied army is too strong for his increasingly weakened forces to destroy or even eject from Quatre Bras.
He has allowed himself to become too pre-occupied with the capture of the crossroads, risking his army in the process, which now has few fresh reinforcing regiments.
Brunswick’s Corps and Perponcher’s Division are both demoralised, but Wellington has enough fresh units on hand to ensure that Quatre Bras will not fall and more to the point, enough to go over onto a limited offensive.
At Ney’s headquarters, there is full agreement that the French should break contact, protect their line of communication (Brussels to Charleroi Road) and prevent the Anglo-Allies using the lateral road (Neville to Namur Road) to link up with the Prussians on the Ligny Battlefield.
The necessary orders are drawn up and a flurry of activity follows.
[notes - The French are awarded one order at the start of this turn, this is the first time a free order has been generated in the game so far.
The Heavy Cavalry subsequent attack on the Brunswickers was a forced action caused by a loss of control test and it would very likely have hurt the cavalry - but they rolled snakes eyes and got a fantastic result instead. In this system, you can never be sure of anything.
The game has a few cards, it is not card drive, but they do add narrative. If you play a card, you get the effect, but you must then hand the card over to the other player, who will be able to use it at an appropriate time. Sometimes it is better not to play a good card, simply to stop the other player getting it. Anyway, in this turn, once the French got their artillery in position, they played the bombardment card, which allows all of their guns to fire ..... if only the dice had known how important this was :-)]
7pm (Turn 6).
Ney orders his Guard Light Cavalry to pull back slowly towards Thyle, denying the lateral road to the enemy. Two accompanying horse artillery batteries will help cover the withdrawal.
Reille is given instructions to pull II Corps back slowly in the direction of Gémioncourt. This will cover the important line of communication back towards Frasnes.
The tricky nature of disengagement has to be carefully managed. French Guard Lancers take heavy casualties escaping from Alten and II Corps lose the cover of Bossu Woods as they fall back in front of Cooke’s 1st Division.
The first French unit to rout does so from being exposed to the withering fire of Cooke’s Guards, but their fire discipline is better than their attempt to charge into contact, which despite a divisional effort has 1st Foot Guards being the only unit to take ground.
 |
| Mixed results for the Guards as they work to eject the worn French from the woods |
To prevent the French anchoring their line on Bergerie, Picton goes over onto the attack and tries to take the farm, but is seriously rebuffed, with some of his units routing. A second attack is put in with 95th Rifles leading the way.
 |
| Bergerie has proven a tough position to take for both sides. |
The French hold, but suffer unsustainable casualties and runners are sent to ask the Divisional Commander for reinforcements or permission to withdraw.
It is now clear to the Anglo-Allies that the French are intent on disengaging and Wellington prepares new orders that will see his troops go fully over to the offensive.
[notes - Some good luck for the French, just when they needed it most, at the start of this turn they received 3 free orders, more than enough to re-direct their formations and allow them to disengage in an orderly way, while also leaving Ney free to use his activations for non-order related tasks.
The +1 penalty to Anglo-Allied units attacking in melee seems a small matter, but it all goes into the mixing pot that dulled Wellington’s attacks this turn.
The woods give a +1 bonus in defence, which is useful to the French in negating the bonus that all English units get when firing, as they get the light infantry fire bonus. Without the cover of the woods, this fire bonus can bite, as successful infantry fire can inflict a step loss and with plenty of the French unit already flipped, this means removal from play.]
8pm (Turn 7).
Wellington gives the following Orders;
Alten - Advance to Thyle
Picton - Go over to the offensive and join Cooke’s thrust towards Gémioncourt.
The remaining elements of the demoralised Brunswick and Perponcher will hold Quatre Bras.
Reilles order are changed to support the Guard Cavalry in denying the lateral road to the Anglo-Allies by moving towards Thyle.
Reille abandons Bergerie as losses there are unsustainable and in any case his line of defence is generally moving further back, but as hard pressed as the French look, they still have plenty of edge as Picton discovers to his cost when Lüneburg and Verden Landwehr, 1st battalion 28th Foot and 79th Highlanders rout and 95th Rifles take heavy casualties after assaulting French guns. The Guard Horse Artillery at the lateral road fire canister at some of Altern’s men who also rout.
The French positions have become interspersed with their artillery and they are proving formidable in the defence. As one of Altern’s captains said “they are a fearsome thing to come up against”.
Even Cooke’s men are having a hard time. The French units are pretty ragged and susceptible to the excellent marksmanship of the Guards, but when it comes to cold steel, Cookes men are suffering just as badly, with 2nd Battalion 1st Foot Guards lost and 3rd Battalion 1st Foot Guards now routing.
Wellington again becomes involved in stemming the tide of routing units. Almost too late, he realises that Altern alone cannot deal with the lateral road and he redirects Picton to leave Cooke to deal with Gémioncourt and instead push towards Thyle.
Picton opens the engagement with Braun’s artillery, firing directly up the road ahead, causing heavy casualties to 72nd Ligne and 1/6 artillery and forcing them to retreat. His full division are launched at the French with devastating results, destroying a regiment, its artillery support and routing a further artillery battery.
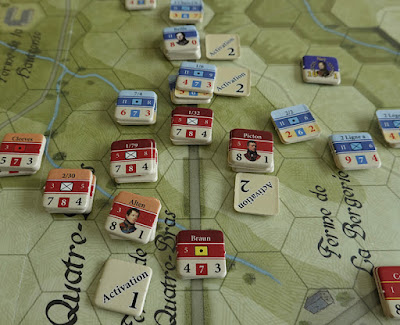 |
| Picton switches his attack to the Thyle Road |
On seeing this, a re-invigorated Alten moves above the lateral road and attacks the French further along the road, in what looks likely to be another devastating blow. The French cavalry and Horse Artillery are preparing to use their mobility to retreat before contact, but Brigadier General Baron Hubert insists that the guns stand and deliver canister - which they obediently do and not only halt Halkett’s Brigade, but drive it back with heavy casualties.
Both sides are becoming exhausted and as the fighting winds down, The Prince of Orange personally takes charge of one final attack, encouraging Picton’s men to press on against the lead French elements on the road. The attack is a complete success, forcing the French columns to retreat off the road.
This is the final turn in the game, I have included conclusions and victory point count below.
 |
| End of game positions - note that French stack that have been forced off the road |
[notes - Both sides were very lucky with their order rolls. The Anglo-Allies got 3 and the French got 2. This gave both sides the flexibility they needed this turn.
Hubert’s insistence that the Horse artillery should fire, was my own dilemma whether to retreat or stand. I decided to stand and rolled cats eyes! The result was that a stack of 4 units were all reduced (flipped) and retreated, that was a big shock for the Anglo-Allies.
The final attack by Orange really mattered since the number of French combat points on the road at the end of the game influences the victory conditions. His attack forced 6 points of infantry and 8 points of artillery off the road and this ultimately stopped the French claiming an additional 70 Victory Points because it didn’t leave them with 40 plus strength points on the road at the end of play.]
Conclusions.
That was a really good gaming experience that kept going right through to the end. When you line up for an attack, you might be roughly able to gauge or even hope for a certain outcome, but nothing is ever certain - Hubert’s final act of resistance with his horse artillery is an exaggerated example of that, but Cooke’s Division blooding themselves on every assault and Picton’s initial assault disastrously failing are all good examples of the built in uncertainly in the game and had the game played for an extra turn, I may even have been inclined to rein the Anglo-Allies back in, lest they harmed themselves too much on the French guns - though as the victory point comment below shows, a little more push, might have brought the French army down!
In some ways, this uncertainty is helping the gamer stay in the seat of high command, while also managing what is going on at the hex level, without becoming a micro manager. Certainly this linked with the order system and the initiative system is bringing that effect.
Though the French were not seeing many counters removed, their units were suffering a steady rate of reductions to their flip side. This not only reduces strength, but also the Quality Rating reduces, which matters. Over time as the forces become degraded, there is a sense of armies tiring and in fact as the victory point section below shows, the French due just to casualties suffered, were coming very close to losing decisively.
The charge by Kellerman at Wellington’s position was an interesting moment. Of course as it turned out, it just assured the loss of the Heavy Cavalry arm, but that outcome was by no means certain as the infantry unit has to pass a quality check to be able to go into square.
If it passes it gets a host of benefits, a +2 on the defence and it negates cavalry benefits of attacking infantry in the open and attacks when surrounded .... however, if the test to go into square fails, pretty much the opposite happens and the defenders will suffer a -2 and the open ground will count, so with a Quality Factor of 7, enhanced 9 for Wellington’s leadership value, it was probably a worthwhile gamble for an instant sudden death victory .. though that may well have spoilt the game for our purposes :-)
In fact, twice in the game, we saw Wellington close to threat. The first being when he was up on the lateral road and the Guard Light Cavalry were pressing Merlen’s Brigade.
The order system is quite intriguing. Essentially you give each formation an objective order, so II Corps initially had an order to go to Gémioncourt, which allowed it to go there to capture it and also to operate within that locality, but then to do the next thing, the formation needs a new order and you may not be lucky enough to get any new orders at the start of the next turn, which might then compel the army commander to use a precious activation to put a new order out.
In this game, on the last turn, both sides were lucky to roll well and get enough orders at the start of the turn that they could re-direct their forces as the fluid situation requires, defensively for the French and offensively for the Anglo-Allies. This took the pressure off the commanders, who were then free to do other things in their activation.
I was finding turns taking around one and a half hours to play and this is partly because even though I am familiar with the rules, I still do a bit of system checking just to make sure that I have things right. This is not particularly a problem because one easily remembers were rule sections are, but it does reflect how much nuance is in the game.
This might not come across in a narrative based account, but there are a lot of interesting things going on here like those units that fire have their hex marked with a +3 movement point penalty, so that there is an overlap between time spent firing and time spent moving. Likewise, cavalry have rules that encourage time spent in organising a charge instead of moving their full allowance and units test for activation, so even when a side is taking their turn, it is not guaranteed that the formation you actually need to move in that instant will be the one that gets the go ahead.
For example, when I wanted Kellerman to charge before the moment was lost, I had to rely on the French getting to go first on the new turn and if I got that, then rolling a 9 or less (Kellerman’s initiative factor) was necessary to get Kellerman’s Corps to activate. Had I failed to roll 9 or less, then an activation attempt would need to be made with another French leader, such as Reille, with his initiative of 8. At the end of the activation or failed attempts there is a roll to see if the turn ends early and if it does, then there are still some limited things that formations can do. It is the combination of all this sort of subtlety under the bonnet that is bringing some gaming richness to this series.
Anyway, thanks to everyone who stuck with it this far, it has taken me longer than it should have to get the full battle onto the table, but having played it through, it is a good addition to the series and it will see an early replay.
Here is a brief look at the victory point schedule. It might be interesting for you to decide who won, before reading it, having regard that it was Ney’s job to pin Wellington in place and stop him reaching the `Ligny battlefield to unite with the Prussians.
Victory points.
Victory has two potential legs, a Decisive or a Marginal Victory. The full conditions for a decisive victory came close to being realised twice in the game. Firstly would be the loss of Wellington, that just ends the game in the French favour. Secondly a high casualty rate for either side can generate the decisive win.
This came surprisingly close, as while French actual full eliminations looked quite controlled, these victory conditions also include the units that are flipped on the map and in that regard, the French had very high casualties. The threshold for the French is 20 casualty points and they received 18½, so yes it was that close, the French were in peril and had the Anglo-Allies known this, pushing their own army harder may well have given them the day.
However as is probably typical, we didn’t get a decisive win and so need to default to the Marginal Victory which is built around Victory Points. Only the French side counts points and there are a list of various factors, but these are the ones that influence our score today;
VP’s per turn that the French are within 3 hexes of the crossroads = 80
VP’s once per game (but not the last turn) if at some point French have over 40 strength points on the lateral road = 30
VP’s for named villages / farms controlled at end of play (they lost Bergerie) = 40
VP’s lost for French casualties = minus -95
VP’s gained for inflicting Anglo-Allied casualties = 179
VP’s lost for each French Guard Cavalry flipped and still on the map = minus -30
This gave the French a total of 204 victory points. Anything over 100 VP’s is a marginal victory for the French.
So in todays play, we can claim a marginal French victory, but we must temper that with the fact that due to a high casualty rate, the French came very close to giving the Anglo-Allies a decisive victory and we can be pretty sure that Napoleon is not going to be impressed with the damage that Ney brought to his own army today!
Excellent. Which of the Eagles games would you start with to learn the series? I don’t possess Waterloo but I do have the other 3. I was just preparing Austerlitz tonight so this AAR is quite timely.
ReplyDeleteThanks Martin, I would use a starter scenario because there is quite a lot of nuance to get under the gamers belt and my favourite is Streets of Ligny from the Ligny package, which you could use with the latest rules from QB, though there are very few rule changes, so it doesn't really matter.
DeleteIf doing Austerlitz, I would read the cavalry rules roughly two or three times, though as a new player you will reference the rules often, but if you broadly know the rule, the referencing just to remind you of exact detail becomes an easy thing. For example, I know the principle of the cavalry fatigue rule - it is an easy rule, but when the moments in the game arise, I just do a quick check.
The rules are written in the same order as the sequence of play, which makes a first outing much easier.
Hope you enjoy your first playing.
Poor d'Erlon. Like Bernadotte was often to do, d'Erlon managed to be nowhere rather than somewhere on this battlefield. Looking forward to the remaining six parts.
ReplyDeleteHi Jonathan, it is such a fascinating and pivotal moment in the 100 days story. The actual daily reports won't go into a ton of detail and will largely stay narrative based, so hopefully will be something that the reader can stay with without an onerous investment in time. The final account will include conclusions and a victory point section.
ReplyDeleteA great start Norm and look forward to reading daily updates on the action. Fascinating to see if d'Erlon actually makes it to either battle and, if so, what might the outcome be?
ReplyDeleteThanks Steve, I am playing the strict historical scenario (there are others), so other than a bit of potential randomness in arrival times, only the troops that actually made the battlefield will be present - so unfortunately d'Erlon will have to wait until another day :-)
ReplyDeleteReally interesting read Norm, looking forward to this series. Quatre Bras is a perenially fascinating scenario!
ReplyDeleteThanks, it does seem a common favourite, though I think its smaller size makes it friendlier for gamers to tackle.
DeleteLovely to see Norm.....a battle I know fairly well. And yet again when I see you play these through I am thinking I should get myself a board game, I am wondering now if I could do something on a bigger scale using 2 mm figures ? That is my thought for the day 😀 and it will keep me busy for quite a while !
ReplyDeleteHi Matt, I just like spending other peoples money :-) Years ago, I did a 2mm Quatre Bras on and 18” x 18” board and the thing I really got from it was that I issued orders and then to change orders would take a certain amount of time, so by time the delay for the new order was implemented, often it was already out of date and so sometimes it seemed better to stick with a less valuable order than trying to change it. I.e. once the plan was in motion - go with it!
DeleteExcellent AAR, and I'll be following along as you proceed. I'm currently working up my own version of the Hexasim QB and Ligny maps, which expand the full battlefield by 5 hexrows on both east and west (giving Wimpy slightly more ground to cover!) I notice that on the published Hexasim maps, there's a non-existant 'lake' midway down the west edge of the Bois de Bossu. That's actually two hexes of higher ground that were mistaken by their artist from my prototype.
ReplyDeleteHi Rick, glad you like the replay. Interesting about the lake, since you are the original source, I will include that as my errata, Fortunately it is in a place that is unlikely to matter, but still good to know.
ReplyDeleteI glad you are enjoying the play through. Why one turn per day? Do they take that long to do or is it also because of the added effort to document the moves?
ReplyDeleteI must be the only moron who doesn’t know napoleonic history. Sure, I’ve heard the name Quarte Bras but I couldn’t tell you anything about it. 😀
Means you’re doing a good job with the AAR since I’m mostly following along despite being an alien battle fought with an alien system. I’m obviously not worldly enough.
Hi Stew, glad you are liking the commentary. The turns have been taking me around 1 hour 30 mins to 1 hour 40 mins to do and then there is the write up to post and editing photo's etc, which can take close to the same amount of time.
ReplyDeleteI had resolved this year to go to a shorter style of post and I thought a single AAR post on this would be overwhelming for many readers, while doing it this way makes it less onerous on me and hopefully gives a more interesting and more easily consumed read for the viewer - also, at the end of all this, the whole thing is still preserved in a cohesive form for anyone late to the party.
I think there are gamers who can in the future plough through what will become a long article like this when completed if they are thinking about plonking their money down on the game or have the game and want to break into it, but the average browser, shooting around a load of new stuff to read that day on their feed might not.
I did a similar thing 18 months ago when I followed the Bulge battle on a day by day basis, matching my play date with the historical battle date, that was interesting, to see how the game kept pace with the historic calendar.
I must say though, having started this, I'm not sure the efforts are worth it and I will be unlikely to repeat it. I am remembering that it was with good reason that this year I planned to do less 'work' on the blog.
Oh yeah, I liked the battle of the bulge play through.
DeleteI also agree that there’s a happy length to blog posts. Too long and people just end up skimming or ignoring. And they take a lot of effort to write. I prefer to write and read blog posts that are a *little* on the long side. But I only write one 2-3 times a month (if that), do how often you post can also be a factor.
And of course, the main thing is if the writer is enjoying the process. Otherwise there would be no blogs. 😀
Now to read the next turn.
Interesting and entertaining as ever! I'd better catch up on what's happened today!
ReplyDeleteBest Iain
Thanks Iain, I am really getting drawn into this.
ReplyDeleteThat was epic and I just read it! Well done sticking at it I'm sure it was loads of work, very entertaining and interesting, a marginal French victory seems a bit much its more like a winning draw!
DeleteBest Iain
Thanks Iain, it may have become a bit much as a single post, but thanks for sticking with it.
DeleteVery much enjoying watching you play this one out. It can be a real nail-biter.
ReplyDeleteAnother suggestion for your errata: Reille's cavalry should set up with the 5th div., which is where it was deployed historically, rather than at the rear of the corps with the artillery. Doesn't seem to change the outcome very often, but it can make the first turn even scarier for the allied player, who now must take real care in deciding when to bring Wellington on the board.
Keep writing, Norm, you have a flair for it!
Richard
Richard, thanks for the thumbs up. Very interesting on the cavalry set-up and as well as good history, seems important that it will help to better ensure that the French have a 'good' turn one, which I feel they need if they are to meet the rigours of this scenario.
ReplyDeleteYet another eventful turn with lots of action and a highly plausible narrative coming out of it. I'm now a fair way along in turn 3 [4p.m.] The French ahd established a fairly solid force of IInd Corps lined up below Ferme de la Bergerie, but the Allies opposite are of similar strength. The latter are standing on the densive and letting the French come on to them. Currently three stacks of French and one Allied stack have routed, but the Allied left flank has taken a couple of hits and looks weak, but the French are not ina greta position there to exploit it. The first end of turn dice roll failure has occurred so if I roll 9+ the Turn will end [and I've been rolling 9 several times for end of Turn at the stage when it had to be 11+].
ReplyDeleteHi Mike, I thought this turn of mine was quite eventful and brought out nicely a few areas of the rules, particularly individual units being charged attempting to go into Defence Orders (Square).
ReplyDeleteI know you said that you had had an early end of turn result on the first turn, bad for the French it seems, but luckily in that regard they only have a couple of commanders at first and then three when Kellerman gets on, so they should all stand a good chance of getting a proper activation ... last famous words :-) The clock ticks for more and more Anglo-Allied reinforcements to arrive! I will give you a ring later.
Great write-up.
ReplyDeleteI love this system. I'll be interested in your comparison to other Napoleonic series.
I didn't fully appreciate what a tough nut the Allied position actually was until I tried this.
Hi, thanks for visiting, it is such a while since I played anything comparable that I would struggle to do a proper comparison. As part of my streamlining of games, most of that stuff has gone as I make the Eagles system my go to game, which I am happy to do as I like it and it is shaping up to be a real series.
ReplyDeleteI do have some Napoleonic 20 games, which I do enjoy at the ligter end of things and also have the Wagram game from Paper Wars by Ty Bomba that I would at least like to get to the table to try.
The restrictive terrain helps the Allies as does their command capability of having both Wellington and Orange in play in such a small space with command ranges of 8 - they can do quite a lot, especially in stopping routs and ordering individual stacks.
this scenario compared to the intro scenario where Ney attacks three hours later is a sobering history lesson.
A fine cliff-hanger ending. Love those moments of decision and the sudden unexpected outcome. Thanks for all the effort that you put in as usual in all your writing, but particularly AAR's which are hugely time-consuming. As you know, inspired by this to get my own copy out and follow the same road - with the French currently in a stronger position and Picton just one loss away from demoralisation. I find it hard to imagine that a game would ever come to a decisive victory for the French, as the 40 pts of Allied loss is a huge proportion of the Allied force to destroy. If any side is going to suffer a decisive defeat then I think it is going to be the French.
ReplyDeleteLike you, this has become the go-to system for my Napoleonic gaming and however far down the line, I hope we see Eylau eventually produced.
Thanks Mike. Considering the small battlefield and the focus on Quatre Bras, there seems to be a good variety in outcomes and the ‘story’ of the individual formation comes through - a very replayable game, which as we have already discussed will be one of the first we will get onto the table once face-to-face gaming becomes a thing again!
ReplyDeleteyes roll on Eylau - a very good series.
Impressive recreation of a most famous battle. I love the scene from Waterloo when Ney is chastised by Rod Steiger for letting Wellington get away. :)
ReplyDeleteThanks Dean, For a generation, Rod Steiger will always be more like Napoleon than Napoleon :-)
ReplyDeleteWell what a dramatic and entertaining read this was Norm, thank you for taking the time to do this. I`ve been following along each day with bated breath :) I`m a relative newcomer to the Eagles system, but not long ago volunteered to playtest Fallen Eagles 2 for the re-release. I love this system! My only prior experience in the genre was SPI`s Wellington`s Victory, did you ever play that?
ReplyDeleteThanks Mark for the thumbs up, it played quite tightly to the end and I would be happy to dive into it again.
ReplyDeleteNo oddly I didn’t do Wellington’s Victory, it was in the days when I was buying and playing pretty widely and was a big SPI fan, but from memory, it was a bit unwieldy, is that right?
Not everyone will agree, but for me, the Eagles system just seems to strike the right balance between fun / game / feel and depth.
I hope you enjoyed this experience Norm. It seems like a lot of effort. I’m surprised that that the French victory was also so close to a major defeat according to the victory conditions. But that does sound like war.
ReplyDeleteI wonder in your usual style, if a few actions during The game might find their way into a miniature scenario? 😀
Hi Stew, It was a very enjoyable game to play and I will do it again. A mistake I think to invest so much time in blogging it though.
ReplyDeleteI think from the perspective that Ney acting earlier in the day could have got him a better position or the fact that when he did act in this game, he came perilously close to destroying his wing, probably quite fairly, put him close to such a defeat.
I would love to draw some actions down to the tabletop, but I don’t have Napoleonic British forces, however, I am working on an Austrian force and I have exactly those plans for another boardgame. Cheers.
Good Lord Norm, this is quite a body of work. Its a battle that has long fascinated me and I will certainly read my way through it all. Real dedication to write it up in such detail but it does bring the action to life.
ReplyDeleteThanks Lee, it was written up on a daily basis, so was fairly bite sized to read as it was building up, but I’m afraid atthe end of it all, as a single post, it just might have become too much.
ReplyDeleteNorm,
ReplyDeleteJust read through this after you mentioned it in your Christmas message. I really enjoyed it, particularly the way you mixed narrative and mechanics. I find the combination makes both more digestible. Thanks very much!
Tanks Gareth, I have been thinking about post content lately and have decided that for 2021 I will increasingly go for the mixed style of AAR that highlights some of the system processes in action.
ReplyDelete