

The Wars of the Roses collection continues to grow at a slow, but steady pace. Recently a fellow blogger gifted me some interesting pieces, two of which have been recruited to my most recent base.
Having to build both armies, Lancastrian and Yorkist, I have tried to balance production evenly between the two forces so that ‘balanced’ games can be played along the way while the forces grow. Most recently, Sir William Pickleton’s retinue (Yorkist) rolled off the table and before that, a retinue of Northumberland’s archers (able to represent Henry Percy, both 3rd and 4th Earl) were completed.
 |
| Pickleton's Bill and Northumberland bow |
I would now normally flip back to a Lancastrian heavy foot base, but a couple of my gifted items (photo below) jumped the queue and one character demands a Yorkist base.
He is a beautifully painted figure of a foot knight, wearing the ‘The Sun in Splendor’ tabard, the livery of King Edward IV, hence the Yorkist aspect.
The other is a raw metal mounted herald with Buisine (long medieval trumpet) and associated draping banner, which could in fact service either side, but I like him so much, he needs to be painted and based ‘now’ and so he will of course be of Yorkist sentiment.
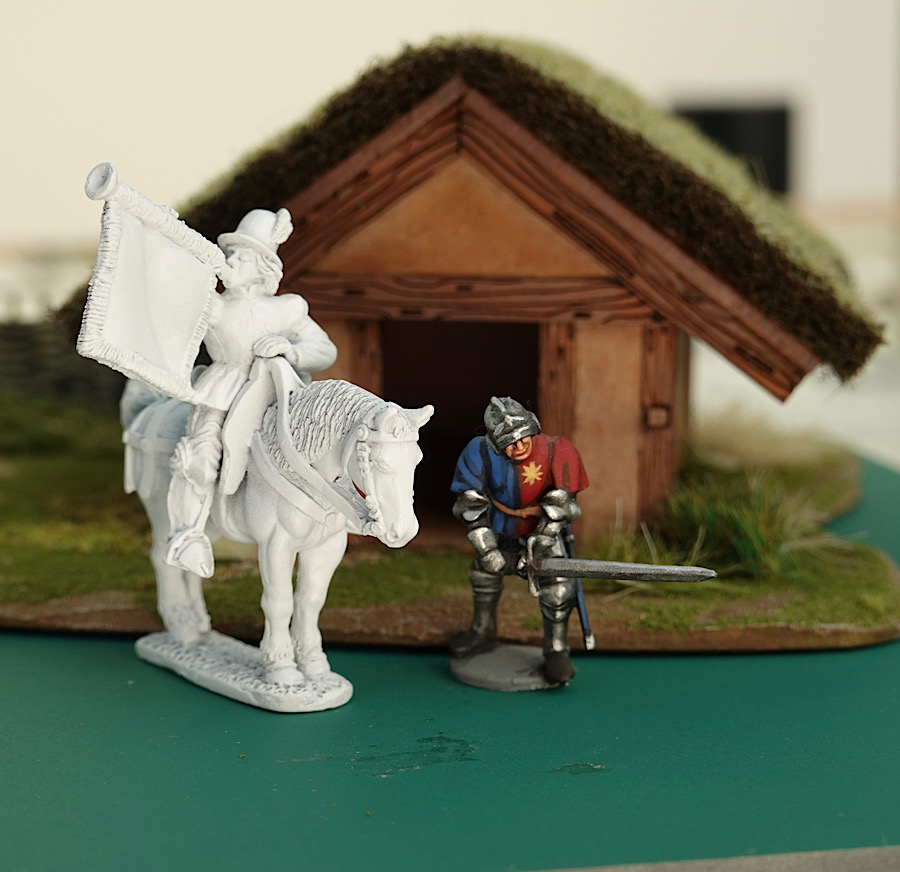
Checking my Perry flag stash, I came across a banner for Lord Cobham, so our gallant painted foot knight will take pride of place in the front rank of the base as Sir Thomas Cobham, 5th Baron Cobham.
I wanted the base to be a bit special, so this is my first foot base that also has a mounted figure amongst the foot and the herald is such a splendid figure, that Lord Cobham insisted on him joining the ranks!
He has been placed centrally due to weight of metal and with everything else being plastic, this keeps the weight distribution across the base better balanced.
Using 80mm bases, means that a horse takes up a fair bit of space, so to keep the foot figure count up, this base has not had the usual casualty die holder frame added to the rear, so that I could squeeze on an extra figure.
To make up for that, a separate casualty base has been made up using (I think) a Perry wounded figure, fixed to one of those casualty dial bases that Warbases do in MDF. An arrow shaft has been added to hint of how this man may have been hurt.

Painting.
The plastics were hand brushed with black Vallejo primer and heavily dry brushed white, to keep them similar to how the rest of the army has been getting prepped, while the metal mounted herald and casualty figure were rattle can primed with white, as I prefer a stronger primer on metal and black primer seems to have disappeared from the shelves of my local retail outlets!
Everything was block painted and then washed with ‘Super Shader’ from Black Hat. I have taken to this wash recently as it tends to easily and naturally slide off the high points and settle in the low recesses, so that the shading is gentle and the total figure is not left devastatingly dirtied by the wash. This has worked well on some recent napoleonics which I have been trying to keep bright, especially the whites.

The Cobham base complete
The gentle wash means that a relatively small amount of follow up highlighting is necessary, though I am finding that I am having to go in again with a soft tone wash on the skin as the Super Shader does not leave it as effectively shaded as I would want to make skin highlights show.
I normally varnish in mat, but where metals are concerned, I have found that high points of paint get rubbed off to expose bare metal. I think this is a primer issue rather than a varnish issue, never-the-less to be sure, to be sure, to be sure! I prefer putting a gloss varnish down first, which I read somewhere was tougher (is that a painting myth?), followed by a mat varnish to kill the gloss. Finally some of the armour parts have been given a few highlights with Vallejo satin varnish.

Lord Cobham leading the fight
I am still happy with the 80mm basing for units. It works well both with my table size and the Sword and Spear rules that I am currently using. The units are taking up the same footprint frontage as my 15mm units used to and though one might argue about mass effect, I have already jumped that hurdle.
 |
| Resin Bridge - Warlord Games |
A couple of weeks ago I picked up this resin bridge from Warlord Games. It costs £13.50, which I though a fair price. Anyone interested can find the item at their site by searching on ‘bridge’, they have a few to choose from.
It is a useful piece as it does the job for 28’s but has a relatively small footprint. The arch span is 90mm at ground level, the length is 160mm and the width of the roadway is roughly 60mm, but the walls pinch in at some points to reduce that ever so slightly in places, which is a shame as 60mm basing is a common size.
In the above shot, the ACW infantry are on 50mm bases and fit fine, but the 60mm based cavalry don't!

the bridge has some nice detail
It has taken paints and a wash rather well and is going to be a versatile piece, covering plenty of periods.
Anyway - steady progress is being made and I hear there are rumblings in the Parish of Piggy Longton, something to do with the Bishop of Dungborough recruiting for The King - what could possibly go wrong there!
My sister webspace COMMANDERS is being re-configured to showcase various figure and boardgame systems that I am enjoying and give a flavour of where current ongoing projects are up to. Link.
Splendid stuff Norm figures and painting is really eye catching. Such a lovely period 🤔
ReplyDeleteThanks Matt, it is and there is some freedom in choosing colours for clothing.
ReplyDeleteGood to see the brushes out, Norm. Your results look great. I am really enjoying fielding Perry WotR armies, in plastic!
ReplyDeleteThanks Jonathan, I do so much in plastic that now metal on the base feels really heavy by comparison.
DeleteA stand of plastic figures still feels oddly light to me.
DeleteLooking at some blog responses entire collecting decisions are being made on the merits of such things :-)
DeleteAnother beautiful looking minis sir!
ReplyDeleteReally love your WotR stuff!
Warm regards
Thank you Michal, they are very rewarding figures to own.
DeleteThanks for the explanation of your painting techniques for the WotR figures. The results are quite splendid.
ReplyDeleteThanks Bill, these sculpts are very friendly to the block / wash / highlight process.
ReplyDeleteThey've all come up a treat Norm.
ReplyDeleteThanks OB, nice to start getting to the number of bases that makes getting a game together, a bit easier.
ReplyDeleteNice stuff all round. That little wounded man vignette is a lovely touch of colour for the battlefield.
ReplyDeleteThanks, I have 3 other wounded figs from a set of four, so they will get the casualty dial, which I quite like and don’t look too imposing at this scale.
DeleteFine additions there Norm.
ReplyDeleteThanks David, stage 1 was to get a Neil Thomas sized game going and stage 2 to double that, so I am on my way to stage two and that feels a little more relaxing and the additions more enjoyable.
ReplyDeleteVery nice additions to your WoTR armies.
ReplyDeleteThanks Peter, I am at a point now where it is all starting to add up.
DeleteThose gifted figures are especially lovely Norm, you clearly have some good friends out there!
ReplyDeleteHi JB, yes, the blogging community is certainly a good and friendly place.
ReplyDeleteHi there Norm, splendid post this one featuring beautifully painted and based soldiers :) Enjoyed reading your description of your methods. Yes, I'd agree that gloss varnish is tougher than the matt for some reason. Is that the wash you mention shading the quilted jackets? Works very well that. I used to like the old 'Magic Wash' made from Klear floor polish and black ink as it was/is the only wash I ever found that left the raised areas totally clean, but saying that yours looks fine, I'll have to look that up. Can't find the original 'Klear' polish anywhere now sadly. Great stuff, keep them coming Norm, I love the variety of action poses and the animation in your bases.
ReplyDeleteThanks Lee, yes the wash has given the quilted jacket the shade ….. though I only have black and there is a brown wash in the same range that may do earth colours better. The wash is very thin and slippy and dries with a gloss, so I am guessing there is something similar going on, to what we see with the ‘magic’ type washes that use the polish in their ‘recipes’.
DeleteA fine looking base of figures there Norm, look forward to seeing them in battle. Didn't know Warlord did bridges, that one looks rather handy I will check them out.
ReplyDeleteThanks Phil. It is the small footprint of the bridge that makes it compelling, it would be better if the roadway gave a clear 60mm width along the entire length to maximise its usefulness with armies so based.
ReplyDeleteLovely work, Norm. Your wash looks to be very effective.
ReplyDeleteThanks Aaron, I am becoming increasingly sold on it.
DeleteHi Norm. If you are having problems with paint rubbing, use a special metals primer before the black.
ReplyDeleteHi, there was a time when I used Hammerite Special Metals Primer, which I believe will even deal with lead, which is a particularly slippy metal. It is brown and gets thick as it ages in the pot, but rather like my special brown primer in a rattle can (Rustoleum I think), it doesn’t seem to take black acrylic primer as easily as I would like. I was bothered that it’s thick nature took away some figure detail, but I doubt that it really did. Even with this primer, I got some rub on 15mm napoleonics, but that was through handling during painting before any varnishes were applied.
ReplyDeletePlastics just don’t have the same problem, but when I do metal, they get gloss varnish, followed by mat varnish and then once flocked etc, another bit of mat gets sprayed to lock everything in, so on metal, my current protection is rattle can primer and 3 layers of varnish. I intend to watch these figures closely for the same signs of ‘rub wear’ that I have seen on my 15’s. If I get a fail, I will revert back to the Hammerite, as beyond that I’m not sure what extra I could do.
Good figures very well painted! I had a 'what?' moment though when I looked at the first picture. I'm using my phone and my eyes aren't as sharp as they were but I thought it was a picture of a real person in period costume sitting on some sort of low pedestal on the ground, until I zoomed in anyway. So good enough sculpting and painting to fool me for a moment.
ReplyDeleteVery kind Ross, the figure animation is very good.
DeleteWotR is such a great period. Your armour looks fantastic.
ReplyDeleteThanks John, there seems to be a ton of interest in the WotR right now, both on blogs and on YouTube. I am surprised that the Perry’s didn’t do a ‘Battle in the Box’ starter set, like they did for ACW.
DeleteGreat work there Norm. You can by a metal primer from Halfords that might help, as they normal etch into the metal, creating a better bond than normal paint. Nasty stuff to use though!
ReplyDeleteSplendid looking bill and bow and a lovely herald,clearly you're favouring the Yorkists!
ReplyDeleteBest Iain
Thanks Iain, the Yorkists have had a good go - Duke of Exeter (Lancastrian) will try and shove himself into the queue :-)
DeleteThanks Steve, if I get a ‘fail’ on his, I will look out for that. These days I am trying to avoid solvent type products. I have already moved to ‘No More Nails’ for basing instead of Superglue.
ReplyDeleteI'll have to give the 'No More Nails' route a go as I know when I've been using superglue for basing, even with the fan on and doors open, as my asthma plays up. That's what come with around 30 years exposure to the stuff:(.
DeleteThe no nails stuff needs 1 absorbent surface, which makes bases of MDF or card fine
ReplyDeleteThese are absoultely smashing Norm! I love the way the bridge came out. Very authentic!
ReplyDeleteThanks Mike, I like the bridge, it is not in any way pretentious and just seems like a good old solid workman like scenic - though for me, the small footprint sells it.
ReplyDeleteYou have done some more beautiful work on these WotR figures Norm - the heraldry is particularly impressive looking! The bridge does look like a nice model and as you say, has come out looking the part
ReplyDeleteHi Keith, the very nice stuff is likely not my brushwork :-) yes it is coming together and so I am able to indulge in a few accessories, instead of ‘having’ to pump out units. I have just completed a stand for ‘The Bishop’ and also some pigs, which seems appropriate for Piggy Longton!
ReplyDeleteExcellent brushwork Norm. Love the smart looking herald in the centre of the unit. And the bridge looks pretty cool as well.
ReplyDeleteThanks Ray, it's a period that's hard not to enjoy and sometimes just nice to get the box of toys out and handle them.
ReplyDeleteSUperb figures, and bridge here, cracking job!
ReplyDeleteThanks Phil, they are going onto the table today!
ReplyDeleteSome fabulous looking figures and great tips there, thanks!
ReplyDeleteThanks for dropping by and for the thumbs up, this period has so much to offer.
ReplyDelete