

Brothers at War covers smaller battles from the American Civil War. It is designed by Christopher Moeller and published by Compass Games.
ACW game systems typically pitch themselves at one of two levels, either divisional with units representing regiments or at corps / army, with units representing brigades.
In this game, the units are regiments, but what makes this title a little unusual is that the language and sub-systems used, give this game something of a more tactical nature.
This volume (1862) covers four battles, Antietam (Miller’s Cornfield), South Mountain (Fox’s Gap), Mill Springs (Thunder in Kentucky) and Valverde (Guns on the Rio Grande).
Between them, they offer 13 Scenarios.
I am just starting out with the game and have three playings completed. I will be using the Fox’s Gap scenario to discuss the system and package in general.
Please use the ‘read more’ tab to get the rest of this post.
Physically, what do we get?
The package comes with 4 maps, one for each battlefield, with lovely oversized hexes. There are 5 counter sheets on thick stock, that allow for each battle to have their own dedicated units (except Antietam borrows Garland’s brigade from the Fox’s Gap scenario).
There are plenty of play aides. Each side in each battle has their own army display, showing brigade status in terms of losses, the use of reserves within the formation and the closeness to collapse.
Each player also gets a 2 panel, folded play aid with all of the play charts on, this has been very nicely done. Finally there is a play aid for each battle that runs the Activation Track.
We have a very nicely illustrated 36 page scenario booklet and a 24 page rules booklet of which around 14 pages are holding the core rules.
There is a 52 card deck of what are essentially random events (this does not prevent solo play - see later) and then there are six dice … 3 blue and 3 grey …. of course!
All told, component quality is very good.
Scales - Turns represent 20 minutes, a hex equates to 100 yards, units are regiments and batteries with command at the brigade level.
The designer - Christopher Moeller has a strong internet presence and is very good at friendly communication and support with the customer base. He is currently working on a second volume which is 1861 based, again with 4 battles, with 1st Bull Run as the key feature battle.
Why isn’t this just like any other regimental game?
Terminology, visuals and sub-systems all work together to get the sense of the internal workings of a brigade and even the regiment.
The bigger hexes give a sort of zoomed in look at a smaller part of the battlefield, putting specific parts of the action under scrutiny. We see things such as individual fields and detailed stonewalls, that units can take cover behind, or hop over to advance / engage with the enemy and we are just left with a more intimate involvement with the battlefield.
Units can throw out skirmishers and these feel like a company or so from the parent unit going out to skirmish, because they can also be used to supplement strength when units take losses by absorbing them into the reserve i.e. they feel organic.
Regiment loss is shown on the brigade track as a Brigade casualty - losing regiments leads to the brigade breaking, but as an extra element, the regiment can prevent loss by absorbing potential casualties by ‘spending’ reserves to support the unit under attack.
Now in some ways this same effect could be gained by having multi step units, with a unit represented by 1 - 3 counters depending upon current strength / loss, but it is the language of reserves within the regiment and how they operate on the track, that again takes us to a more tactical feel and a sense that at any one time, we as the player, are invested in an individual unit.
The infantry units can be in one of two stances, formed or unformed, which influences both movement and fire. Unformed is a sort of open order, allowing units to move more freely over obstacles and to have a better chance of reducing casualties when fired upon, while formed infantry (ranked line) delivers better firepower and assault strength.
All of the above come together to make for a believable examination of action in lower scale game.
Activation - This is a key element of the game. Each brigade typically has two command chits that are placed into a draw cup. Also there is an end of turn marker in there. On the activation track, there are ‘draw a card’ and ‘end of turn chit’ symbols located at various points.
As brigade chits are drawn from the cup, they are placed along the activation track. If the next available location on that track has a card or ‘end of turn chit’ symbol, then the players draw a card each or add an ‘end of turn’ chit to the draw cup, as appropriate.
So the more chits that are drawn, the more end of turn markers end up in the cup, increasing the chance of the turn suddenly ending and potentially leaving some brigades not activated or having activated only once - lovely command chaos for very little rule overhead.
If we look at the Fox’s Gap battlefield, there are 3 scenarios. The first is thought of as suitable for an introductory game and is based upon the initial contact between Scammon’s brigade (Union) and Garland’s Brigade (Confederate) during the morning and plays out as turns 1 - 9 (9 AM to 1140 AM). During that time, each side will also gain one brigade sized reinforcement.
The second scenario covers turns 10 - 16 ( 3.40 PM to 5.40 PM) and gives the next phase of the battle, during the afternoon. Reinforced and determined to break through to Turner’s Gap, the Union again attack.
The third scenario combines the two actions into ‘the Battle for Fox’s Gap’.
The system is very nuanced and I think if I tried to explain it all, it would likely be very dry ..... and quite possibly become longer than the rulebook :-) so here is an of AAR of my third playing, which I will use to just highlight a few moments in the game that help describe the system.
Scenario 1. Turns 1-9 covering 9 AM to 11.40 AM
Scammon's fairly strong Union brigade is advancing on Garland's Confederate brigade. Rosser's (Confederate) cavalry is out on the Confederate right.
Plans.
Union - Scammon to engage and destroy Garland wherever possible. Crook (reinforcement) to advance on Wise House, attack and occupy it.
Confederate - Garland to pull back slowly and weaken the enemy with firing and falling back tactics. On the right, the cavalry will prevent the Union from sweeping around that flank. A defensive battle is to be fought, while waiting for reinforcements (G.B. Anderson).

In this 9 turn scenario, Union reinforcements arrive on turn 4, but Confederate reinforcements arrive later, on turn 8 and in my two previous games, Garland has not been able to last that long - breaking each time, before Anderson arrives.
Both sides have off-board artillery. The Union guns are placed in a location from which they cannot see the battlefield, but they can see the enemy off-board artillery position, so their task is one of counter battery fire. The Confederates by contrast can see both the battlefield and the Union off-board guns, so they can target either the battlefield or the Union off-board guns
The Confederate off-board artillery (Lane) can see that Union artillery (Chrome) are limbered and advancing along Old Sharpsburg Road - they fire, disordering the limbered artillery.
Note - In the system, the firer score HITS and the defender may get a chance to roll for SAVES. For infantry, a hit will flip a unit from formed to unformed or an unformed unit will take a disruption.
Once a unit is disrupted, a further hit will destroy the unit, unless the brigade is able to commit some reserves as support and negate that hit. Over time, as a brigade expends its reserves it will reach a point of becoming exhausted …… but, if you don’t support a unit with reserves then it will be destroyed and that is the path to a brigade breaking early, so the brigade has to balance release of reserves against regiment loss.
So going disrupted is potentially a serious state to get in, but units do get good opportunity to rally that disruption status off during play. Once a nearby enemy is disrupted, it is tempting to go after it and see it off before it can recover.
In the draw cup, one ‘end of turn’ marker is always put in at the start of the turn, others can be added as the Activation Track is progressed along and the player is instructed to add a chit to the draw cup. Once the SECOND end of turn chit is drawn the turn ends.
 |
| Click for detail |
On turn one, this is the order of the draw from the cup - End of turn (1st one doesn't do anything), CSA artillery, Garland, Scammon, US artillery, CSA artillery (again) and then the second ‘end of turn’ marker gets drawn and the turn ends.
Note - Neither of Rosser's cavalry activation chits got drawn at all this turn, which as a consolation would allow Rosser to recover one spent reserve point ... though Rosser to date has not spent any reserves!
Counter-battery fire from the off-board US artillery destroys Lane's off board battery. This make the road below much safer now for the Union troops to use.
EDIT - I know I got this wrong, after a conversation with the designer - I allowed 2 scores of 6 to count, when at extreme range, a max of 1 hit is allowed to take effect! Lanes should have stayed in the game at this point.

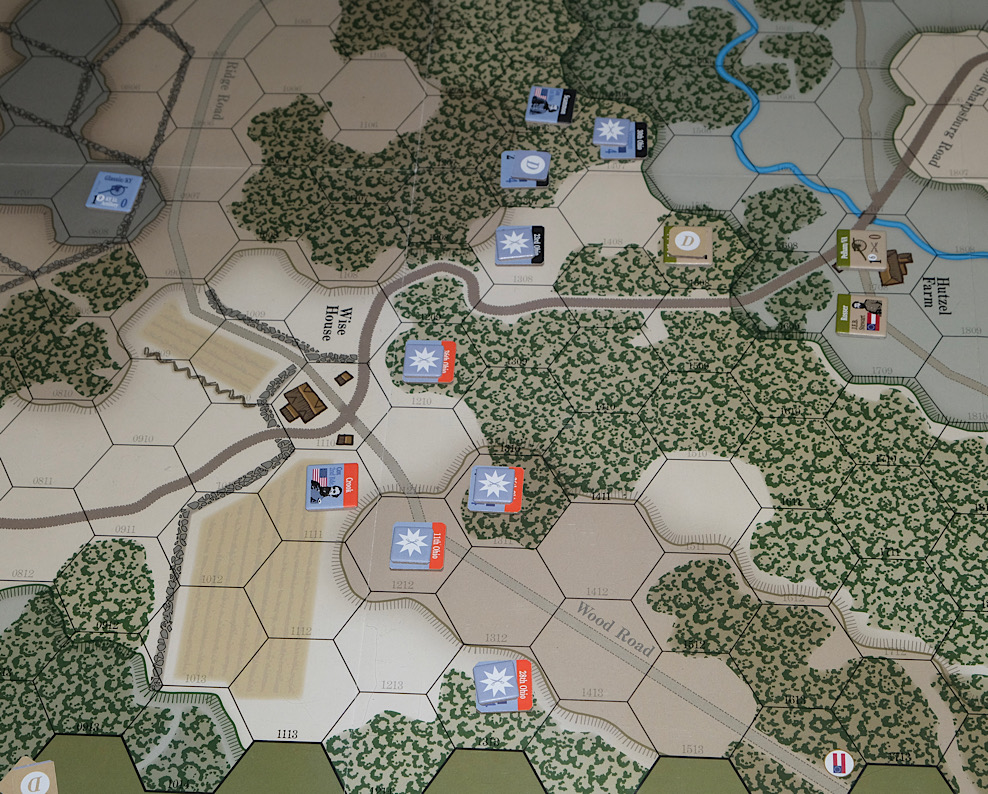
Above - turn 3 (09.40) Garland (brown counters) activates. The Union (blue counters) 12th Ohio up on the hill top in front of them is already flipped to unformed and disorganised, so are vulnerable. Should Confederate 23rd North Carolina jump the wall, advance and fire and then in the following turn hope to assault the 12th?
Very tempting, but player discipline takes hold and the 23rd stick with the plan of defence and falling back ... they are already getting unhinged by Union 30th Ohio on their left. So they content themselves with firing instead.
Their firepower value is 3, so they get 3 dice. Units always need 5 or 6 to hit as default. They roll, 6,4,1 so cause one Hit. We must always check to see whether the target gets any saving dice - they don’t always!
Their position is clearly strong, so .... they get 1D6 for being unformed (open order), 1D6 for differing elevation, 2D6 for being behind a stone wall and 1D6 because this is ranged musket fire. So an impressive total of 5 saves. Like attacks, saves are successful on 5's and 6's. They roll 6,4,4,3 and 1, getting 1 save, negating the one Confederate hit.
In the aftermath, Union 30th Ohio fire down on 23rd North Carolina, into their exposed side. The powerful 30th rolls 6 dice and gets 3 hits. 23rd save just 1, so must suffer two hits. These are absorbed by firstly flipping the 23rd to their disordered side and then going disrupted .... oh dear! 23rd NC stayed around too long and should have retreated instead of firing - perhaps.
Garland moves nearer the action (he can help support rally attempts), but that puts him out of Command Radius from his troops at Wise House. They need to take a command test to whether or not they are 'in command'. If they fail, then if moving, they automatically become disrupted .... good job they don't want to move!
It is Turn 4, Garland has done a good job of fending off Scammon. But now Crook's Brigade arrives. His two activation markers go into the draw cup. Wise House is going to come under a lot of pressure soon.

Above - It is turn 6 (10.40 AM) - Crook (red band) has reached Wise House. His 36th Ohio, on the left, throw themselves at the building complex, defended by 20th North Carolina.
This is an assault action, so both sides participate in the fight and saves are never made! Both sides secure 2 hits (considered a draw), so 36th as the attackers are thrown back, their losses cause the risk of elimination, so Crooks spends a brigade reserve point to stop 36th being removed from play - but this minor setback apart, overall the situation is serious for Garland.
A cruel fate .... Crook is again drawn from the draw cup on the next activation, giving his brigade a back-to-back go, before Garland can prepare.

Above - Union 11th Ohio fire on 13th N.C. causing them to flip and disrupt. A unit is usually 'finished' after performing a fire action, but they play the Fire & Close card, which instead of finishing, allows them to now also move and assault, so they assault the weakened 13th ....... who defying all the odds, see off the 11th's attack!
Regardless of this Confederate local success, Wise House itself falls when attacked for a second time.
On the Union left, Scammon pushes through the wood and inflicts enough casualties on Garland to push the brigade over the edge ...... with no further reserves to help, Garland’s Brigade becomes exhausted.
'Exhausted' status is dealt with at the end of the turn. Firstly, Garland surrenders one of his two activation chits to the Exhausted Brigade Box. He would now only have one chit in the draw cup.
First however, a Fate Check is made. This is a straight roll of 1D6 and that will result in Garland's brigade either breaking, remaining exhausted or regrouping.
A '2' is rolled (bad) and the brigade breaks. All of Garland's regiments are removed from play and a single 'remnant' counter is placed in one of the hexes, which a moment ago had one of those regiments belonging to Garland located there. The remnant has a firepower of 2 and cannot move.
We note that the Union have now achieved the scenario objective and will win unless ejected from Wise House by the Confederates.
It is 11 AM (turn 7). The Union will use this time to re-organise before the Confederate reinforcement arrives. Scammon continues to advance through the woods to secure Hutzel Farm, which is defended by Rosser's dismounted cavalry and horse artillery. Hutzel Farm is an alternative victory location for the Union. Rosser’s cavalry defeat the first assault launched by Scammon.
Above - Crook (red band) uses his time to push forward and line Wood Road with troops, setting a trap for the Confederate reinforcements to walk into. They have defended in some depth and it looks improbable that Anderson will break through …. yet he must try!
11.20 AM (turn 8) The pivotal question now is; can Rosser hold onto Hutzel Farm and can the Confederate reinforcement recapture Wise House? Both are necessary for a Confederate win.
Anderson arrives, but only gets to do one activation before the turn ends abruptly when a second ‘end turn’ chit is drawn, so he doesn't get into contact with Crook this turn.
Scammon smashes 5th Cavalry and captures Hutzel Farm - there is now just too much for Anderson to possibly achieve. Regardless, I will play the last turn, just see this through and see how far Anderson can get.
Turn 9 - The order of activated units drawn in this turn starts with Anderson, followed by Crook and Crook again! It couldn't have got much worse. On his activation, Anderson walked into opportunity fire from Crook's 'ready' regiments. Then on Crooks two subsequent activations, his regiments continued to punish Anderson hard and push his brigade into Exhaustion status due to huge casualties.
In the Fate Check (D6) that followed, Anderson broke!
So the Union not only win, but do so handsomely. They captured two locations and destroyed two Confederate infantry brigades and a cavalry brigade. This is a tough scenario for the Confederates …… but, one must keep trying :-)
Conclusions.
An enjoyable game that throughout pulled me into the nuances of what individual regiments were doing. Surprisingly in this session, I did not make any use of skirmishers and doing so might have helped both sides at different times.
By this, my third game, I pretty much had the rules committed to memory and made few rule references. I had one administrative question, which I asked on BoardGameGeek and before my game was over, the designer had made a reply.
I'm not keen on card play in games, particularly disliking the 'gotcha' type moments they can create. I used the card play today, but playing solo, found it a little hit and miss whether I remembered to use them at the most appropriate moments, simply because handling a hand for both sides is too easy for this brain to forget things.
The designer has said that in his solo games, he plays without cards and I think that I will do the same in future, also hoping that it might shave a little bit of time off the play.
For those liking cards, these are a good fit with the game and fairly gentle in nature and often any benefit they bring can also comes with a sting in the tail.
They also add quite a bit of story and subtle effect to take the game out of it's routine processes, such as a card allowing a unit to perform a change of formation for free (normally 2 movement points to say go to open order - unformed) and there-by having enough movement left to reach enemy troops that may have thought themselves to be safe from contact!
Overall, this game is doing something quite different for ACW battles, giving the smaller engagements a chance to shine with a depth that feels a bit more personal.
There is a lot in the package and each of the scenarios look like they will give a different experience, I am certainly looking forward to tackling one of the big Antietam games.
Complexity - The box says medium to high. I would say that complexity comes from the system being unusual rather than being inherently complicated. I found that on my 3rd game and after two full readings of the rules, I was playing without much reference to the rules at all, though in the normal gaps between how long games take to revisit a table, I think I would have to do a rule read again, unless I as playing very regularly and in that regard the medium - high rating is about right, regular play would make this of medium complexity. The play aid is very good.
My first two games were face-to-face plays. We both have the game and so with a rulebook each, I think us both learning the system did help embed the rules more easily - two heads being better than one etc.
Size - These are full industry standard sized maps (8 panels), with one map per battle, but they do also need two army displays (A4 / letter sized) and an activation card (A4 / letter) placed next to the map, so this is taking up a typical kitchen table type space. On the shelf, this has a box depth of 2 1/4".
Solitaire - The box rates it as medium. This is a 2 player game that can be played fine as a solo experience, with the player playing both sides fairly. The only real aspect re solitaire play are the cards and I managed my solo game using them, as knowledge of what the 'other' hand has is not that detrimental, but also the game can be played without the cards. They are mainly injecting some versatility in unit performance. So if you are the sort of gamer who is happy at playing two player games solo, then the solitaire rating is higher than the stated medium in my opinion.
Time - The box says 1 - 4 hours depending on scenario. Based upon my limited experience, I would add an hour to that range. My game today, which is the recommended intro scenario, took around 2 ½ hours and my two previous face-to-face games with the same scenario were each in the 3 hour range, though each ended early because Garland’s Brigade broke before Anderson came on and as we were running out of social time, it became a natural place to halt the game.
Resource Section.
Recent post on playing Fox’s Gap with miniature figures - LINK
https://battlefieldswarriors.blogspot.com/2023/10/side-action-at-foxs-gap-1862.html
My sister webspace ‘COMMANDERS’ showcase the various figure and boardgame systems that I am enjoying and gives a flavour of where current projects are up to. Link.
A most enjoyable read. An interesting note about how the game’s terminology and choice of rule mechanic set the scene for a regimental level game.
ReplyDeleteHi Peter, yes, the game guides you towards the right feel in a rather clever way. actually, it has a strong miniatures feel to it. The situations look like they would very easily move to the tabletop.
ReplyDeleteAnother interesting read Norm, thank you. I don't think this one is for me, you have cost me enough money in the past! I enjoy Blind Swords series games. This looks a quite different gaming experience?
ReplyDeleteBest,
Dave
Hi Dave, I would say it is a different experience to blind swords - though they do share that steep learning curve due to being unusual systems and both systems do draw you in to what is happening in THAT hex at THAT moment, there is a sense with both games of personal involvement rather than anything generic.
ReplyDeleteWith Christmas coming up, I will cast my net and see if I can find something for you to spend your money on :-)
Don’t you dare Norm!
Delete:-)
DeleteGreat report Norm. It looks like a fun and interesting game.
ReplyDeleteHi Ben, I am going to move on through a couple of the bigger scenarios while I have the rules under my belt.
DeleteThank you for a interesting report sir!
ReplyDeleteWarm regards
Hi Michal, there was much more going on than I could write about - it is a very engaging system.
ReplyDeleteFirst off I have to say that I love the map graphics and the fact that the 'terrain' bleeds over into other hexes slightly, to give it a more naturalistic look. The game does look good and certainly you get the feel of being right in the action. As with many of the games you have showcased, I can see this one easily trnasferring directly to the table.
ReplyDeleteHi Steve, the interesting terrain feature are the walls, because they are given a more natural alignment rather than strictly following the hexsides - but they do match up to the hexsides for easy calculation of defence and obstacle etc - it is just easier on the eye than is traditional with boardgame artwork.
DeleteThanks Norm, that was very interesting. I particularly like the reserves mechanism. I am very keen on that sort of thing for nineteenth century warfare.
ReplyDeleteHi Martin, it is an important part of the system - abstracted somewhat, but the feel is that reserve companies are being sent forward, one assumes from within the regiment, but it is a brigade level function.
ReplyDeleteNice looking game Norm, sounds like I would enjoy converting those scenarios onto the miniatures table ?
ReplyDeleteHi Matt, your fine collection would easily take on anything that the game could throw at it.
DeleteExcellent overview and playthrough, Norm. The game sounds interesting and the graphics look superb. Like you, I am not a fan of adding in event-type cards into a game unless absolutely crucial to the running of the game engine. Good to see that the designer does not utilize these cards in solo play. I guess my question is if they are needed for solo play (which would seem more suitable for driving an AI narrative), why include them at all?
ReplyDeleteHi Jonathan, re the cards, in the words of the designer ‘ They are super fun and add a level of "oh no!" to the game’.
ReplyDeleteThere are indeed moments that the cards do cause genuine ‘oh no’ moments to one side or the other. An example from my game, the confederates had a battery out on a limb, the Union player thought it worth assaulting. The Union player did not know that the Confederate held a card (Double Shotted) that gives a +2 to hit modifier on the first two dice …. Nasty, but as I said, cards very often carry a sting in their tail as a balancer and this one is that if any of those two shots fail, the FIRING unit suffers a hit for each failing roll.
I’m not defending the use of cards, but pointing out that those that like them, will likely like these. The things I dislike about cards are the things that I dislike about them in all games - in moments of crisis the player searches their hands looking for a rescue card, for me it has the sense of grubbing around looking for something that has nothing to do with good solid deserving play and when found, it is generally served with a degree of relish and satisfaction of the ‘Gotcha’ moment, something, as we have discussed in the past, that neither of us sees befitting good play.
Just my personal view of cards.
I know what you mean, they can help add that element of unknown and having to adapt to a new set of circumstances which I quite like and in V&P it's quite a nice way of bringing in some national characteristics without going overboard?
DeleteBest Iain
Iain, V&P have a good use of card play as they link directly in to performance, so less of the ‘GOTCHA’ aspect. My only issue with them (same as all games) is that in solo play, two hands are harder to manage i.e. I keep forgetting to use them.
DeleteThat made for a nice read! I will add the game to my ever growing list of "must-haves". Thank you.
ReplyDeleteHi Fred, thanks for dropping by. We are on a bit of a roll with it at the moment, we have another face-to-face planned for Friday evening.
ReplyDeleteThis looks like a cracking boxed game. It’s nice to see another refight of the same scenario, I think I’d be hooked now to see if the Confederates could actually win this scenario. Looking at it so far it’s going to be very tough for them to get a victory? Looking forward to your next game and a new scenario.
ReplyDeleteHi Graham, it certainly has that ‘one more game’ element to it. I am going to play the whole day scenario, which of course means by default that the first scenario gets replayed as part of that.
DeleteOn another forum, the author has corresponded re this and he was a little surprised that Garland has been getting thoroughly trounced in each of my games and he offered up a couple of gaming tips that might help his brigade have a bit more survivability - one being, to combine the fire of two regiments to inflict greater harm per shooting on Scammon’s brigade and the other is to make better use of the retreat rule (where you opt for a retreat to get an extra saving roll).
As you say, it begs further play. I am doing Valverde this Friday evening face-to-face, so another chance to hone my skills with this system.
Great sounding game and the graphics are very nice!
ReplyDeleteBest Iain
Hi Iain, the designer is responsible for the graphics and compliments are frequently made, some comparing it Combat Commander graphics, but I feel they are more organic and all the better for that.
ReplyDeleteSounds like an interesting game to play Norm, but that first scenario does seem very hard for the Rebs!
ReplyDeleteHi Keith, we are on a bit of a roll with this, last night we played the 1st scenario of the Valverde battle … a very different and new situation to me.
ReplyDeleteOuch, Norm! Another game that you make me want to buy!
ReplyDeleteOut of all your posts, I particularly enjoy the ACW games and reviews. You have a real feel for the period and your thoughts are always worth careful noting.
Cheers,
Aaron
Hi Aaron, thanks, I’m getting a lot of enjoyment out of the package at the moment.
ReplyDelete