 |
For some time now, I have wanted to get a more textured, 3D look for crop fields, but have never really found the right materials. Either the leaves are too big or the wrong shape etc.
I did see an overseas seller doing corn plants, but by the time they are bought in the needed numbers, the cost is quite off-putting to this gamer.
Anyway, over the past few months, I have been making regular visits to an aquatic store, checking out their plastic plants. Last week, I was pretty sure that I had found something that might do the job.
Above - these balls are formed from lots of smaller plant like florets (is that the right word?). The label describes these as Classic Aquatics - Code 4713.
They were sitting next to another tray that had slightly smaller and tighter balls, which had a different code and might just be useful for smaller scales. There is a web address on the label, this being www.classicpetproducts.co.uk
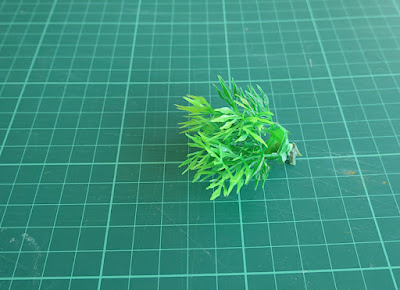
Above - taking these apart with scissors or snippers gives us a ring of the florets. The individual plants can be cut off these bunches. You end up with stems that can pass for individual plants averaging 3 - 4cm in height.
 |
| Click for detail |
Above - For construction, I went with an 80mm x 80mm MDF base (2mm thick) and gridded it off into 20mm squares. Then on the intersections drilled small holes with a Dremel.
This seems to give a good comprise between foliage density, but giving enough room (just) to get the basing paste into the centre of the piece. I used one of those fancy pants strong general adhesives.
Above - once done, a basing paste was made up with a significant proportion being from the Vallejo Textured Mud pot, which has a blackish brown hue, to hopefully resemble soil.
This was pushed towards the centre of the base using a very thin and long artists palette knife. Once fully covered and dry, dabs of PVA glue were applied to exposed spots and my flock mix sprinkled over it. I have little idea what is in the flock tub, it has grown into an anonymous mass over a number of years as various bags of flock just get added.
Finally, I did a quick pass with an airbrush with German Yellow Vallejo paint, just to take the edge off the vibrancy of the lush green. I used the yellow from their primer series in the hope that this might better adhere to the plastic leaves. The base edge was painted green.
So, there we are - done. You may think it either does or doesn't look crop like. At first, I wasn't too sure, but then I thought about the sort of terrain that I was making as a youth with no money and limited materials, yet I hugely enjoyed whatever was on the table.
The point is, sometimes I think we have made ourselves a picture perfect world and lost something along the way. For me, these will do the job as a representational corn field for ACW or a Rye field for Napoleonics. I don't even know what rye looks like ... so I suppose that may be an advantage :-).
There were rye fields at Quatre Bras 1815, described as being 6 - 7 feet tall.
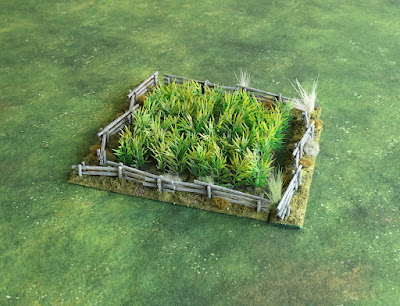
Above - To start with, I just built four test bases, which gives a 2x2 field grid, with a small enough footprint that it is a good compromise for my small table and the 28mm troops.
I will build another five bases, so that my field can grow to 3x3 if needed.
Above - the idea was always that the troops should fit IN (not ON) the field and with the minimum of fuss. To that end, I am going to treat a field just like a Built Up Area (BUA), that is, it can only be occupied by one unit at a time, facing an enemy that wants to eject it.
You just pay half your movement allowance and you are in ... likewise to leave.
Above - finally and well off topic, with some progress done, I will soon be ready to do an update (number two) to the Napoleonic 1809 Project. Here we have the French command stand, with Napoleon (of course) and Mameluke Ali.
These castings are Perry metals and I got the pairing inspiration from a similar base that Iain (Caveadsun 1471 Blog) recently showed on his blog. Thank You.


Excellent work sir!
ReplyDeleteThank you Michal.
ReplyDeleteI like the crops Norm certainly very ACW corn looking and very nice work with the great man himself and his colourful chum!
ReplyDeleteThanks Ian, I note your ‘great man’ is on the loose :-)
ReplyDeleteSome inspirational modelling there matey. Might work with my 10mm lads (just).
ReplyDeleteI’ve not checked it out, but the ‘other’ ball, which will have a different code, might just do it. Their website might reveal more.
DeleteWonderful job on all, Norm. The rye field looks excellent and I love the Napoleon stand! Cannot wait to see him on the table in a battlereport!
ReplyDeleteThanks Steve, I am rather pleased with Old Boney!
DeleteA good aquatic find for your scratch build corn/rye fields. Very nice.
ReplyDeleteHi Peter, I have been looking for a while and searched the shop twice before these revealed themselves!
ReplyDeleteThose fields look great Norm! Another source of similar plastic plants is what we call here a $2 shop...probably a Pound shop in the UK?
ReplyDeleteHi Keith, a great resource for their money and I think those seeking tropical jungle type plants can be well served from most sources, though the ‘corn’ look has been hard to track down. Each of my foliage spheres cost £7.50, but were on a 3 for 2 offer, so fifteen quid in all. I reckon each sphere will certainly give 5 bases and maybe 6.
ReplyDeleteNorm,
ReplyDeleteNothing to do with rye but here’s a method for replacing bayonets.
https://prometheusinaspic.blogspot.com/2018/10/fix-bayonets-guest-appearance-by-goya.html?m=1
Thanks you, I would never have thought of using a staple - excellent.
DeleteBeing an impressionist at heart, your crop fields make the right impression.
ReplyDeleteHi Jonathan, yes, I think they will do. Once I have done a few more, I will set a Quatre Bras type scene to photograph, from an incident when infantry standing in man high rye, where suddenly set upon by cavalry that sat above the rye - that would take the illusion a step further.
DeleteThese fields work a treat Norm…
ReplyDeleteI may have to steal that idea…
All the best. Aly
Thanks Aly … steal away :-)
ReplyDeleteExcellent work! We have similar options in the US in the various craft stores. I used to love shopping the flower arranging sections during sales. Until I over filled my storage capacity. Looks great to me.
ReplyDelete~ Tom T
Hi Tom, thanks for dropping by. The three units that I bought will be more than enough for my needs, but it is hard to tell at the point of buying ….. if they had had more, I probably would have got them :-)
DeleteWell they've come out really well Norm and love the fact that the infantry can sit in, not on, the crop:).
ReplyDeleteHi Steve, yes I think sitting IN the field does help with the illusion.
ReplyDeleteA splendid find and utilisation of aquatic merchandise, not quite as high as an elephants eye but mighty pleasing to the eye. As is the command base with old Boney.
ReplyDeleteThanks Phil, it was a lucky drop on the foliage. I think poor old Boney is being upstaged by Mameluke Ali :-)
ReplyDeleteNow that is an excellent representation of a corn field Norm, Reading through it I was thinking to myself will the figures need to sit 'on' the field but your last photo is just the job :) I recall I did one years (decades!) ago using one of those small Christmas trees and trimming all the individual pieces down, your idea looks much better.
ReplyDeleteThanks Lee, in my original text, I made mention of an earlier attempt years ago with Christmas tree bits and that to my minds eye, all I could see was Christmas trees 🙂
DeleteVery nice Norm. I'm afraid my corn fields are still bits of cut up floor mat, so the troops stand resolutely on top of them! One day I'll make something better.
ReplyDeleteThanks Martin, it us surprising just how widely the floor mat has been adopted onto the table top. I still have some brown corded carpet serving quite adequately as ploughed field.
ReplyDeleteSplendid work and really useful guide to your process. The 'plants' remind me of tea bushes for some reason. The Ogre stand has turned out really nicely too.
ReplyDeleteThanks David, Mameluke Ali gives a fine excuse for a splash of colour.
ReplyDeleteThey look excellent - cornfields is something I have been meaning to add to my 20mm ACW collection and these look like they'd be perfect. Like you I want the units to move through the cornfield, not over it!
ReplyDeleteHi Mike, I’m hopeful that these will become my crop solution. It’s just a case of finding the right size and shape of leaf and I have noticed in the past 12 months (in the UK) that more retail outlets, not just aquatic stores, are selling plastic plants.
ReplyDeleteGreat looking corn field Norm. And I agree, we sometimes tend to want terrain to be too realistic. I think giving the impression and then allowing the troops to interact with it, as you have done, gives a much better final result.
ReplyDeleteHi Ben, exactly so, the minds eye does the rest.
ReplyDeletegreat job! i love the fact the troops can sit IN the field.
ReplyDeleteyou'll now need to make lots of these. LOTS! 😁
the plastic is not too shinny? doesn't look so in the pics.
I did make a bunch of corn stalk bases awhile ago for my own ACW gaming using a christmas material, came out alright. You're look better. 😁
Hi Stew, I have them on the table now ….. and am admiring them :-) but it does scream out …. make more!
ReplyDeleteExcellent terrain addition I'm convinced, you just need lot's more! I've been hacking the edges of my doormat fields so that they're more irregular, I saw it on Ray's Don't throw a one blog, it really improves the look. Your command stand has turned out really well, I suppose mine is blog recent as I'm sure it was at least a year ago!
ReplyDeleteBest Iain
Hi Iain, the crops are like snakes fencing …… never enough! :-) I have seen some doormat fields cut irregularly, mounted on board and filler paster brought right up to the edge of the mat, which looks good. I have had those command figures in the mountain since your blog post, so it shows how long these things take to surface …. However, it has made me also to the Austrian senior command stand (Perry) which includes Archduke Charles.
ReplyDelete