
I have been playing a boardgame called Clash of Giants - ACW by GMT, which has a 2nd Bull Run scenario. There was a situation in the game that looked like it would translate across to a figures game with low unit density and it seemed like an interesting opportunity to squeeze the Black Powder rules to play out a small action in a small space.

Black Powder is a set of figure rules from Warlord Games. Slightly generic in nature as they cover a fair block of history, but the ACW supplement, Glory Hallelujah, brings a period focus to the set.
The boardgame counters represent brigades, so we will break them down into their regimental and battery components and create a more tactical game of the same situation.
This post outlines the conversion process, while Part 2, will give an AAR (once that is done, a link will be added to the Resource Section at the foot of the post).
Please use the ‘read more’ tab for the rest of this post.
Firstly, what are we seeing in the boardgame action? The Clash of Giants system is unusual in that each turn represents 3 hours, so here we are looking at a 3 hour slice of action. At this point in the game, the Union have moved up to Bull Run, a deep sided waterway, and are trying to force several of the fords that lay along its length. We are looking at at just one particular crossing here, in which two Union brigades of mixed capability push against a lone Confederate brigade.
The map below shows how the units looked at this moment of time in the game (a rough camera photo - sorry). Today, we are just dealing with each hex on either side of the ford, ignore the other units, they are otherwise engaged this turn.
 |
| The Union have managed to already get across Bull Run to the left, but those weakened units are vulnerable. |
Below - This is a re-staged image to tidy up the area, remove the other units and show the unit values and terrain, so that we can clear our minds and focus on this small action.
 |
| Gregg's Brigade (from Hill's Light Division) stands resolute |
In this attack, 3 Union strength points (the first figures on the counters) attacked 2 Confederate strength points, who in turn get a +1 combat enhancement for defending behind a ford, making their defence 3, so the final attack is 3 strength points against 3 or a 1:1 attack for a more appropriate terminology.
Note, in this system, the woods themselves do not offer a combat benefit to the defenders, however, woods do prevent either side from adding in their artillery chits, which are set off to one side.
Note, in this system, the woods themselves do not offer a combat benefit to the defenders, however, woods do prevent either side from adding in their artillery chits, which are set off to one side.
A 1:1 attack sounds bad, but it just means there are no modifiers to either players combat die rolls, which unusually is conducted by each unit rolling against their own Tactical Efficiency Rating (the second figure on the counter) to see how well they survive the 3 hour ordeal. They must roll equal to or less than that number, so units with low TER’s don’t do too well in this system and the Confederate rating of 4 is pretty good, so they are fairly confident of holding the position. Note a 2:1 attack would allow the attackers to deduct 1 from their die roll and make the defender add one to theirs!
The defenders roll first with a D6, Gregg scores 6 (ouch) an automatic fail, they flip to their weaker side (to show losses) and retreat 2 hexes, the ford is now wide open! Schimmelfenning (Union) also scores 6, an auto fail and they should flip and retreat 4 hexes, but they are a single sided unit and so are destroyed instead and removed from play.
Finally, Krzyzanowski (Union) scores a 1, which he not only passes with his rating of 3, but in any case, a 1 is always an auto pass. Since the defending hex has been abandoned by the Confederates, Krzyzanowski can advance across the ford and occupy the vacated hex, which is what they do. The Union have won the battle, taken the objective, but at cost, with one Union brigade destroyed, though the retreating Confederates obviously took heavy casualties when they flipped to their weaker side.
But how will this play out on our tabletop?
Black Powder rules - For anyone not familiar, Black Powder is something of a generic horse and musket set of rules that was designed around the authors use of a 12’ x 6’ table and magnificent 28mm figures. The Glory Hallelujah supplement adds an ACW flavour to the game. Regiments are grouped into brigades and if regimental casualties get high enough, the entire brigade will collapse. The system uses a number of D6 to get hits and then the target rolls a number of D6 to try and get saves. Once a unit receives 3 or more hits it is shaken (note one of our Union brigades will shake with 2 hits in this replay) and resulting morale tests become harder to pass, with unit destruction an ever present fear for both players.
The game is perhaps best known for its potential to generate large movements ...... or no movement! The way this works is that a unit declares it’s orders aloud. It can declare a maximum of three orders each turn and an example of three orders would be ‘the Regiment will move forward twice and then change formation into line’. The player then rolls 2xD6 against their Brigade Commanders rating and if the exact rating or 1 less than that is scored then only the 1st order is executed. If rolling at least 2 below then the second order must also be executed and if rolling at least 3 below, then all three orders must be executed. So a unit could actually bound forward 3 lots of movement allowance in a single move if that’s what their orders requested.
The flip side is that if the dice roll fails, then the unit does not get to execute any orders and simply stands still. (There are some exceptions - such as a unit in march column on a road will always get 1 move if it fails its roll), so the chaos generated by the order system puts a firm hand of restraint on the shoulder of the gamer - Good!
Note to Black Powder players - Glory Hallelujah does not allow units to fire if they have made more than one move order that turn, a sensible rule, that could be applied to other periods.
Conversion.
I have neither a 12’ table or glorious 28mm armies, so the first thing to do is to go to a trusty 4’ x 3½’ foot table and halve all distances in the rules, so we will convert inches (used by the rules) to half inches for everything. This also means units will occupy a frontage of 120mm rather than the usual 240mm. 12mm troops (from Kallistra) will be used, though frankly even 28mm on a 150mm frontage would also work fine here and my top secret plan is that I am plodding away to make that a possibility at some point.
Terrain.
Since we are going to a more tactical level, it makes sense to not only reflect the two hexes occupied by the fighting units, but to construct our table by extrapolating the terrain from the boardgame terrain that sits immediately around the two hexes concerned. This gives us a battlefield as shown in the diagram below. The table is liberally covered in light woods, which are treated in Glory Hallelujah as;
Providing a -1 to hit modifier against small arms, not artillery.
Being rough ground.
Units within 1” of the edge can shoot without penalty.
Visibility is 12” and those visible count as ‘unclear targets’ except when charging.
 |
| Plenty of scope for confused fighting here |
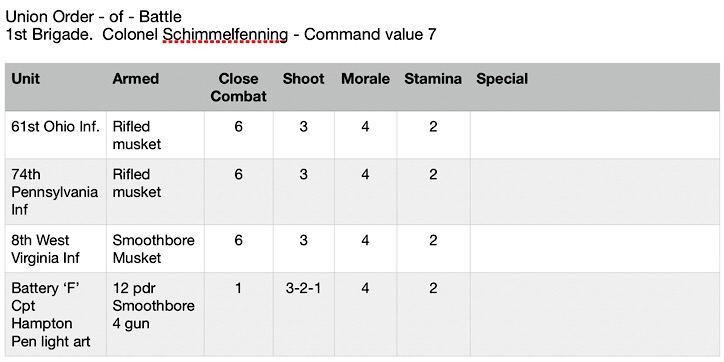
Tools of the Trade - For rules, Black Powder, together with the Glory Hallelujah ACW supplement will be used, with the stat lines taken from the 1862 Eastern Theatre lists (presented below). Several dice for rolling and more dice to act as markers for hits. I just move bases slightly apart to show when a formation is disordered. I also have the Pickett's Charge rules by Dave Brown, which might make a good comparison post at some future point.
Order - of - Battle
OB NOTES - The boardgame counters represent brigades and we have converted these to their historic constituent parts (regiments and artillery batteries). The actual unit values, their weapon types and special rules fall out of the army lists for the Eastern Theatre 1862 from ‘Glory Hallelujah’ ACW expansion. A D6 was used to randomly assign attributes etc when necessary, so some units here may not necessarily be a true representation of their historical counter-part, so for example, for the lists, I needed to have a couple Confederate units to have smoothbore muskets, so I diced for selection, with smoothbores going to 12th and 13th North Carolina regiments, though in reality neither may have used them.
Glory Hallelujah allocates purchase points to units and so our forces here cost 280 points for the Confederate and 404 for the Union. When one considers the overall situation, that imbalance seems about right for a good game as the Union are disadvantaged by being tasked with taking the ford crossing and their 1st Brigade under Schimmelfenning, is both fragile and less likely to perform well, due to lower Stamina levels and that command rating of 7. Plus the 'good' Confederate brigade is bigger than each of the Union brigades.
The boardgame shows Brig Gen. Henry Bohlen as leading the 1-2 Union Regiment. However, my research indicated that Bohlen had died a few days before (22nd August 1862) when a sharpshooter hit him while he surveyed the Rappahannock River. It seems he was replaced by Schimmelfenning, who is the leader that we shall use in the Order-of-Battle for this game.
We are loosely mirroring the values of the counters in the boardgame onto the tabletop. Schimmelfenning‘s brigade shows a counter strength of 1, which is based upon unit size, suggesting the brigade is below standard strength. Rather than use the option of creating one or more small regiments (which is a Black Powder mechanic), we will lower the stamina of all his regiments to 2. While that may initially seem severe, it has been done with the next paragraph in mind, so that the rating of 2 is justified based on two influences.
Schimmelfenning has a Tactical Efficiency Rating of 2 in the boardgame, which is notably low. The reduction of unit stamina to 2 as explained above for all three regiments will adequately reflect this, as will giving him a command rating of 7 (not so good).
Gregg (Confederate) has a decent Tactical Efficiency Rating of 4, which gives them an edge in combat in the boardgame. We will therefore make one his regiments ‘tough fighters’ and make one of his smoothbore musket units more practised with their fire (with the “Bring it on boys” rule). We could instead have moved his Command rating up to 9 and this may be necessary if the scenario doesn’t work well, but for now, a gentler approach seems preferable, plus the Jackson special rule (see below) gives Gregg a one off boost.
The Union troops are still learning their art in 1862 and they took heavy casualties in attacking at this battle. We will make all of Krzyzanowski‘s regiments ‘Uppity’. This is a Glory Hallelujah term and makes units more likely to charge to contact as they will ignore the reluctance to charge modifier and can also use an initiative order to charge. Experienced units tended to have a more ‘considered’ view of charging good ordered enemy positions!
The boardgame does not allow artillery to be used in woods, so I am going to have to think a bit as to how the formations artillery is handled in the figure game.
The boardgame does not allow artillery to be used in woods, so I am going to have to think a bit as to how the formations artillery is handled in the figure game.
Confederate OoB (you can click on each of these to get a zoomed clear view of the text)


Special Rules
‘Stonewall’ Jackson is the Confederate wing commander. Highly regarded, he is not represented on this part of our battlefield by a game piece, but once per game, he may influence the Confederate forces by allowing Brigadier General Gregg to re-roll his command dice, but the re-roll will totally replace, for good or for bad, the original command roll.
Bull Run cannot be crossed at any point other than at the ford. Artillery cannot cross the ford. Units can fire across it normally. Treat the ford as rough terrain.
The Confederate forces set up first on any part of the board that is on their side of Bull Run, then the Union Forces set up on their side of Bull Run. They cannot set up any closer that 9” from the edge of the Bull Run / ford feature.
Victory Conditions
At the end of turn 6, roll a D6. On a score of 1 - 3 the game will end and victory is assessed. On a 4 - 6, the game will continue into turn 7, but for this turn, all commander ratings will drop by 1, making the issuing of orders a harder thing to do, reflecting exhaustion for both sides. At the end of the 7th turn assess victory.
If the Union currently have one infantry regiment across the ford, they get 2 points, if they currently have 2 infantry regiments over the ford they get 5 points and if they currently have 3 or more infantry units over the ford they get 8 victory points. In addition, each side score 2 victory points for every enemy unit (infantry or artillery) that they have caused to be removed from the game and 1 victory point for every enemy unit that at the end of play is still on the table, but with the status of being ‘whipped’ (a Glory Hallelujah term that shows a broken unit that remains in play).
Part 2 of this post will cover an after action report as to how the figure conversion with these rules worked out. The rules typically work well with big games on big tables with 3 - 5 brigades per side, so we will see how we get on. Once done, a link to part 2 will be added below.
Resource Section
Link to part 2 of this account (the AAR) ... Pending
http://battlefieldswarriors.blogspot.com/2018/04/the-fight-for-balls-ford-black-powder.html
http://battlefieldswarriors.blogspot.com/2018/04/the-fight-for-balls-ford-black-powder.html
Link to my sister web site COMMANDERS, which is more magazine based than here.
Interesting. You probably can guess my question...Why not use TF-ON to resolve this action?
ReplyDeleteThat will likely follow. But ..... as part of my 'monthly read' I have gone cover to cover with Black Powder and read most of Glory Hallelujah, so it was really to get something back from that investment. The additional spin-offs are that it offers up something that more people could use or relate to, plus BP on a small table brings its own interest and finally I still have not been able to part with my 28mm ACW (part done) stuff and since this scenario is so small .... who knows! :-)
DeleteI blame Matt Crumps two most recent postings ..... deliciously wonderful.
Deletehttps://wargamesinthedungeon.blogspot.co.uk/2018/04/the-battle-for-knutsville-crossroads.html
Yes, I enjoyed Matt's BatRep too. He sets a very fine table regardless of the period.
DeleteYes, interesting. I admire your willingness to spend time and energy in this type of experimentation and actually carry it out. I do lots of experimental thinking, then more thinking...
ReplyDeleteFunnily enough, I was looking at MMP's Line of Battle (ACW Regimental) and wondering if that would be a good conversion for miniatures. I'm still thinking about it...
Hi Ellis, I do like the tinkering side of things, but am much less co-ordinated than I sound, I have recently picked up Battle Hymn from Compass games and am eager to play the Gettysburg scenario to make comparisons with the Clash of Giants game and this is already occupying my thoughts and wanting attention!
DeleteACW Regimental sounds perfect for transferring to the table.
An interesting idea Norm and I look forward to the AAR and your post game thoughts.
ReplyDeleteThanks Steve, if the game works to produce some tension, then because the situation is so simple, over time, I might test a few rule sets against the scenario as a bit of benchmarking..
ReplyDeleteMinor glitch: "They must roll equal to or greater that number (TER)" should be equal or less than, no?
ReplyDeleteIndeed, thanks for the catch, it is at odds with the rest of my text, Doh! will amend now.
ReplyDeleteInteresting idea. Looking forward to seeing a single set of die rolls in the board game replaced by a small miniatures game!
ReplyDeleteThanks Ross, it will be fun just exploding that 3 hour boardgame turn apart, I think a simple activity like this will help enhance future boardgame playing as it will amplify the senses as to what might be going on behind such simple die rolls.
DeleteLooking forward to the AAR on this. I've been experimenting with ACW rules on a small table myself recently.
ReplyDeleteI will have to see how Black Powder handles managing only 3 brigades in total and may need to adjust how brigades break.
DeleteOur group does a fair bit of Black Powder with six units per side (split into two brigades) and it seems to work OK. They do it more as a training exercise for bigger games, but still .. :)
ReplyDeleteyes, it does 'feel' like I will asking the rules to be played outside of design intentions, yet on the face of it, there doesn't seem to be any real reason why these rules can't bend in the same way that we wargamers often do with rules.
ReplyDeleteAn interesting idea Norm
ReplyDeleteTake care
Andy
Thanks Andy, there are a few people doing similar to various degrees. I note there is a club at one of the shows that is fully taking across an entire boardgame map to a Kallistra hexed battlefield for one of the Lock ‘n Load games games set in Germany in 1985.
ReplyDeleteI am also following the joint enterprise of Jonathan Freitag of the Palouse Wargaming Journal blog, running a strategic boardgame to set up battles that are then played out on the figure table by Peter from the Grid based wargaming - but not always blog.
It’s nice to see board and figure gaming complementing each other more these days.
I must admit I quite like the idea of using board games and then transferring it to the table
DeleteIt was fun to see how the board game translated to a miniature war game. You could do a whole series of how it would be done with different wargame rulesets. We’ll have to see how BP does but on first blush it does seem like a poor fit: a system designed for a huge table with tons of miniatures being played on a small table and few miniatures. Guess I’ll just sit by the computer and wait for your ARR and thoughts. 😀
ReplyDeleteI am really enjoying all the ACW posts lately as well.
Thanks Stew, I'm already picking up my Pickett's Charge, Rank and File and GHQ rule sets to see how some aspects are covered there. I will try and make this as less of a 'mash up' as I can:-) but hopefully the outcomes will be worthy of a follow up post.
ReplyDeleteNicely done, Norm. While many people would disagree, BP is one of my favorite rules sets for horse and musket, and I feel is a great compromise between playability and game length and simplicity. It offers a fun game with historically plausible results.
ReplyDeleteThanks for posting. I love the level of thought that you’ve put into this!
Thanks Steve, I quite like what the rules do and some of the period supplements are very good, rebellion being my favourite. I do like all that digging around for scenario.
ReplyDeleteInteresting ideas as always, Norm!
ReplyDeleteThanks Aaron, it is on the table now for a 'test-drive' and all that woodland is throwing up some interesting nuances, especially for the artillery!
ReplyDeleteI like the idea of transferring from a larger scale boardgame to a miniatures wargame, I was talking with my nephew about using kingmaker as a generator for WOTR battles and maybe the Italian wars although I might try pike and plunder for that,impressive amount of thought youve put into this!
ReplyDeleteBest Iain
Thanks Iain, I am pretty sure that Jon Bleasdale has that very thing planned for his blog, so it may be worth keeping an eye out for that.
ReplyDeleteLINK
https://grymauch.blogspot.co.uk