
I am putting together a mini campaign game for Old School Tactical, based around an ongoing battle that is split into four gaming sessions and uses an entire mapboard. Between each battle, there is a Resting Phase, which includes an opportunity to buy in some reinforcements.
The idea is that it will be generic enough to be usable with any of the core modules or the map boards in their associated expansions.
 |
I am running through a campaign now to test the package and tighten any loose areas. My first draft already has quite a bit of the red e-ink all over it. Once done, I will put the file up for download.
This post covers the setting up and playing of the first of the four ‘Actions’ and shows a bit of buying activity taken in the subsequent Resting Phase.
Please use the ‘read more’ tab for the rest of this post.
I decided to use the Volume I (1941 - ‘42 East Front] core module and to not use any of the components from the Stalingrad module. I am guessing that many of OST gamers will have access to this module, so can follow some of this on their map.
Map board No1 was selected. This is a fairly open map, with some small woods, a scattering of buildings, a couple of hills and a church with a large graveyard.
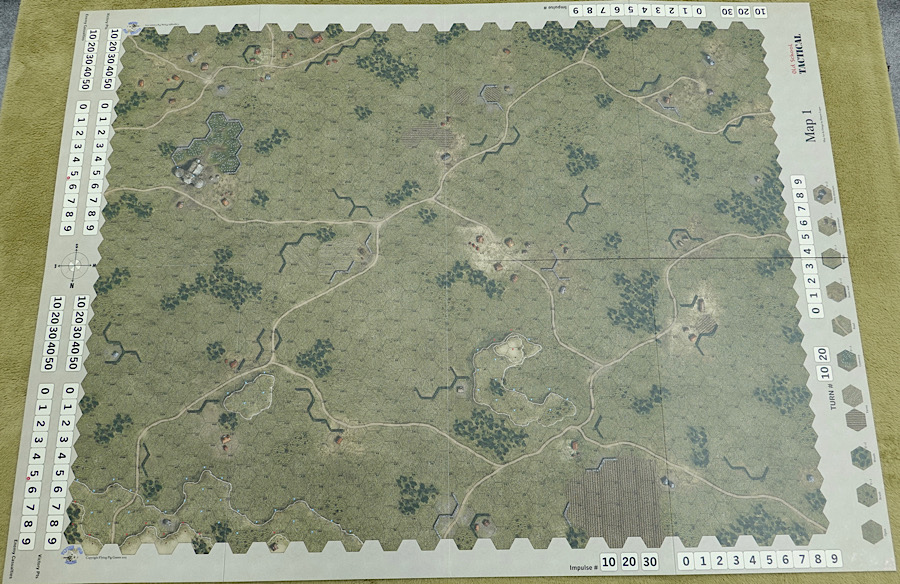 |
| The total play area. The Germans will attack from the right (western edge). |
The system has generated the Soviets as the defenders, controlling the eastern side of the board (left), which we will call the defensive zone. The big church and graveyard are located very much to the rear of the defensive zone and so the Soviets elect to make that stone building (based around hex JJ19) as the enemy prime victory objective.
 |
| Areas of significance |
Within the defensive zone, the Soviets also have three areas of high ground that will also yield victory points if captured by the Germans, as well as a scattering of buildings, which are mostly concentrated at the village in the centre of the board.
The Germans therefore get the western side of the board. They control the first band of 10 hex rows, which gives them a mix of woodland and open spaces to set up in.
The two sides going through their respective army buying process end up with an interesting mix of units. The Soviets, to cover their frontage have bought ten of the lower cost 3-4-4 infantry squads. The immediate impact of this is that is sets their Gut Check (morale rating) value at 8. The Germans buy ten 4-4-4 infantry units, plus two 5-3-4 assault teams, which will give them the better Gut Check rating of 7.
The Germans also come out of the randomised part of the buying process with three flamethrowers and a couple of satchel charges, so as an attacking force, they are quite well equipped and with better morale.
The Soviets got a bit of luck on their crew weapons draw and gained two 57mm anti tank guns and a 45mm anti tank gun, which will give them a useful defending edge against the armour in this open terrain.
For armour, the Germans bought four 38(t)’s and a useful Pz IVf2, while the Soviets got a couple of light BT7’s and also a tough cookie ....... the KV-1. So on the face of it, the German’s have well equipped infantry that will put the Soviet infantry under pressure, but the Soviet’s have respectable anti-armour capability and this will make the German armour at least cautious.
All the other things such as artillery allocations, minor support weapons, leaders and snipers all came out of the mix. For defensive positions, the Soviets chose one mines, one bunker and one wire, which no doubt will all play their part in blunting the German attack at various times.
Finally, each side were allocated their Luck Card (the players are dealt 3 and must choose one, discarding the other 2).
With the forces chosen, the Soviet side (defenders) set up first, except for their armour. Then the Germans set up everything and finally the Soviet armour is placed. This allows the mobile reserve to be better situated to reflect an early response to the attack.
The German plan is to use their infantry in the centre and to the left, while a strong armoured element with flamethrower armed assault troops in half tracks will attack on the right and break through into the open ground beyond, making their way to the church objective.
 |
| The German armour prepares to punch a way through the Soviet line. |
The Soviets hope to be able to absorb and contain the attack, long enough for reinforcements to block the route to the church.
It all begins with a German pre-game artillery strike, which they choose to strike at infantry defending in woods, causing the first casualties of the action and weakening the central part of the defensive belt.
 |
| The opening barrage catches this unit, flipping it to its weaker side (note the explosion markers are from my figures collection). |
The Soviet KV-1, with it’s heavy armour has found itself a superb little hiding spot, behind a stone wall, that gives open views to the German tanks. Being a prime threat, the Panzer IVf2 engages it at almost 800 metres, but the shells just glance off the heavy armour.
The KV-1 simply focuses it’s fire on the light 38(t)’s, knocking the first one out with ease. The Germans open up with heavy mortars and get lucky, finding the deployed 57mm Anti-Tank gun that was next to the KV-1, leaving the anti-tank gun smashed. This gun could have caused the German tanks a lot of grief.
 |
| The powerful anti-tank gun and transport is taken out my heavy mortars, that were actually meant to hit the KV-1's position. |
The KV-1 shifts position further along the wall (stays within the hex, but passes a test for additional cover), discovering a shallow dip that offers even more protection. As a 38(t) tries to use its speed to outflank it, it gets caught by the KV-1 and destroyed from a critical hit.
Frantic fighting now starts, with all command focused on this small sector. A pair of BT-7’s from the other end of the battlefield pull out of the line and start to make to where all the noise is coming from! Another 38(t) manages to get right up close to the KV-1’s rear, which has now become shaken, but is still alert enough to open fire (intensive fire) on the 38(t). A hit! The crew of the 38(t) are now broken, but the shaken KV’s attempt at intensive fire also breaks them as well, so now it is a race to see which will recover first.
Just at that moment, a 57mm anti tank gun that had travelled across the fields, unlimbers not more than 150 yards away from the little 38(t) and fires, but in their excitement, manage to miss. This local firefight is hanging in the balance, but the KV-1 is holding out and proving a tough nut to crack.
In an effort to break the impasse, the Germans unleash their artillery on the the KV-1 position, hoping to catch the 57mm anti tank gun, but the fire widely misses. In a desperate escalation, they push their half track mounted assault teams forward in the hope of overwhelming the defences, but still the attackers are held off.
This is really quite an exciting game, everything hangs on the Germans breaking through and the soviets stopping them ....... and then! ...... at the end of turn 4, which would normally only be the half way point of the battle, the players roll an end of game dice, with the result that only one more turn can be played. Obviously both sides now make a final Herculean effort in this make or break situation.
The Germans make some progress on the centre left with their infantry, but at cost, due to crossing the open ground, but it is on the critical right that the battle rests and here, it concludes with KV-1 still holding its position, duelling with the nearby 38(t).
The fighting here has been very intense and could still easily go either way, but the Germans are worried, they need to crack this line and open the battle up.
End of action casualties.
German losses are three half squads and three 38(t) tanks.
Soviet losses are two half squads, two full squads, a sniper, a lieutenant, a BT-7 tank, a 57mm anti-tank gun and truck.
So far the accumulated Victory Points are 13 v 11 in favour of the German side.
The front line looks like it has not appreciably moved, but it is thin in two places and ready to buckle.
 |
| End of Action positions. Two Soviet infantry units are isolated (top right) and the Soviet held village is vulnerable. |
The Resting Phase.
This is a phase with several steps, but the important one to consider here is the buying of reinforcements.
The Soviets get just a few extra buying points and they select 3 rifle sections and 2 T-26 tanks. They also manage to get another sergeant. The infantry are placed just to the rear of the village in the centre, ready to occupy it, while the light armour is placed over on the flank to deal with the German armour and especially the 38(t), which has broken into the rear of the Soviet line.
The Germans need to be able to deal with the KV-1 menace and the 38(t)’s are not up to that, so they buy a Panzer IIIJ and a Panzer IVE. These are still not a match for the KV, but will stand a better chance, plus the Panzer IVE has quite a good H.E. Value, so should be useful in supporting the infantry attacks. The purchase does not leave them with any buying points to support elsewhere.
Overall, the Soviet purchase has probably been the more useful, as it has given them some extra numbers to help absorb the German attack, protect the village and threaten the German tanks.
The next Action will start with the 38(t) at point blank range to the KV, so perhaps the most important dice roll in the entire game could be the very first one ........ who gets the initiative and fires first!
Though a critically important die roll will occur first ..... the roll for mud from very heavy rain. This may never occur in the campaign, but if it does, it will only happen once in the campaign, affecting just one action. It is made at the start of an Action and is very debilitating. If it occurs - it could very well have big implications on our unfolding tank battle.
We shall just have to wait and see :-)
With the first action down and a Resting Phase conducted, the mini campaign seems to be doing a good job. I will continue through the next three Actions, posting updates as they conclude and if the campaign module feels ready by that time, I will make a downloadable file available.
Resource Section
My sister web space is COMMANDERS - LINK
The second instalment of this post can be found here - LINK
For some insight into the problems that the Germans face when first meeting the KV-1, see the KV-1 in action section in this LINK
Very interesting Norm and those KV-1's are tough nuts to crack for the Germans. I think the Soviets wisely chose more infantry in their rest phase, but we'll have to wait and see...
ReplyDeleteThanks Steve, these rules seem to bring out the characteristics of the KV-1 quite well. The Soviet infantry arriving at the rear of the village have probably prevented a breakthrough there, just in the nick of time.
ReplyDeleteInteresting and convincing round of events with the Germans having to winkle out the tough nut KV1!
ReplyDeleteBest Iain
Thanks Iain, there are three more actions to go, so this will only work if an interesting game to both sides can spin out of this, but it is a good start. The KV-1 performance was exactly as I read about in one of the Arten Drabkin books, so I am pleased about that.
ReplyDeleteGreat looking map game Norm. It doesn’t matter what scale you play but KV-1s are beasts to come up against at the early part of the war.
ReplyDeleteHi Matt, the map is a lovely piece of work. The designer has just released Pacific modules and there are two maps available that are equally lovely.
ReplyDeleteThe fight against the KV has become a mini game in its own right.
Pretty cool stuff, Norm, and yes, very intense action.
ReplyDeleteMy only question is, how did it strike you with the PzIVf2's long 75mm rounds bouncing off the KV-1 at 800m? I'll admit to being a bit surprised by that; it seemed to me that would be close enough to be able to score a penetrating hit. BUT, I'm certainly not a tankie technical guru, so maybe I'm incorrect about thinking the long 75mm could penetrate a KV-1's frontal armor at that range, or maybe the rules had it where it was possible to penetrate but the die rolls didn't succeed?
At any rate, looking forward to part 2!
V/R,
Jack
Hi Jack, good question. The KV fight is becoming a game within a game :-)
ReplyDeleteThere is a two part process. For the ‘to hit’ at this range, the PzIV needs to roll 7 or higher, so a hit is just a bit better than 50% chance. (Note this is the L43 version of the 75mm, not the later L48).
then looking at the hit, at this range the German 75mm L43 penetration figure is 8 (it is 10 at up to 250 metres) and the frontal armour of the KV is 9, But it gets a +2 cover bonus from the wall and a further +1 for additional cover it found by finding the ‘best’ position within the hex. And so the Panzer IV 8 is attacking a defence of 12, so is on the -4 column of the differential table.
On 2 dice, it needs to score 9 or higher to inflict any harm and that is mostly shaken or broken tests, you have to roll a 12 to get actual damage.
If the KV didn’t have cover, it would just defend at 9, so the panzer IV’s 8 would attack at -1 instead. This is much better, on 7+ you start to get effects, damage starts at 9+ and a knockout at 11+.
So in our situation the chance of a ‘to hit’ followed by some effect behind all of that cover is a tough one, you need to be lucky with the dice.
The 75/43 could penetrate 82mm at 30 degree from the vertical with standard shot. The KV-1 thickest armour is 90mm max, which we were probably getting because the tank has hull down protection (represented by the +3 defence bonuses of wall and cover).
So we are probably in the right ball park with the chances being against the shot, but still some chance of harm, especially to ‘the nerves’ if the tankers fail any of those shaken or broken tests.
What is an interesting aspect about the campaign is that when the forces are first set up, there is every chance that the Germans will pull out an 88mm gun of the hat!
If they had done that, then just as happened in reality, when these KV’s were encountered, the 88’s could have been deployed.
The unusual thing about the KV, it was heavily armoured everywhere, so even the flanks and rear have a value of 7! At this stage in the war, these really were tough cookies. I read an account somewhere of a captured KV that had held up the enemy for several days, was found have been hit over 130 times with various calibre of weapon (though at this time there were still a lot of 37mm guns about!).
The mini campaign document is developing nicely and I think it will interest you from your own campaign interest. Cheers Norm
Norm,
DeleteThank you very much, Sir, for taking the time to explain all that, very kind of you! And I'm happy to see it turned out I was on the right track with it being possible for the KV to be knocked out by the 75mm gun, but very, very difficult on the 2D6 roll, so excellent!
V/R,
Jack
Interesting to see in the future how one action will affect the next and how each side will cope with the successes and failures. Great choice on the setting for the campaign. I don’t know who to root for. 😀
ReplyDeleteThanks Stu.probably he hardest part is not to allow a side to get a momentum that is so significant that it quickly becomes an avalanche towards victory, making the last game or two boring. So far the balance seems tight, but only time and playing will tell.
ReplyDelete