

Crisis on the Right: Plancenoit 1815, described as an introductory boardgame from White Dog Games is designed by Michael W. Kennedy and was published in 2015 for the 200th anniversary of the battle. The game is still in print.
All of the Waterloo games that I can recall, concentrate on the day long Anglo-Allied struggle against Napoleon’s French, with the arrival of the Prussians being a secondary feature. This design shifts the entire focus of the game onto the Prussian arrival (Bülow’s IV Corps) on Napoleon’s right and to the fight for Plancenoit and surrounding hamlets.
The rest of this post looks at this system and gives a couple of exploded examples of play to highlight game mechanics. It then rounds off with a brief AAR and conclusions.
Please use the ‘read more’ tab for the rest of this post.
This is the third introductory game that I have bought from this company. I have enjoyed the other two (Borodino and Antietam) which have been subject to previous posts - links to which are included in the Resource Section at the foot of this post.
It is a small format game with a 17” x 11” map and a rulebook that is just 4 pages long. There is a Quick Start play sheet, which basically is a summary of the rules and a double side Quick Reference sheet, which has the game and terrain charts to run the game.
I believe the game’s production is based upon a print on demand model. The map, while very attractive, does look to be a low res output, which has caused some fine pixelation to hex edges and wording. It does not impact play, but rather is just an observation.
The counters are produced on a sort of fibre board, which I found a tad harder to get the counters free from their tree compared to the more common cardboard counters. However, once out, they are nice and chunky.
Despite the short rules, the designer has been able to insert some interesting touches.
Firstly, a turn is divided into potentially three segments. At the start of each segment, each player rolls for new ‘Action Points’. However if either player rolls a ‘1’, then that segment is played, but the turn then ends, so not all turns will run for three segments … or even two!
Whichever side rolls for the most action points, goes as player 1 in that segment. These two things taken together keep things a bit unpredictable.
Secondly, there are a list of various actions and a unit can conduct multiple actions in one turn by paying Action Points, for example, rally, move and then conduct combat, but a unit cannot repeat the same action in a segment, so you can’t move twice or fight twice with the same unit.
Further, rather than activate single units, which can be expensive, a player can activate a group. The group must consist of units that are adjacent to each other and be from the same parent formation. This, combined with stacking and combat rules hugely encourages the players to keep units from the same formation (Brigades for Prussians and Division for French) together and not have them doing fancy footwork, dancing all over the map to get perfect attack stacks or getting perfect defensive lines etc (very good).
Thirdly, the combat table is in two parts. Combat strengths are worked out as differentials (rather than strength ratios) and the combat table gives a result when the differential is cross indexed with a D6. However, here is the twist, this table only gives three results, a DEFENDER WINNER result, an ATTACKER WINNER result and an EXCHANGE result. In each case, the players go to a second chart and each roll a D6 on either the winner or loser column as appropriate - a very interesting tweak is that on an exchange result, both sides roll on the losing column. It is here that players discover exactly what happens to their units following combat.
Example, roll a 5 on this second chart and the winning side suffers no effect, while a loser rolling 5 would suffer all units in one hex eliminated and all other involved losing units in any other hexes, retreat two hexes.
Stacking is interesting. 8 combat points can stack in the open, but only 4 can stack in towns. Most of the infantry units can break down and be exchanged for 2 smaller units, which will allow them to enter town hexes, it will also allow them to extend their line when in the open.
With all of that said, let’s play!
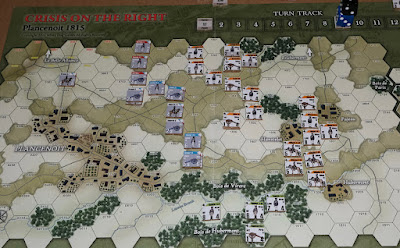
The French start with two cavalry and two infantry divisions on the map. They are screening Plancenoit. The Prussians who have two brigades just arriving on the field, have two objectives, to capture as much of Plancenoit as possible, the 12 Hexes are each worth a victory point - or if they can move beyond Plancenoit and exit the map edge, they will get an automatic victory.

Into that mix, the Prussians will get an extra victory point for each guard division (there are two) that the French release to deal with the threat on this wing.

Above, these are the opening positions. Plancenoit is to the left. The Prussians (in white) are just entering the battlefield top right and the French are between those two points, with their two cavalry divisions out in front.
FIRST CLASH
Turn 1, Segment 1. Both sides roll for their Action Points (AP’s). The rolls are poor. The French get 2 and the Prussians get 1. This immediately indicates two things. The French have the higher roll, so will go first in this segment, but one side has rolled a ‘1’, so the turn will immediately end after this segment and segments two and three will not occur.

The French spend 1 AP to bombard a hex with artillery. They are firing with two units of horse artillery, which combine their fire. They roll a D6 and score 2, which is no effect. Artillery only have two results, no effect and disruption (which is bad).
For their second and final AP (they could bank it), they use a ‘Group Move’ and bring Simmers Division down to broaden their front.
Having now used up all their AP’s the French hand the segment over to the Prussians, who have a single AP to spend. They use this to Group Move Hillier’s Brigade (top right corner) towards the high ground at Pajeau. This ends the segment and because of that rolling of a ‘1’ earlier by the Prussians, it also ends the turn.
FIRST ATTACK.
Losthim’s Brigade (Prussian) has been advancing and the French cavalry have been falling back, but this is expensive as it is costing the French 1 AP for each cavalry / horse artillery stack choosing to retire and at this moment, for better or worse, they choose to stand!

Two Prussian infantry units have strengths 4 and 6 for a combined strength of 10. They declare an attack on the French stack of 1 cavalry and 1 horse artillery unit. If cavalry fight infantry in the open, cavalry strengths are halved, so here the cavalry is halved to 1 and the artillery provides 2 strength for a total of 3 combat points. The unengaged adjacent (to the attacker) French cavalry unit at the top of the map is allowed to lend defensive support at half strength as it is not itself being attacked.
So the supporting unit is halved from 4 to 2, but then halved again for being cavalry fighting infantry in the open, so they contribute a strength of just 1 to the French defence. The final combat differentials are 10 points for the Prussians and 4 for the French, so the Prussians have a differential advantage of +6.
At this point, each side could spend 1 AP to add an extra 2 combat factors to their strengths, but it wouldn’t actually make a difference to the combat column being used, we would still be attacking on the +3 to +7 column.
Importantly, the defender is not already disrupted as that would give the attacker a +4 to their strength - a good reason to pay AP's to rally from disruption when possible.
On the first combat table, a D6 roll scores a 3, giving an Exchange result, so both sides now go to the second combat table and both separately roll on the ‘losing’ column. The French roll first, scoring 4 and get ‘All players units involved in the combat retreat 1 hex. All units in one of those stacks are disrupted’.
The Prussians likewise roll a 4 and get the same result. Now both sides have got their first disrupted units and so there is more to think about when spending AP’s as a Rally Action costs 2 AP’s!
As the French play their part of the segment out, they have 3 AP’s to spend. They use 2 to rally the cavalry unit that was just disrupted in combat and use the other one to to move a lone stack.
WE NEED THE GUARD!
As the turns play on, the Prussians have been slowly pushing the French back and more Prussian units are entering the field. It becomes obvious to the French that unless they get more support, the relentless Prussian advance will see them win.
The French player release the Young Guard Division, with the instant consequence that the Prussians gain a victory point. The only other reinforcement available to the French will be the Old Guard, but for now, they are not called upon.
The Young Guard move towards the high ground on the French left (top of the map) and attack Losthim, badly mauling them (2 units flip), but they are counter-attacked by Hacke, forced to retreat disrupted and take a loss. You can recover from a step loss if you pay enough AP's.
 |
| Tippleskirch moves through the woods at the bottom of the map |
Above, it is the start of Turn 9 and the Prussians are running out of game time. They have rolled several ‘1’s in first segments, ending those turns early. The line has largely stalemated ….. but, in the south, Tippleskirch has moved his brigade below Hubermont and is currently moving through Bois de Hubermont and are set to threaten the French right and the exposed tip of Plancenoit!
Simmer (French stack just above the woods) counters by moving with his artillery to take position in Bois de Virere, to cover Plancenoit.
THE FIGHT FOR BOIS de VIRERE
Tippleskirch has positioned his brigade to attack across the brook and assault the French position in the woods. Prussian attack strength is 21. The French defenders in the woods have 6 strength points for the infantry and their strength 5 artillery is halved, rounded up (3) for being in woods to give a total of 9 strength points. However, they get an uplift of +2 because all the attackers are attacking across a brook and they also get +4 for defending the woods. Their final defending total is 15, giving the attacking Prussians a differential advantage of +6.

The die is rolled and the result is an Exchange, both sides must roll on the ‘losers’ column. The French are lucky, all their units stay in place and are disrupted. The Prussians have to retreat all units and disrupt one of them - so this first attack is thwarted.
THE FINAL MOMENTS OF BATTLE
Turn 12 - at last Tippleskirch cleared Simmers from Bois de Virere. It had taken three separate assaults.The first disrupted the French, who then recovered (Rally), the second disrupted them again, giving the Prussians a +4 bonus in the next attack, plus by this time, Prussian cavalry had got behind the French position to cut them off and the result was the French unit and its artillery were removed from play.
The Prussians entered the lowest hex at Plancenoit and in response, Jeanin had to break his division down into two smaller units and enter Plancenoit from above to prevent further Prussian penetration.
Alas, this point in the battle had taken the Prussians too long to reach. It was an exciting turn because it went for the full three segment and in each segment the sides rolled high for AP’s. When the turn concluded, the Prussians had captured two town hexes for two victory points, plus the one victory point granted when the French released the Young Guard, giving them a grand total of three VP’s ….. which is classed as a Major Prussian Loss!
Conclusion.
An enjoyable game, where on this small map, everything mattered, each hex and situation took on its own importance. I would put the Prussian failure down to two things. Firstly they did nothing for too long with their cavalry - that should have been used against the weaker French cavalry as early as possible.
Secondly, there were an awful lot of ‘1’s rolled in the first segments, ending those turns prematurely - worse, it was the Prussian side rolling them, so on those turns they were only getting one Action Point anyway.
While the way the Action Point and segment systems is administered looks like it might overall give very different games, certainly in terms of tempo, it is down at the hex level that it makes the most impact on a segment by segment basis.
For example, towards the end of play, Tippleskirch managed to disrupt the French at Boss de Virere, but in the next segment, it was the French who rolled for the most AP’s, allowing them to go first and they successfully recovered the French stack before the Prussians could attack again, so the Prussian attack was back to square one.
The unit identity on the counter is not pin sharp and neither are my eyes, this meant a bit more of an effort was needed to ensure that brigades and divisions are grouped together correctly and for when managing units breaking down into sub-units or re-building back up again. It is not a big problem, just a noticeable awkwardness.
The game is billed as introductory and having four pages of rules adds to that impression, but in practice, I found some of the unique rather than common mechanics, had me rechecking the rules quite a bit. The flip side of that is that the extra depth made the game more engaging for me and I suppose the point is that regular gamers will get a good game out of what is termed introductory.
I’m not sure it meets the needs of a brand new gamer, not so much that it does things differently, but the level of sophistication of the rules create moments that are not well enough covered in the rules and it perhaps needs the experience of a regular gamer to work through that, so I see these rules as perhaps four pages that really needed five pages with some examples to help things along, though there were no game stoppers for me.
An example is that artillery uses line of sight for ranged fire. Some things block line of sight, but artillery on a hill can see over such blocks i.e. other hill hexes. This creates the situation that artillery on a hill can see over an adjacent hill hex and beyond and could fire at enemy artillery on a lower level, but that artillery would not be able to fire back, as it cannot see beyond the first blocking hill hex. This breaks the common sentiment of line of sight rules that if A can see B, then B can see A.
There is a quick play summary sheet that lists some of the main mechanics and important rules. I read that and was surprised that I had missed two rules when reading the four page set - that artillery could stack for free and that a side could accumulate up to 12 unused AP’s. This goes back to my observation that to get all of this system down to four pages has required some brevity, so some rules are just single sentences, added to an associated paragraph, they are there, but this is not a quick four page rule read capture.
I would like to have seen some examples of play and some designer notes, which could have gone onto the two sides of a single fly sheet, or even the unused reverse of the quick summary play sheet.
We are used to seeing 'Exchange' results in games and these are commonly managed as both sides having to take losses and each flipping a counter to it's weaker side or eliminating an already flipped unit. Here, instead, both sides each roll on the losers column of the second Combat Result Table, which is quite a neat idea and brings a more nuanced selections of outcomes.
Overall, I am pleased with the game and will happily play it again. With the Prussians losing so badly, there is a slight puzzle for me to crack here. As for the French, I suspect that they will always need to call up at least one of the two extra divisions (in our case the Young Guard) to assist them cover all parts of threat.
Subject wise, I am delighted to see a game shine a light on this part of the battlefield and this will be played again soon.
Complexity - The game is described as introductory and is delivered in four pages of rules. Considering that combination, I feel there is quite a bit of system here that is punching above its weight for an introductory game and that the game is more involved and nuanced than ‘introductory’ suggest, plus the rules could have done with a bit more space to breathe. The player will find their way through the game and after a few turns will pick up the rhythm of play, but that the rulebook will be more frequently referenced than ‘introductory’ suggests. In the end, I like that a simple / small game is in fact not superficial in nature and has some depth to the play. So just move the complexity rating up one notch and enjoy :-)
Size - A small map makes this a compact game. Some space needs to be set aside for the breakdown units for each infantry division or brigade, but these occupy no more space than a single sheet of paper would. It comes in a 1” deep box and would make for a good travel game for vacations and since the map can also fit onto a large tray, anyone recuperating or with mobility restrictions would find the format useful.
Solitaire - This is a two player game, that like many two player games, plays fine solitaire. I played this game solo and did not come across any barriers to such play. The way that segments can bring a turn to an untimely end and the randomness of who goes first each segment and the allocation of Action Points takes quite a bit of player control away, which can only help solo play.
Time - I was photographing and writing / typing while playing, so lost track of actual gaming time, but felt that my game would have sat in a 2 - 2½ hour session. However, it must be remembered that turns can be randomly cut short when a ‘1’ is rolled for Action Points and my game seemed to have their fair share of that, so putting an accurate time on play will always be difficult. Next time I play, I will come back and edit this with something more accurate.
Resource Section.
Borodino - by White Dog Games - Link to post
http://battlefieldswarriors.blogspot.com/2020/12/borodino-1812-most-terrible-battle.html
Antietam - by White Dog Games - Link to post
http://battlefieldswarriors.blogspot.com/2022/01/the-battle-of-antietam-17th-september.html
My sister webspace COMMANDERS is being re-configured to showcase various figure and boardgame systems that I am enjoying and give a flavour of where current ongoing projects are up to. Link.
Very nice AAR and review, as always. I feel that print to play is no excuse fo fuzzy graphics these days. More likely poor definition art was used in the first place, and maybe a poor printer, but neither need to be...
ReplyDeleteHi, thanks. Their most recent map (Antietam) is gorgeous, so something went wrong with this one.
ReplyDeleteoutstanding batrep, Norm. that map is absolutely gorgeous, too. I'm seeing a revival in board games in my hobby area, and certainly have been spending quite q bit of money on older games I'm nostalgic for lately.
ReplyDeleteone thing I'll say is that there is no shortage of choice out there across eras and genres for board wargaming.
Thanks Steve, yes I think the cross over between figure and boardgamers has been growing in recent years. I’m keeping an eye on Compass Games who are bringing back some of the old titles - hopefully this year they will be bring out John Hill’s Tank Leader that was done by West End Games in the 80’s.
DeleteA little bit of math.
ReplyDelete11 out of possible 36 results end the turn (11, 12, 13, 14, 15, 16, 21, 31, 41, 51, 61). The average number of APs a side will have on the last segment is 52/22 (~2.36) To get that value, sum all the digits above and divide them by their count).
The average number of segments per turn is given per 36/11 (~3.27).
The average number per turn is given by [(36/11) - 1] * 3.5 + 52/22 = 227/22 which is 10.32 APs.
I think it's important to know at least the average APs one will get per turn to correctly plan.
Note I was part of the early playtest and the turn ended on doubles. The average number of activations was thus 6 (36/6) and the average number of APs was 21 (6 * 3.5), a much higher number. That number was too high and caused the French to lose some games very early.
If someone wanted to experiment about the average number of activations, I suggest they use a third die (d6, d8, d10 or d20) and have that die determine if the turn ends on that segment. For example, if using a d10 and saying the turn ends on 1, 2, and 3 then the average number of APs one would receive is (10/3) * 3.5 = 11.67.
The way APs work gives the game excellent replayability.
Thanks, I struggle with such things but I did wonder whether there was a 1/3 chance of the segment ending since either player can roll a ‘1’ (a 1/6th chance) to end the segment, but then I figured that to get the true maths of that, something no doubt had to be multiplied against the other …. So I left it alone :-)
ReplyDeleteI particularly like the way that AP’s and the associated mechanics help solo play. I will run everything again now that I have a better understanding of how the two armies might be better used.
I too struggle at times ... one of the calculations is wrong.
ReplyDeleteThe average number of APs per turn is given by [(36/11) - 1] * 4 + 52/22 = 252/22 which is 11.45 APs.
My mistake was forgetting the average number of APs per player given neither rolled a "1" is 4 (22, 23, 24, 25, 26, 32, 33 .... 65, 66).
Have you tried WDG's The Russian Empire Strikes Back: Lodz 1914? Silly title but a pretty good game that also uses APs but only to perform special actions. Same system as We Shall Fight on the Marne but more streamlined and a more interesting situation for this system in my opinion.
I wasn’t making that average number (11.45) AP’s per turn, so I must have been making more than the average number of low die rolls …. And it did feel like that.
ReplyDeleteI have not seen the Lodz game or the We Shall Fight game, though I am seeing some of Michaels trademark design elements crop up across a few different titles, such as the treating of woods and buildings terrain as being something that disrupts formations and causes units to presumably fight dispersed, rather like skirmishing.
Thanks, that was a very interesting AAR. I'm slightly baffled why cavalry in the open should halved when attacked by infantry. Shouldn't it be the other way around? (Or is the idea that cavalry are more effective against cavalry?)
ReplyDeleteHi Martin, it is an interesting point. I had assumed the design is doing two things, firstly cav v inf is showing the inf using the advantage of square and that cavalry can retreat (at AP cost) in front of advancing infantry, which seems acceptable, however that doesn’t seem to go far enough, because infantry are very successful when attacking cavalry and cavalry don’t get a benefit for attacking disrupted infantry, so overall, it feels like the cav v infantry rules are a little under-developed in that regard.
ReplyDeleteA good review Norm and great to see the very important Prussian action at Waterloo getting its own game. Too often games tend to focus on the main action and ignore the periphery, when the latter can be more interesting than the former.
ReplyDeleteThanks Steve, Waterloo is one of those hugely popular subjects for game publishers to concentrate on and almost by default, like a spotlight, designs fall on wellington’s stand, while the important Prussian arrival sits somewhat in the shadows - I just can’t think of another Plancenoit game, yet would run out of fingers and toes for Waterloo games, so this title is a welcome addition to the big picture.
ReplyDeleteThis sounds like a really good little game Norm....you must be a good writer and advocate for board gaming, because it's never really interested me that much, but the last few blogs you have written have certainly painted a rather attractive picture of this branch of our hobby....maybe one day I will take the plunge?
ReplyDeleteThanks Keith, I enjoy board and figure gaming in equal measure, though it does add to the list of demands for your time. The handy thing about the smaller titles is they can come out anytime in any place and use a slot of time that you might not otherwise use to get a game done. Plus, for those times when my my back hates me, I can just sit at the dining table in a hard chair with a small game right under my nose and no stretching.
ReplyDeletePerhaps everyone should have even just one or two titles that they can get good at and know well.
Seems a very nice little game Norm. Like Martin, I was quite perplexed with the inf v cav engagement rule. Seems a bit off doesn’t it?
ReplyDeleteOtherwise, nice game board (shame about the low res) and interesting mechanics. Having a summary sheet for four page rulebook made me smile though! :)
Hi Mike. yes, I think a sheet of design notes would help make sense of some design decisions. You can see some of his design ideas in his other games, so they must be seated in his philosophy of how action unfolds.
DeleteThe summary sheet is a welcome addition, though a poor stand - in for for some examples of play or extra space for the rules.
Their latest game, Antietam has a really gorgeous map and a separate 4 page play book with examples, so I suppose this 6 year old game has been part of that learning curve for production.
Interesting review, thanks. Game looks well-designed, although I think the scenario as a whole is the most tempting thing, I don't think I have ever played the Plancenoit actions.
ReplyDeleteHi, I agree and if I had those armies I would be looking at doing that, though the situation could stand as proxy for any armies. I also wondered about using the broader system as a figures game on the period.
ReplyDeleteNow I like anything on Waterloo but as you say in the majority of games the Prussians always seem to be an afterthought. This seems to address that, certainly I will go hunt it out. It also looks like it could be transferred to a table top set up fairly easily, I have a few hex mats 😀 I never got chance to comment on your post re clearing out stuff and refocusing - I’ve done that a couple of times now. I most probably still have too much but the collections are getting smaller and each time I do a clear out I do feel a lot better for it 😊
ReplyDeleteHi Graham, the Plancenoit situation is a different perspective on the battle and a bit of a re-fresh to gaming 'Waterloo'. It is interesting to see the comments on clearing out, some regretful, but the majority feeling it does come with a feel good factor. Perhaps a mix of the two is nearer the mark.
ReplyDeleteWow, very detailed analysis of the game, Norm. It's definitely a lot more of a thinking man's game than Black Powder - lol!
ReplyDeleteHi Dean, the good thing about single systems like Black Powder is that you can play it very often and get good at ‘just knowing it’. Sometimes with boardgames, it is like that journey starts repeatedly with each different game put onto the table.
ReplyDeleteI fell into the trap here of thinking that 4 pages of rules would be more straight forward than they were, but then, I did enjoy the greater depth.
More interesting to me than another Waterloo game,does seem odd re cavalry and infantry but a good source for a figure game, you'd better start on some Prussians!
ReplyDeleteBest Iain
Hi Iain, re the cavalry, I think it would work better if the cavalry were rewarded for attacking a disrupted unit and that might even make a good house rule, it is not knowing the designers intent in this area that makes me hesitant.
ReplyDeleteYes - some Prussians :-)