

With the ACW pocket army having grown a little in January, I was encouraged to get the new recruits to the table. The armies are still less than half the size planned, but never-the-less they currently allow for a game typical of the Neil Thomas table teaser style scenarios.
I have been working on a sister set of my Two Flags - One Nation rules, with a conversion that moves them from being purely hex based to going onto the open table, so it seemed a good moment to put together a new starter level scenario that might make it into the revised rulebook, while giving all of us blessed with ‘small collections’ a handy game that can be played out in an hour or so, with whatever rules we like.
The action will be fictional with the prime intention that the scenario should touch upon several areas of the rules to serve its introductory purpose.
For the scenario and AAR details, please use the ‘read more’ tab.
It is late summer 1863, the Union have been on the offensive in Tennessee. Brigadier General Johnson has been operating his division as flank security as the army moved towards Chickamauga Creek. Neither side have properly appreciated the presence of the other and an initial contact between advancing cavalry elements will develop into a meeting engagement.
In our small sector, the Confederates have orders to cut Larkin Turnpike. To that end, Captain Hollis has been ordered to take his cavalry and secure Figgins Farm, which intersects with the road, while 1st Brigade, followed by 2nd Brigade, will move up to consolidate the position.
Union forces likewise are advancing, intending to secure the lateral road. Cavalry commander Captain Perkins has arrived at Crows Wood and can see Confederate activity at the farm. He orders his men to dismount and advance onto the farm. As the initial troops clash, more troops from both sides get fed into the battle.
At Start - Hollis’ cavalry are dismounted and hold the farm. Perkins cavalry are dismounted and stand in front of Crow Wood. They are beyond carbine range. Larkin Turnpike is lined with snake fencing on both sides of the road for 16” in both directions from the farm.
The game lasts for 10 turns and the Union side takes the role of Player 1.
Victory Conditions - At the end of the game, each player totals their victory points earned. The side with the most points wins. Sole control of Figgins Farm is worth 2 VP’s. A player gets 1 VP for each enemy infantry regiment, cavalry regiment or gun battery that is removed from the table as lost.
Special Rules
Woods and the farmhouse block line of sight.
The woodland is heavy and can only be entered by infantry in skirmishing formation (including dismounted cavalry). Units in woodland can claim being in cover.
Woods and fields are classed as difficult terrain. Snake fencing is also classed as difficult terrain, but costs a fixed 4" of movement allowance to cross one section.
Cavalry of both sides are always automatically in command.
If using the optional rule for giving commanders attributes, then for Woods (Confederate) and Dodge (Union) add one (+1) to the testing die roll when trying to get an attribute and if successful, again apply a +1 modifier when testing for which attribute is selected.
Neither side has a Divisional Commander present.
Reinforcements
Only the cavalry of either side start on the table. Everything else arrives as a reinforcement and arrival point for each brigade is randomly allocated. Roll a D6 and consult the entry point on the map. The Confederates have the better maps, so have a better chance of arriving near Figgins Farm.
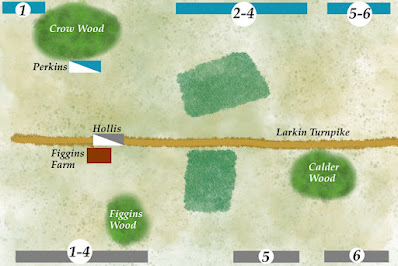
As soon as at least one of the cavalry units suffers at least one HIT, then at the start of their next respective Command and Control Phases, each player rolls a D6 to see where their respective 1st Brigades arrive. The Brigade will then enter the table in the player’s Movement Phase of that turn (i.e. there must be a cavalry fight with casualties before reinforcements can arrive).
Once each player’s 1st Brigades have arrived, both players can call in their 2nd Brigade in any subsequent Command and Control Phase after at least one of the 1st Brigade regiments (of either side) suffers at least one HIT. Each player repeats the above arrival process to see where their 2nd Brigade arrives (i.e. there must be a fight involving either of the players 1st Brigades getting casualties before both players can call up their 2nd Brigade).
Random Events Table - Use the table provided for the Mill Creek scenario in the rulebook, but replace Event Number 2 with this Event ….. ‘Figgins Farm catches fire - the building must immediately be abandoned (move any occupying unit out now, a normal rearward move towards their own baseline) and cannot be occupied for the remainder of the game. The farm does not contribute the usual 2 Victory points at the end of play. The building stays in place and continues to be a line of sight obstacle. If this event is resulted again, treat it as ‘no effect’.
Orders-of-Battle
Confederate

Union
The Union are disadvantage by having two units graded raw and perhaps arriving on the table at some distance from the farm. They have the advantage of having a second artillery battery.

The Action!
Firstly we test to see whether any of the brigade commanders get attributes (for good or for bad!). Unusually, two do. Brigadier General Wood (Confederate) rolls ‘Inspirational’, which essentially allows the commander once per turn to add +1 to any Capability Test. The downside is that if he is killed, all his regiments suffer 1 hit.
Brigadier General Dodge rolls ‘Superb Tactician’, so his command range is extended from 12” to 18”.

The cavalry firefight
The two cavalry units start outside of carbine range, so Perkins (Union) finds himself leading his men forwards towards the farm. Shots ring out from Hollis’ men, who have lined the snake fencing and they cause 1 Hit ……. This also activates 1st Brigade for both sides.
1st Brigade arrives (turn 2).
The union randomly bring on their 1st Brigade in the centre, the confederates on the left, behind the farm.

Willich (Union) has his three regiments veer towards the farm, while his artillery takes up position in a muddy field, causing them some delays. As the infantry approach the farm, the dismounted confederate cavalry fallback from the fencing at the road, taking up positions in and around the farm building.
Brigadier General Wood (Confederate) pushes his two regiments up the left flank towards the farm, while Calvert’s artillery moves around to the right of Figgins Wood.

Oh No! A fire at the farm.
While the dismounted confederate cavalry continue trading shots with the enemy cavalry, a fire takes hold of the farm building, forcing the confederate cavalry to abandon their prize and fall back to safety (caused by a random event).
Willich (Union) had brought the whole brigade into line to cover the lateral road in front of the farm, with 1st Ohio forming up on his left by the field. This brought them into the sights of the deployed confederate artillery, which immediately inflicted 2 hits (and there-by activating the 2nd Brigade of both sides).
2nd Brigade arrives (turn 5).
Random selection brings the Union 2nd Brigade in on their right, besides Crow Wood. The Confederate 2nd Brigade arrives immediately behind 1st Brigade.

The battlefield has suddenly become quite crowded, with nothing at all happening to the right of the fields. The first brigade of both sides are essentially in the way of the reinforcing second brigades, so initially neither side can take advantage of their concentration of force.
Hollis exploits the open ground.
With no further role for him at the farm, Hollis mounted his troopers and moved out to the right towards Calder Woods. From here he could threaten the enemy flank, while securing the confederate flank, but as they rode in front of the Union artillery, they took fire that disordered them, forcing them away from the guns and spurring them on to go and seek refuge behind Calder Wood (using the once per game 'fast cavalry' rule).
No room to manoeuvre!
With the Union 1st Brigade firing and their 2nd Brigade pressing down the right flank, reaching the road in column of attack, the confederates lacked the time and space to take the initiative.
Confederate 2nd Brigade ranked up behind Wood’s brigade and prepared for the inevitable union assault, but being in such depth, they were ready to immediately counter-attack once the union assault had been absorbed.

The union charge turned out to be half hearted and came to nothing. The confederates reorganised. Worn 1st Brigade got out of the way. 2nd Brigade moved up, spent a short time firing and then charged home. Their impact was devastating, inflicting 6 hits, adding to the 1 that 29th Indiana (union) already had, almost sweeping them from the field.
Serious misjudgement by Hollis.
While taking cover behind Calder Wood, Hollis observed the enemy artillery moving across the lower field in the centre and decided to attack, despite his level of casualties and disorder. The artillery was too far away and by the time Hollis reached them, the guns had deployed and were able to cut the cavalry men down.

A natural lull followed in the battle. The job was not done for either side, but the end of the scenario arrived with turn 10 played out.
Adding up the victory points, there had only been one loss, the confederate cavalry, so technically the Union won on 1 VP.
However in truth, in this game, the battle had yet to reach a point of real decision, it was just that the clock had run down. Union 2nd Brigade were in a perilous state, while the confederates had stabilised the left and the centre by successful disengaging 1st Brigade and redeploying it to support the guns.
Conclusions.
This was the first play test of this scenario and in principle, the framework of a ‘meeting engagement’ with the Union having some intel limitations worked quite well, but the scenario needs two immediate tweaks.
Firstly, the game needs longer to run, so the next play test will be increased from ten to thirteen turns to see how that goes.
Secondly, the arrival of so many forces on the left half of the table became problematic and made for a less interesting battle, so the die roll ranges for the random entry points need smoothing out, to make a broader and more chaotic arrival. I have kept the union values at 1, 2-4, 5-6, but changed the confederates the values to 1-3, 4-5, 6.
The game took around 90 minutes to play through, which is fine for what is intended.
The Special Events are rolled for at the start of each full turn with 2D6, so ten turns gives ten potential events. Results of 6, 7 or 8 are no effect. The ‘farmhouse is burning’ event needs a 2 to be rolled to happen, so is less likely to crop up in a playing, but the possibility is there as indeed it was today and that changed the game dynamic to being casualty based only, which then suffered from the fact that everything was so bunched up in depth, that most units were saved from the carnage that would have driven the victory points.
Hopefully the two changes will open that aspect of the game up.
The rules for the open table seem to be doing their job okay, with some control being wrested from the player and nuances cropping up to give local intrigue. I would be interested to also run the scenario with both Black Powder and Pickett’s Charge, just for comparison.
Resource Section.
My sister webspace COMMANDERS is being re-configured to showcase various figure and boardgame systems that I am enjoying and give a flavour of where current ongoing projects are up to. Link.
A posting of the update design notes for the 2021 Two Flags - One Nation conversion to the open table. LINK
http://battlefieldswarriors.blogspot.com/2021/08/converting-tf-on-rules-to-non-hex.html
Seemed to be a realistic engagement but as you say Norm, the artificial ten turns gave the Union a technical victory they did not really merit from the position on the table. That said, setting a limit and providing s mechanism to reach a winner/loser conclusion is a valid game mechanism, as many players do want to get an actual result...that's one of the things I like about To the Strongest!
ReplyDeleteHi Keith, I set the turn level to help define the scenario and then stuck with it, so that post game I could decide where the tweaks should go. While I quite like a fixed number of turns, I do like those games that give a chance of a final bonus turn, which stops players playing to a known final line.
DeleteRebels and Patriots uses a variable game length mechanism too that allows for extra turns. It works well.
DeleteAn interesting little game there Norm, good to see your growing collection on the table.
ReplyDeletethanks Phil, it has moved me to get another union regiment on sticks while I still have the flow.
DeleteYour arrival approach for units looks really interesting, and it was fascinating to read how it created unintended results.
ReplyDeleteHi Peter, yes a deliberate mechanic intended to bring some fluidity and uncertainty, but I misjudged the effect here, something that different die rolls would likely have hidden, so the tweaks can really help the tempo of the game. I suspect I have not gone far enough, or perhaps should reduce the length of edge that the Union can arrive on in the centre.
DeleteAlways fun to read Norm, and I like the small mechanic of losses triggering reinforcements, had not thought of that before..
ReplyDeleteThank you - I would like to introduce that into a few more scenarios as I was immediately aware that even though I designed the scenario with a ‘thought’ on how things would run, it surprised me and I must say there is a little bit of excitement when rolling for the unknown arrival points.
DeleteChalk up one more great narrative of the battle following on from the fascinating details of rules and developments lying behind the action.
ReplyDeleteHi Mike, thanks, I’m keen to get this back to the table to see how the game plays out when the troops deploy over a wider frontage.
ReplyDeleteThanks Norm, I enjoyed that post. I like the randomised arrival locations for the brigades as this can give potentially different games each time it's played (a big plus with me personally, who plays alot of solo games). Very much in the spirit of the OHW scenarios. your post reminded me I wanted to play an "open" game of TFON soon. Perhaps after my latest project.
ReplyDeleteThanks Steve, your plate is always full :-), I am looking forwards to your Sicily game. I like that the randomised arrival can be pushed to give greater weight to a particular area in the battle and in this case, was a device to reflect that the confederates had the better maps, it just needs hardening a bit more.
ReplyDeleteAn interesting scenario and a lovely looking game. I like the tweaks you have made which will hopefully help avoid the issues that cropped up in this play test. Could you possibly move the barn to the centre of the table, to give some more room for play on the flanks?
ReplyDeleteI look forward to seeing this played out again.
Thanks Steve, I was hoping that the barn on the left would cause a dilemma for those troops arriving at the other end of the table ……… except they didn’t :-)
ReplyDeleteGood to see these rules out for a test drive again. Are you moving away from hexes due to your switch to 28mm figures? Table density looks quite heavy with larger figures on a small table. I wonder if this will require more modifications down the road to discourage WWI-style play? As always, interesting and pleasing to the eye.
ReplyDeleteHi Jonathan, yes the move to 28’s just requires the hex rules having alternative options. I could (and would like) six inch hexes, but in my space the reduction in the number of hex cells makes that an impracticable route, though I could return to my roots of an 8 x 6 grid - which is what Tigers at Minsk was originally designed to work with and TF-ON not much bigger.
DeleteThe thing about density v table space is an interesting point and I think more weighted towards the visual than the practical. In my 12mm games, I would preferably be running regiments at 3 x 40mm for a 120mm frontage. My 28mm regiments are based upon a 150mm frontage, so frontage wise, surprisingly there is just 30mm in it per unit.
The depth increase of the larger scale is a doubling, yet in wargames, frontage matters more than depth as all of our bases are seriously out of scale depth wise compared to what we are trying to do with the frontage anyway.
In Warlords Epic, I was running 2 x 60mm for a 120mm frontage, the advantage as with the Kallistra 12mm is the 20mm depth, so two lines (one supporting) gets closer together and looks right, so I think its more about looking right rather than real impact on play.
The road is clearly wider and the building bigger, though in 12mm, I would have the same actual footprint of BUA, but likely have 2 - 3 buildings. So taken in the round, the reality is that it is not as bad as it looks, if you know what I mean.
This particular scenario did not work out as a good example of intention, as everything was bunched up on the left side of the table. Spread out, it wouldn’t probably look as oddly dense.
Fine looking armies mustering there Norm. A nice looking game and interesting AAR.
ReplyDeleteThanks David, your period, so hopefully it entertained.
ReplyDeleteNice ACW action. It’s a good scenario made better by the tweaks. I also greatly appreciate it when AARs include an overview map like you do here; makes it much easier to grasp what is going on. 😀
ReplyDeleteOne day I’ll get some 28mm ACW. They just look sooo pretty. 😀
Thanks Stew, if I can get the tweaks right, it should make for a good throw down game when time is short. I have been encouraged to throw another Union regiment on painting sticks while I have some momentum.
ReplyDeleteNicely done Norm and interesting scenario I’ll be back to borrow it. Your 28 mm armies really can’t be described as pocket anymore two good sized brigades plus cavalry. You’ll need deep pockets ! They look splendid.
ReplyDeleteThanks Matt, I feel reaching the point of being able to claim two separate brigades, even smaller ones, is a turning point on the journey of collecting.
ReplyDeleteEntertaining and interesting as always, your 28mm troops and terrain look great!
ReplyDeleteBest Iain
Thanks Iain, I am enjoying them.
ReplyDeleteLate to the party but I very much enjoyed that....
ReplyDeleteThanks Steve, a game to the size of both our likings.
ReplyDelete