

Regular readers may recall that recently, in my figures based Wars of the Roses ‘Imaginations campaign’, which deals with two local feuding factions, I used a boardgame to play out a couple of the bigger battles taking place on the national stage.
The most recent was Tewkesbury and our local feuding Lords, Darcy and Trebian, were instructed to bring troops to support their respective armies (Lancastrian and Yorkist).
I represented this by inserting a few extra counters into the boardgame to show the extra troops brought by our two local notables.
During the boardgame, a situation presented itself that I wanted to bring to the figures table, so here were are. This post is all about that clash, using miniature figures, between Lords Darcy and Trebian, who by chance had been posted to the same part of the battlefield.
For the rest of this post, please use the ‘read more’ tab.

When I set up the boardgame, I used dice to randomly select where Darcy and Trebian would place their troops. It could have been anywhere on the board. Darcy, thanks to the men of Piggy Longton had an experienced contingent of bowmen, plus a contingent of billmen (adding 2 additional counters to the game). Trebian on the other hand had brought two contingents of retinue billmen (also adding 2 counters).
Trebian’s die roll put him on the right of the Yorkist army, amongst Hasting’s battle (or ward). The ward on the right of an army is known as the Vanward. Darcy’s roll put him on the Lancastrian left wing, known as the Rearward, so they were roughly facing each other!
Then they diced to see where they would be placed within their ward, on the left, the right or the centre. By total chance, they were both placed on the outer part of their respective wings and so would be facing each other. This was a real chancy outcome, but one that I could enjoy … their embittered hatred of each other would now no doubt be played out on the battlefield and it would be personal!
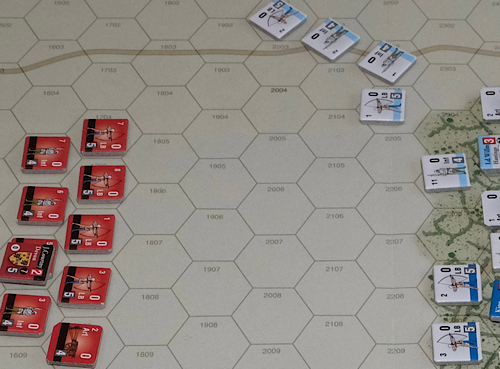
Above, in the opening move, Hastings (Yorkist - white) ordered Trebian to extend the wing with a view to avoiding difficult terrain and hoping to envelop the Lancastrian line.

Above, to counter the move, Devon (Lancastrian - red) ordered Darcy to extend the Lancastrian wing and block the enemy manoeuvre. Darcy’s contingents are represented by the red counters with the number 7 on them. Trebian is represented by the white counters with billmen numbered 1 and 2.

Above, Trebian took the fight to Darcy, with his billmen, supported by bow, crashing into the Yorkist line. Here we shall depart from the boardgame and take the fight to the tabletop.
Note, the Tewkesbury boardgame has already determined a winner and the political fallout has already been covered in an earlier post, so that outcome is already fixed, this is just a side show for fun and will not count towards any campaign outcomes. There is a link to that earlier Tewkesbury post in the Resource Section at the foot of this page.

Above - this part of the battlefield is open and flat. Darcy (nearest the camera) holds an advantage in bow, Trebian an advantage in billmen. We shall be using the rules Sword & Spear 2nd Edition from Great Escape Games. Victory will be based upon the break point of each force as per the formula in the rules.
The situation has presented us with a head on clash, not much subtly here, no fancy footwork or terrain to negotiate. It will start with a solid block against solid block, but the difference in bow / bill balance of either force may become the telling factor. Trebian’s bow are concentrated towards his right (as per the boardgame), whilst the Lancastrians are distributed more evenly. However, the Lancastrian bill are stretched rather thinly behind their ranks of bow.
There were three units (counters) per side in the boardgame. I will give these a multiplier of 4, so that each side gets 12 units for the figures game. Darcy has 8 bow and 4 retinue bill, while Trebian has 8 retinue bill and just 4 bow, so he will be wanting to make contact as quickly as possible and get out of the inevitable Lancastrian arrow storm!
Special rule - to reflect the embittered relationship between Darcy and Trebian, any unit in a melee that has their Lord attached, will get two additional combat dice.
And so it begins!
The two sides start at extreme bow range and in common with these things, the twang of bowstrings and the whoosh of arrow shafts slicing through the air, opens the affair.

Above - Trebian’s bowmen (left) trade arrow shafts with the Lancastrians, but for those Yorkist billmen that do not have archers to their front, they break into a run to close the gap with the Yorkist archers …. much to their detriment as Trebian’s centre takes heavy casualties.

Above - These casualties continue as they close to contact with the Lancastrian archers, which in turn start to fall back through their own billmen, so that soon, the melee troops of both sides are in action.
The Yorkist left, have only advanced with part of their force and they are quickly overwhelmed, causing the Yorkist left to retire. Despite things not looking so good for the Yorkists, it is three of Darcy’s archer units that are the first to rout.
Trebian moves between his three bill contingents in the centre, urging them on (using that powerful +2 dice in combat), while Darcy is also in the centre, forcing his own billmen to press on.

Above - it is Trebian who is getting the upper hand and he eventually cracks the Lancastrian centre, but he doesn’t have enough troops immediately on hand to exploit the gap. There is a pause while he calls forward contingents that have remained behind their ranks of bow.
Darcy takes this opportunity to counter-attack, causing Yorkist contingents in front of his men to rout. As the troops thin out on this part of the battlefield, Trebian and Darcy manoeuvre their own contingents against each other, but both sides are exhausted and other than a bit of push and shove, nothing can be decided.
It is difficult amongst the swirling melees to get any sense of who is winning. The Lancastrians have suffered more from routing units leaving the field, but the Yorkist troops have taken heavy casualties and several contingents are near breaking point.

Now the moment of crisis! The Yorkist forces hit their ⅓ loss mark and all units are forced to take discipline tests. The problem for them is that many of their contingents have already suffered badly enough that they are failing these tests and routing. The panic is infectious, remaining contingents have to take two test, one for the ⅓ losses and another at seeing fellow contingents rout.
As the tests continue, the Yorkists lose increasing numbers to rout and they quickly reach their tipping point ….. ½ losses, which is the signal for the army to withdraw - defeated!
Conclusion.
Exposed to superior enemy archery, the Yorkists from the outset were compelled to quickly close with the Lancastrian line and to be the more aggressive side.
They took many casualties on the way in to contact, whilst seeing their left collapse and retreat. In the centre, they did break through, but had failed to ensure fresh contingents were immediately on hand to exploit the gain.
For a while, the Yorkist right looked to be pressing the Lancastrians hard, but eventually the tide turned and here too, they were beaten back.
We did end up with Trebian and Darcy fighting in the centre, but by this time the troops were exhausted and we never did get to see a personal clash between the two leaders.
Of course, as said earlier, the outcome of this action has already been determined and accepted during the playing of the boardgame, so we are just having some fun here, but to have Trebian and Darcy square up to each other in the boardgame and not capture that moment on the figures table, would most certainly have been an opportunity lost for me, as these two nobles have been fighting each other locally at the Piggy Longton ‘imaginations’ parish for over a year in my own campaign.
From the outset, this was something of an unimaginative scenario to bring to the table, being a block on block head on clash over clear terrain, but the imbalance of force type did add something, as did the special feuding rule, so I was keen to see who would fare best, Darcy with his extra bowmen or Trebian with his extra billmen, plus I do like linking figure and boardgame outings to each other.
The truth is that Trebian’s force was quite heavily damaged before the hit the Lancastrian line. Some kinder dice were certainly possible and so the outcome was not necessarily going to automatically favour the Lancastrians, but it must be said, the bowmen did perform well ….. though many fled the field rather early!
Anyway, an enjoyable exercise to add into the mix of War of Roses games that cross the table. Thanks for stopping by.
Resource Section.
The battle of Tewkesbury (the boardgame) was recorded on this blog and can be reached at this LINK;
https://battlefieldswarriors.blogspot.com/2022/08/tewkesbury-1471-and-men-of-piggy-longton.html
My sister webspace COMMANDERS is being re-configured to showcase various figure and boardgame systems that I am enjoying and it gives a flavour of where current ongoing projects are up to. Link.
So essentially the same outcome as with Men of Iron?
ReplyDeleteYes …. Even down to The Men of Piggy Longton (bowmen) fleeing to the standard.
DeleteThe transition from board to table worked really well and effectively the same outcome glad you enjoyed it and I’m sure we shall be hearing more of their exploits
ReplyDeleteHi Graham, yes a good fun couple of hours that pushed out a scenario set-up that perhaps I would not normally do when working within my own ‘imaginative’ constraints - the boardgame situation did give a good framework to build upon.
ReplyDeleteIt is always an interesting read when you take a small piece of the action from a boardgames to the tabletop, and your armies look splendid on the tabletop.
ReplyDeleteThanks Peter, I think we both share an interest in the same sort of sized game and I do like seeing these armies on the table, though lots of flags always helps :-)
ReplyDeleteA straight forward scenario but that’s to be expected from a big battle. Line up and slug it out. The losing side was very outnumbered regarding ranged attacks and had to advance quickly and I guess could not pull it off. No group moves?
ReplyDeleteHi Stew, the ‘imbalance’ in the force actually read as 44 points for one side and 40 for the other and since total victory is based on half loss, that is only really a difference of 2 points, so it was interesting to see what the different unit types brought to the party.
DeleteThere are group moves and that is how the Yorkist 3 units of billmen initially ‘ran’ towards the enemy. They could do that because they didn’t have any friendly ‘pesky’ archers in front of them to interpenetrate.
It is quite a luck dependent system, so maybe the archers were luckier than they may have been on a more average day.
Excellent looking game Norm. And always fun to get the figures on the table even if the scenario is quite simple.
ReplyDeleteGood to see the same result as the board game which would have added some interest to the play through.
Unlucky that Darcy and Trebian did not face off man to man.
Thanks Ben, a visual but short game was just the ticket and I’m glad results stayed broadly in line with how the boardgame played, probably just a luck thing.
DeleteDarcy and Trebian in good old one-on-one combat would make a great narrative, though I would lose one of them! There will always be a son to take over the title ….. but still! :-)
Nice to see this small part of the bigger action from the boardgame played out on the table as planned. A simple head on clash but there seemed to be plenty going on to give an enjoyable enough game though. The figures look superb too.
ReplyDeleteThanks Steve, yes, very enjoyable. On the face of it. Most War of Roses games are going to be head on clashes between 3 or 4 wards, but in most of my games, there is quite a bit of terrain and perhaps something of a mission, so plenty to break it up a bit - so the change here was part of the fun.
DeleteYou certainly have a way of bringing the action to life Norm and it makes for a most enjoyable morning coffee read. Could the rules handle a man to man single combat had it come to that?
ReplyDeleteThanks Lee, Sword & Spear doesn’t do the man-to-man thing, which I think is a lost opportunity. It does use the common mechanic that if a leader is attached to a unit and the unit suffers harm the leader tests for risk. However, in these rules it is harder to get a leader loss because that can also be tied in to the leader’s unit not inflicting any hits itself.
ReplyDeleteDid you get to your DBN game with those nice building?
Not as yet Norm as hoping to get a couple of Epic battalions off to the States by Friday, but enthusiasm is still high for a game.
DeleteI look forward to reading more about that. My Napoleonic Epic commanders have just arrived and they are rather nice sculpts. John Stallard of Warlord Games at the recent open day said that there was a lot more Epic to come down the road.
DeleteA fine transition to the table and a similar result too. I always imagine our tabletop battles to be part of a bigger picture.
ReplyDeleteThanks Phil, most of my actions are quite small, so thinking of the bigger picture does help with context. I note that the new Napoleonic rules by Warwick Kinade set the game up with a definite nod to the battle that is going on beyond the perimeter of the table edge.
ReplyDeleteIndeed, I attended a Battlegroup campaign weekend that Warwick organized and if your side lost on the table opposite you and you were still playing you had to take a chit.
DeleteWhat a superb set of figures. Apart from the enjoyment of the post, I loved just pouring over the shots of the action. Though you comment on the lack of subtlety to the action - just plough in and attack, attack, but still gave an exciting narrative.
ReplyDeleteHi Mike, it is nice to get these figures to the table, just for their own sake. I really enjoyed the game, even though I am familiar with the rules, for most of the time, I really was unsure which side would win and I think that brings its own tension and excitement to play.
ReplyDeleteThe men of Piggy Longton and their deeds of daring-do are amongst my favourite niches in the blogosphere. I shall miss them when the conflict is finally over!
ReplyDeleteThanks David, I’m glad others are enjoying that part of the world.
DeleteNicely done Norm a bloody encounter !
ReplyDeleteThanks Matt, I’m amazed that my original leaders are still standing!
ReplyDeleteVery nice game Norm. Your figures are a real treat! Love the way you seamlessly switched from boardgame to tabletop even if only as a ‘casual fun’ scenario.
ReplyDeleteThanks Mike, It was just pure luck that these two managed to end up in the same part of the battlefield, but a good gaming opportunity fell out of that, one that I will remember for a long time.
ReplyDeleteGreat way to round off the battle Norm. I have played games with a preponderance of archers over melee troops, and come a cropper when the archers under perform during firing...mind you, I have had the reverse, when archers who should be swept aside and slaughtered by billmen somehow defy the odds and win the close combat....it's one of the joys of the hobby,nas long as the unpredictable outcome favours you, of course...not so much fun if your elite mounted knights take a beating from a rabble of smelly peasants!
ReplyDeleteHi Keith, the Sword & Spear rules are quite ‘dicey’, so those sort of swings are quite likely and on another day, our advancing billmen may have been treated more kindly!
ReplyDeleteNorm, your Perry figures arrayed for battle look splendid. I have been thinking about your replay and rereading the action but I cannot quite reconcile your figures against the cardboard counters. The board game slice shows three distinct units each of the same troop type within each counter. Your miniatures’ battle has troop type mixed within BMU. I must have overlooked a vital detail. Can you help clear my confusion?
ReplyDeleteHi Jonathan, the boardgame doesn’t allow stacking. In general the boardgame set-ups for each battle will have a line of archers to the front, with the melee troops behind (which photo 3 shows in the original boardgame post) - and which would also be the way that I would set up my figures game with the Sword and Spear ruleset.
ReplyDeleteTo extend the Yorkist wing in the boardgame, I thinned the line, so that the heavy troops were ready to assault and intermixed with archers for their support (i.e. hoping to gain the flank position and use the advantage go straight into assault). However, the boardgame uses an inter-active activation system and before the Yorkist could assault, the Lancastrians (red) counter manoeuvred and to meet the threat, they also had to thin the line, though they did have greater archer numbers anyway, so in effect, their front was archer based.
On transferring to the tabletop, I decided to deploy with the archers still getting the foremost position - but, kept regard for the boardgame situation by a) having the Lancastrian billmen spread thinly across the rear line and b) pushing most of the Yorkist archers to their right, which left some Yorkist bill without friendly archers ranked to their front.
So basically it was a merge of replicating typical period deployment, but with a nod to reflecting the numbers / deployment in the boardgame.
In practice, under the rules it worked well, the Lancastrian billmen were stretched and the Yorkist centre / left didn’t open with enough friendly bow, which resulted in their bill taking such heavy casualties from arrows on the way in. So a little abstract, but with the same feel that the boardgame delivered.
Or in Haikus speak
Not enough bowmen
Stagger forwards under fire
Too many losses :-)
Thanks for the clarification. Excellent Haiku! We should do this more often. It could be a bit habit forming.
DeleteAnother habit
DeleteA new one for each project
A time sink for sure 😀
Good one!
Delete