
Title Marengo 1800

Part of the Jours de Gloire system, Marengo has recently been re-released as part of a quad of 4 games called Early Glories, the other games being Montebello, Rivoli and Zürich.
This is published in a dual French and English package and is presented in an attractive soft folder.
The following post gives a brief AAR plus some general observations.
Pease use the ‘read more’ tab for the rest of this post.
The scenario I have chosen for today is the second day historical scenario. The game starts on the morning of 14th June 1800 with the French (Victor’s Corps - counters have a red stripe) located around the village of Marengo.
The Austrians are pouring across the river, in enough numbers to overwhelm the French, who are expecting reinforcements, but they are still some hours distance away. The game is played over 10 turns, with each turn representing 1 hour and 40 minutes.

Above - this is the opening situation. Each side will score victory points for objectives held / taken. The redoubt at the River Bormida (far left) can score VP’s for either side. The Austrians will score an automatic victory if they can exit the bulk of the Austrian army off the map to the right (this is a big ask). The black squares show objective locations that the French should hold and likewise white square for the Austrians.

At 0800 hours, the Austrians push forward across the bridge and have an early success as their cavalry gets behind 101st Line, who then rout when Austrian infantry assault them to their front. Victor responds by trying to extend his line to the right to prevent an Austrian breakthrough.
 |
| The first assault on Marengo |
Taking advantage of Victor’s confusion, the Austrians pile on the pressure, their assaults result in the capture of Marengo. Both sides are becoming disorganised and entangled. Victor contracts the line to shore up the left flank, just as Lannes (French) arrives to counter-attack into the centre.
By noon, the fighting intensifies. Lannes re-takes Marengo, but almost immediately loses it again to an Austrian counter-attack, though the French have managed to isolate the village. The main problem for the Austrians is that they are being contained by the French and there just isn’t enough room for their reinforcements to deploy, with the marsh making things worse for the cavalry and impossible for the artillery.
Increasingly, French reinforcements are feeding in to stabilise the line and some of their attacks cause several Austrian formation to break and run to the rear. However, the arrival of Ott and his attempts to develop the Austrian left, stabilise things, though his artillery struggles to deploy forwards, mainly due to the marsh.
Just after 1440 hours, the Austrian commander Melas is killed and replaced by Zach (this is a scenario event, the main impact is that Zach can only issue 2 orders as opposed to Melas’ 3 orders). Victor, now properly reorganised, concentrates a counter-attack from the French left and very successfully blunts the Austrians ability to breakout in this direction and further adding to the number of Austrians routing, which in turn are disordering other friendly units that they flee through in the rear areas.
The lack of room to manoeuvre and the effects of the marsh has removed the Austrian advantage in cavalry.
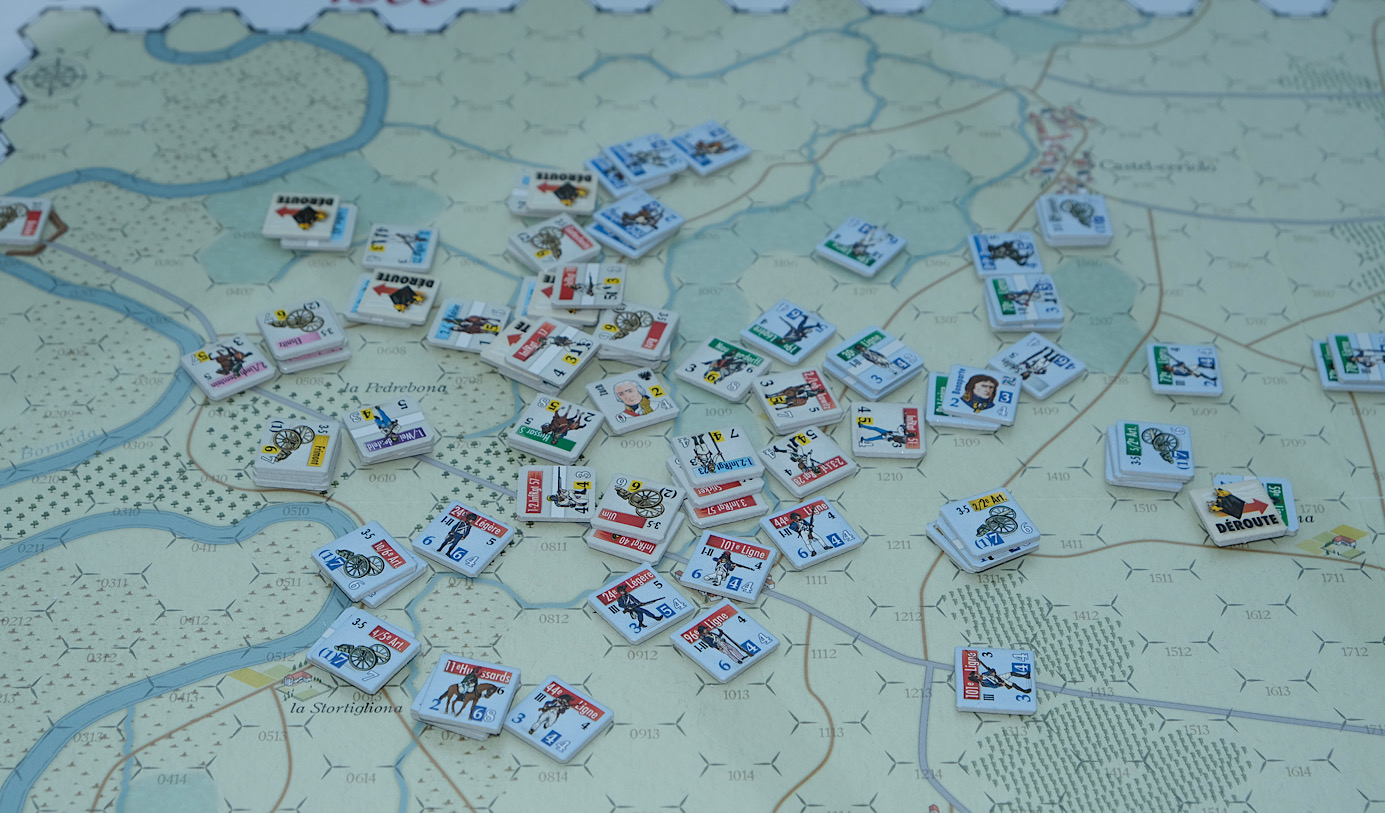
 |
| Note the routing Austrian units |
By late afternoon there is a real too and fro in the centre as Ott with fresh forces tries to break through the French lines. Lannes and Desaix just about hold firm, the situation precarious for both sides.
Despite the swirling mess in the centre, the French slowly start to get the upper hand. The 101st Line re-take Marengo …. and then one of those moments of incredible opportunity occurs, Murat’s dragoons have been hanging around patiently on the French right near Castel-ceriolo and suddenly they see a chance to strike at a disordered Austrian regiment.
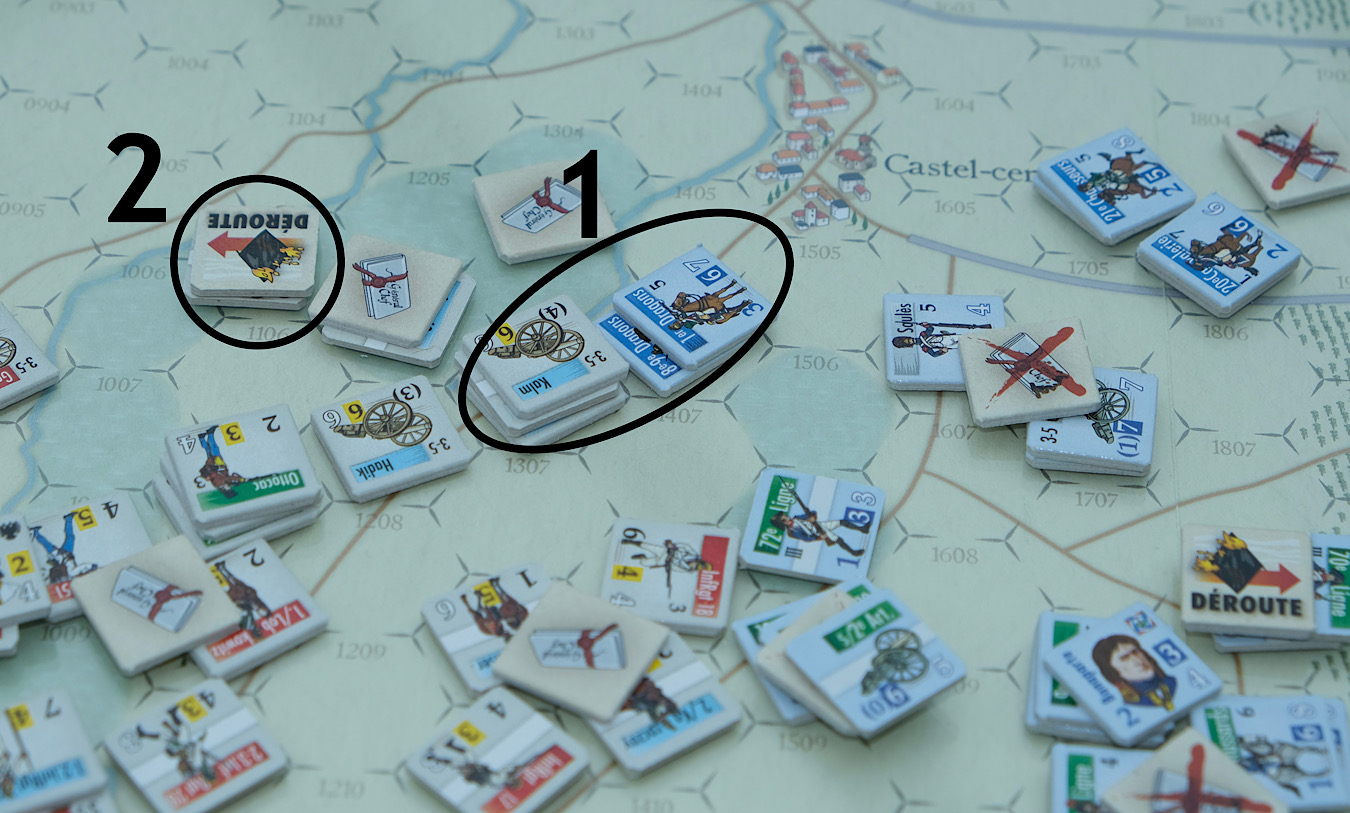
The charge goes into the flank and 45th Infantry rout, crashing into other friendly units in their panic (unit in position 2 in the photo). The powerful charge carries on (pursuit as shown at position 1) and catches 52nd and 53rd, plus their artillery in the flank. The 53rd also rout, while the 52nd recoil and fortunately for them, manage to form square, dissuading the dragoons from pressing further, Murat successfully recalls these well trained cavalry.
This crashing into the Austrian left flank, combined with the arrival of the rest of Desaix’s Corps (blue units with green stripe) looks to have effectively put an end to Austrian hopes of breaking the French.
Late in the day (1840 hours) Murat is sent on a flanking manoeuvre, up through Castel-ceriolo and skirting around the top edge of the marsh. Ott’s artillery await them and the marsh causes the cavalry some positional problems, but the Austrians are certainly feeling increasingly squeezed and the steady stream of routing Austrian units making for the rear is indicative of an army facing collapse.
With dusk approaching, the Austrians retake Marengo again and then immediately lose it (again!) and they are now forced to go over to the defence to protect the bridgehead, but the French are pressing into both flanks, cutting off the head of the Austrian army.
As darkness falls (end of the scenario), Austrian soldiers are either caught in forward positions between the jaws of the French envelopment, or fleeing back across the Bormida River towards Alexandrie.
The French by contrast are in pretty good shape and essentially holding the Marengo line that they had held at the start of the morning.
Victory - Looking at the board, the Austrian position is nothing less than a disaster. A significant part of their army has been lost through rout or battle losses and since the French still hold their own objective hexes, it is only night that will save what is left of Zach’s men.
It is an absolute French victory, to the point that it is not even worth counting victory points …. To win, one side must score 7 VPs more than the other, the French have done this several times over!

Conclusions - a thoroughly enjoyable game. The system means that games are quite lengthy, so having this on a small footprint helps, makes it easier to keep the game set up over two or three sessions.
There are three notable things about the system;
Firstly, each formation is represented by a chit placed in the draw bag, so formations activate in a random order as they are drawn from the bag. This brings unpredictability to the game with opportunities frequently both won and lost - very good for solo play.
Secondly, although you, the player, are managing individual units as one must of course in any game, once you set up attacks etc, the variables of a D10 system means that you can have either success or failure, nothing is certain and it is beyond your control.
Modifiers will push this in one or the other direction, but importantly outcomes are taken out of the players hands i.e. the player can direct, but it is the local commanders on the ground that are clearly doing the fighting and this helps keep the player focussed on the higher level of generalship - as you look through your field telescope you comment “Oh look, we are getting pushed back out of Marengo …. I thought I had that well covered!”
Finally - when units are hit, they first flip to their disordered side and the next set-back puts a rout counter on them, so parts of the line can be subject to quickly breaking down. Some gamers are unhappy that units can reach the rout stage and then recover to return to fighting - the term being described as rubber routers.
However …. I think this is taking the term ‘rout’ too literally for this design and it also underplays the fact that each turn is representing an hour and twenty minutes. If we accept that rout simply means that troops enter a state that ranges from anything between temporary retreat and confusion to complete rout in the full sense of the term and that the passage of time in any case puts such units out of effective use for some hours, then the catch-all term of ‘rout’ fits well within these battles.
You can stack up to three units in a hex and then there are markers, this combined with units gathering in large numbers in a small area causes a congestion on the map that is best managed using tweezers rather than fingers …. especially sausage fingers!
If players are to play this face to face, then it would be wise to set the game up before the players meet as sorting counters into formations and then setting up can take a while - but it is a fixed set-up with most units still off the map as reinforcements, so the host can set up both sides for this scenario without the visiting player losing placement choices.
Four separate battles in one package is a lot of gaming potential. The rules can look short, but they have a depth, that really needs repeated play to get comfortable with. I am still regularly referring to the rules and those four battles mean that investing in the rules is rewarded with a lot of play.
Overall, I was very happy with the game and looking forward to playing more of this quad.
Resource Section.
An in depth look at a Quatre Bras 1815 game LINK
https://battlefieldswarriors.blogspot.com/2022/06/quatre-bras-1815-jours-de-gloire.html
My sister webspace ‘COMMANDERS’ is being re-configured to showcase various figure and boardgame systems that I am enjoying and gives a flavour of where current projects are up to. Link.
This comment has been removed by the author.
ReplyDeleteExcellent report, Norm. Marengo is such an interesting battle, and not all that easy to replicate. You’re right about the chit pull, definitely helps with solo play. All in all, an attractive series that I wish got to the table more often.
ReplyDeleteThanks, its funny how some battles are favourites, but for no particular reason that you can put your finger on …. This is one of mine, so I was pleased to get a chance to play it.
DeleteYes - I got some nice solo surprises, little things like a formation getting a back to back turn and the occasion when a formation I gave orders to attack …. Couldn’t, because friends were in the way, but their chits got drawn AFTER those of the attacking formation!
Seeing this series updated and re-released was most welcome. Nice to have diecut counters and improved maps. Your "rubber routers" comment is advanced by those hung up on naming convention and not necessarily understanding or appreciating game abstraction. For me, the system works.
ReplyDeleteMy gosh, I cannot believe the success of Murat's charge and the ensuing destruction of the Austrian army. Very impressive!
Hi Jonathan, the system brings about some very engaging ‘happenings’ that as they unfold, feel like they are falling from the pages of a good book.
ReplyDeleteMurat sat there for ages frustrating me, at best being a baby sitter to the French right and then suddenly out of the blue ……. Opportunity!
What an exciting game full of incident, Norm! Bloody Austrians have resumed normal service though, I see! I must say, I think your interpretation of the word "brief" as in "brief AAR" is slightly different from most bloggers....it must have taken you a fair bit of time to write such a comprehensive précis of the action, so thanks for making the effort, as it was an absorbing read!
ReplyDeleteCertainly different from my definition of “brief”!
DeleteThanks Kieth, I opened the blog post at the very start of play and it really was meant to be brief, just two or three photos and then a bit of text, but ……. :-)
DeleteYes, the poor Austrians, everything that could go wrong did! Though they did enjoy the Yo-Yo game at Marengo of in - out - in - out etc.
Excellent report, I have Rivoli and Montebello so this will be a must buy. Another one of my favourite battles, I remember fighting this many years ago at one of the Warcon events with Danny Boreham using the Eagle bearer rules and lots of AB figures. It’s a challenge for both sides.
ReplyDeleteHi Graham, I rather fancy that on another day, the Austrians might fare much better - I need to get this back to the table soon.
DeleteReally great report sir!
ReplyDeleteThanks Michal, it was enjoyable to both play and write about.
ReplyDeleteGreat report Norm and a fun game it seems. Good to have the random activation for solo play and also showing how hard it can be to coordinate an attack or movement of large numbers of troops.
ReplyDeleteHi Ben, the activation system has the potential to bring some interesting moments, such as back to back activations. On one turn the Austrians gave an order to a decent stack, but they had friends in the way who had to get out of the way first …. The stack with orders drew both their chits before either of the blocking units drew theirs, to a promising attack did not go ahead …. An opportunity lost and as you say nicely (and easily) reflects the difficulties of coordination / manoeuvre and reliable delivery of orders and their interpretation etc.
ReplyDeleteI am a big fan of interleaved activation systems, they can cause all sorts of friction but feel quite natural. One thing which struck me with this and your Plancenoit games is how differently boardgame treatments of Napoleonic warfare 'feel' compared to tabletop games. Perhaps it is to do with the granularity of the hex grid, or unit count or some combination of both.
ReplyDeleteHi Martin, I do quite a lot of solo play and that sort of friction definitely helps give solo play a different dynamic.
ReplyDeleteYes, there is very much a different feel, but I think within the boardgame sphere itself, there are different ‘feels’ depending upon the player style, so for me, in the boardgame, I am there, I want the right tactics and formations behaving like formations, so (say) cavalry charging should feel like cavalry charging, I am visualising the clash, but another player, might see it more as game than sim and just see a game counter with factors on it and to their mind it is just a case of how do you get the best out of the counter in the game …. and of course all shades of grey between those points.
I obviously play to get a win as that is what is needed in game play to set the direction of the game, but I have no personal enthusiasm in winning, I couldn’t care less about it, so the visualisation of what is happening in the hex become the pleasure point for me.
Figures are so much more visual and I think figure gamers are more likely to connect with the motion of the forces rather than factor counting and looking for perfect odd ratios etc.
One lends itself to a more academic pursuit and the other to a more emotional one, with of course degrees of cross-over, but as a generalisation, perhaps that is most where I feel the two genres feel different.
Generally declaring board games and figures games as “Academic” v “Emotional” pursuits is a topic to which you ought dive a bit more deeply…
DeleteHi Jonathan, yes, an interesting proposal - though controversial I would imagine and weakened by the myriad of folk who sit somewhere in the middle.
DeleteA fine, fine game there Norm and perfect for this large scale (to my mind) action, something that I think a figures based game would struggle with. Having said that Bloody Big Battles does a great job of zooming out to play this level of game, where each base is normally a Battalion/Regiment.
ReplyDeleteI have no problem with the rubber routers given the sclae being played and the time duration for each Turn, something that we should all bear in mind in our games.
Hi Steve, I think some bath-tubbing would be in order for a figures game - giving a themed breakout from a bridgehead with a village up ahead.
ReplyDeleteThe system goes further to allow routers to stop their rout movement (but keep rout status until rallied) if they enter a village and then overnight, it becomes much easier to re-organise and recover an army.
What is interesting is that units that rout / recoil etc through other units can do that, but the unit passed through must take quality test for degrading to disorder or rout if already disordered …. BUT if an already routing unit is passed through, that just automatically takes another rout move - when you have lots of routers fleeing down the highway, this can cause domino effects and quickly afford the rapid dispersal of routers from the field of battle - so conditions have to be very right for a unit recently routed to return to action no earlier than 3 hours later … but in all likeliness, much, much later.
Interesting as always to see your review….don’t know how you have the time though 👍
ReplyDeleteHi Matt, something has to give …… sleep😀
ReplyDeleteLooks like a fun system. I never heard the term rubber routers before (and I get what you are saying) but I love it and will now use it all the time. 😀
ReplyDeleteHi Stew, I first heard it termed in a sister system to this, which was used in ACW (your fave), but there, the response time to recovery was far too fast and units would recover very quickly from just behind the line and be back to full capability in no time at all. I think the problem there was that the term ‘rout’ was wrongly used and perhaps something more in keeping to what was actually happening should have happened - like whipped is used in the Black Powder Glory Hallelujah expansion.
ReplyDelete