

A perennial favourite battle from the Waterloo campaign. At Quatre Bras it was the French commander’s task to prevent the Coalition forces under Wellington from supporting their Prussian allies, who were just a few miles away at Ligny, engaged in battle with Napoleon and the bulk of the French army.
Today, we are putting to the table, the 39th published Napoleonic battle in the Jours de Gloire system, published by Ludifolie Editions under the Canons en Carton label and designed by Frédéric Bey.
The following post will just highlight a few basic notable aspects of the rules and then give an AAR of the battle that will weave both narrative and system into the descriptive. Please use the ‘read more’ tab for the rest of this post.
This is such a tried and tested series that has been in circulation for over 20 years and known to so many wargamers, that I don’t particularly want to approach this as an in depth out of the box type piece, as many readers will already have a greater appreciation of the system than I can offer from my initial playing.
However, my own reality is that after my early dabble with the system many years ago and then not following it (my loss, I know), my recent re-introduction to it has sparked a renewed enthusiasm that makes it worth writing about (to me at least). So here we are ….. at the starting gates! With this article primarily aimed at those who have not had that much exposure to the system and might fancy a go.
The origins of this system go back to Triumph and Glory by Richard Berg, published by GMT in 2000. Now developed by Frédéric Bey, the series has since been regularly showcased and updated across a number of publications over the years.
The heart of the system relies upon Activation Markers (AM’s). Each formation on the map is usually represented by two AM chits. These are drawn randomly from a cup and when one is drawn, that formation is activated, so in a turn, a formation will likely activate twice.
There are some interesting wrinkles - the last chit does not get drawn, so one formation will lose out - perhaps at the critical moment! Reinforcements just get one chit upon their first turn of arrival and in the next turn, their second chit is also added to the draw cup. I do like that demoralised formations are only given one chit, limiting them, which is a superb ‘design for effect’ delivered with such simplicity.
A further command abstraction comes from the allocation of orders. An army can only be given so many orders depending upon the army commander’s rating. The effect is that some units will be considered ordered and others not. The ordered units essentially act normally at the players direction, but the units without orders have reduced movement and have to take and pass ‘Engagement Tests’ to be effective in combat, including cavalry having to pass a test before their ‘declared’ charge can be made.
I like games that take certainty and control away from players and this system does that rather handsomely.

With a series that has been around for so long, the refinements to the rulebook make for a tight system. There is a 12 pages rule set, which though of itself is not too long, there is a lot covered in them and I found that I needed to read the rules, set the game up and then read the first half of the rules again before I felt ready to start pushing counters and even then the rules were being constantly referenced throughout my first game.
The game blurb describes complexity as being 7 out of 9. On the first reading of the rules, that seems a tad overrated as everything, as you read it, seems straight forward and sensible, but there is a lot going on under this bonnet and it is all the little incidental rules that bring both completeness, nuance and complexity to the game. As a new player, I really did miss an index as I fumbled through the first few turns and will likely resort to making my own.
However this is a substantial series, with something like 45 battles covered to date (though many are out of print) and so the benefit of potential repeat play will bring rule familiarity and one should see the first exposure to this game with its steep learning curve as being part of that 7 out of 9 score and that over time that sense of complexity will reduce.
Our map is measuring 59cm x 83cm (roughly 21´´ x 15´´ ), scaled at 400 metres to the hex. 350 infantrymen equal 1 strength point and one turn equates to 90 minutes. The ground covered extends a fair bit behind Quatre Bras (from the French Perspective) and so you get a sense of the Coalition reinforcements filtering in across the map, with still a bit of marching to do, which was an important aspect of how the battle developed.
I recently played the Quatre Bras game from the Eagles of France system (Hexasim), with a bigger map, but having a much tighter focus on the immediate battlefield around Quatre Bras. In the Hexasim game, the distance between Quatre Bras and Thyle is 12 hexes and between Quatre Bras and Géminioncourt 8 hexes. On our map today, we are at 7 hexes and 3 hexes respectively between those points.
So the actual fighting area here is more compact and better suited to the sort of space that a kitchen table gives. For those who do figure gaming with hexes and would like to replicate the battle, at this scale, you can probably get away with a 12 x 12 hex grid for the core part of the battleground and that may be something that gets some closer attention from this blog at some future time.
 |
| Opening positions for the Coalition |
The scenario opens with just the 2nd Netherland Division (Orange) on the map. In the Hexasim game they are represented with 10 counters that are fully stretched out over the deployment area, making best use of ZOC’s to cover the ground frontage and various farm complexes. The JdG game by contrast uses 7 counters, but 3 of them are pure company level detachments that cover just the fortified farms and then the parent units each have a marker showing that they are each missing strength because of having detached a company - I really like this approach as it feels truer to the nature of the opening deployment of this battle and to the way that units operated.
Over the last few years, I have made the Hexasim design my ‘go to’ Napoleonic system, so it will be very interesting to see how this smaller footprint game shapes up against that.
One last thing - terminology. Some terms in the game do not always match with expectations. For example, in many games, a disorder result doesn’t normally inflict anything too onerous and only has one level of effect, but here, a first disorder flips the unit to a weaker side, the next disorder turns a disorder to a rout and then another disorder result on a routing unit removes it from play. It is fairly easy for units to move through this cycle so there comes something of a necessity to try and recover units (rally) early to keep them off this slippery slope of certain doom.
Anyway - enough! On with the battle.
Turn 1 - 1300 Hours.
In this scenario the French are automatically given the initiative on turn 1, so they get an Activation Marker (AM) of their choice to start. Ney selects Reille’s Corp and uses the Activation to enter the map. Arrival is sequenced to represent the unit arriving in or from march column, so the first unit pays the ordinary cost of the entry hex, while the second unit pays double the ordinary cost, the third unit three times the normal cost etc.
The consequence here, since both Reille and Guyout only have one AM each this turn, is that all of Reille’s Corps just about get onto the map, but the subsequent road jam means that Guyot, with the Guard Light Cavalry will not, they must wait until the next turn to arrive.
The Coalition under Orange do some fancy footwork with their guns and a couple of infantry units to get a better organised line to meet the enemy and also to take advantage of some high ground …. but, their remaining AM is the last chit in bag, so since the last chit is ignored, they don’t get a second activation and that means that their now nicely placed guns don’t fire!
Kempt (infantry) and Rogers (artillery) enter the top of the map as Coalition reinforcements and are making best speed towards Quatre Bras.
Turn 2 - 1430 Hours.
Reille’s Corps successfully press the Coalition centre and the Dutch / Belgian defenders suffer a number of disorders (flip to weaker side of counter), a recoil (fall back one hex) and Saxe Weimar, who is repeatedly hit with disorder results, routs!
Bijlandt (infantry) is disordered, but stands its ground, supported by artillery. Huber (French Cavalry) sees this as an opportunity to unhinge the Coalition defence and decides to charge Bijlandt. On another day this might have worked well, but today, the cavalry suffer badly from close range artillery reaction fire on the way in and their attack stops and turns instead into a rout.
At the same time on the other French flank (left) Coalition cavalry (Merlen) suddenly appear near to Petit Pierrepont, a fortified farm and charge into the open exposed flank of Husson, who go disordered while trying, but failing, to form square (a test is taken), so they are now disadvantaged when the charge hits home for being disordered. They unsurprisingly rout, taking their guns with them and are then destroyed in the pursuit by Merlen’s cavalry.
This moment reminded me very much of an account that I read somewhere about this battle, in which cavalry, concealed by the 6´ tall rye crop, suddenly appeared and fell onto the flank of a Dutch regiment, causing mayhem, so it was nice to see a similar incident naturally occur in the game.
The big disadvantage now for Merlen is that he is deep in the enemy rear and next turn will be too far away from Orange’s command range and so will be marked ‘no orders’. The inherent disadvantages will likely see Merlen both vulnerable and of little use in the next few hours as the unit makes its way back to their own lines.
The last chit out of the bag is the Brunswick reinforcement (Coalition), so as it is the last chit, it is not used, his reinforcements will be delayed until the next turn ….. nice touch.
Turn 3 1600 hours.
Wellington, now approaching the battlefield, takes command and Orange is removed from play.
Bijlandt’s artillery fires at the French Guard Cavalry, which had been moving out on the French right. Ney was under strict instructions from Napoleon not to use the guard, so even though this artillery fire is not effective, the Coalition immediately get a Victory Point for firing at the Guard (this penalty is designed to dissuade Ney from using them). The Guard respond by moving further over to the right and concealing themselves behind the village of Thyle. They will likely stay out of this battle unless a crisis demands their involvement.
The French have become a little stretched. They are tied up at a couple of the fortified farmhouses, while also suffering some disorders. They have lost Husson and Huber is currently routing.
The fresh units of 6th Division arrive, together with Kellermann’s heavy cavalry …… “thank goodness” cries Ney!
Bauduin, from the 6th, immediately takes the fortified farm, Grand Pierrepont, but Jamin’s first assault on the important Gémioncourt fortified farm fails.
 |
| Positions at the end of 1600 hours / start of 1730 hours |
Above - Note the Coalition reinforcements under yellow counters moving towards Quatre Bras.
Note Merlen’s cavalry right out on left of picture, they need to get back to friendly lines.
Note lower left quadrant, under French flags, two farm complexes now captured.
Note the Guard Cavalry out on the far right behind Thyle.
The Dutch / Belgians are under a great deal of pressure, but the Coalition reinforcements are streaming in. Can the French get an advantage before the Coalition positions strengthen?
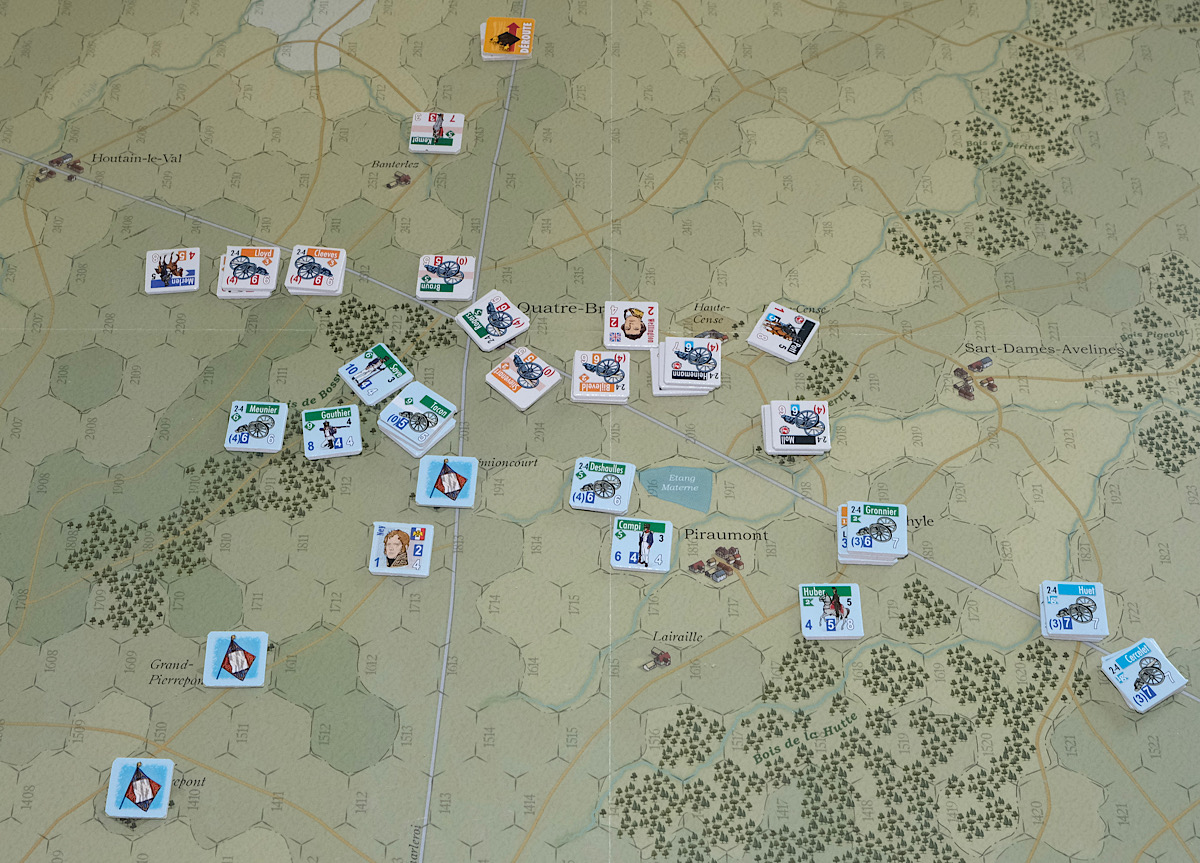
Turn 4 - 1730 hours
The second assault on Gémioncourt fails, but around the farm, French infantry are mauling the regiments of Pack and Best. The Coalition desperately need more of their reinforcements to join the line. The French are just 800 metres (2 hexes) away from the Quatre Bras hamlet.
And now from nowhere! A moment of crisis for the Coalition. Soye (French) attacks Best and routs them just outside Quatre Bras, advancing after combat and gaining a ‘Breakthrough’ result (so they can immediately attack again).
 |
| Quatre Bras under threat |
This leaves him facing Pack (infantry) and Rogers (artillery) who are holding Quatre Bras and next to them, Wellington, standing with Braun - a disordered artillery unit. Soye is suddenly presented with a great opportunity. This is a precarious moment for the Coalition.
Their artillery cannot lay defensive fire (Braun is facing the wrong way and Rogers is disordered) and so Soye has a straight run at the defenders, all he has to do is roll high, but Soye rolls so badly that he recoils! Both Wellington and Quatre Bras have sailed close to the wind and there is a sigh of relief from the Coalition commander.
 |
| The defence stabilises |
But even as that moment passes, it is clear that the Coalition have now stabilised the line as more reinforcements arrive. This is just getting harder for the French, though Ney is cheered by the eventual fall of Gémioncourt, following a third assault.
Turn 5 - 1730 hours
Kellermann orders a cavalry charge on the French right, hoping to try and open up the Coalition flank. Both Guitton (heavy cavalry) and Wathiez (medium cavalry) are marked to make a charge, but they are without orders, so must each take an engagement test to allow their charge, which Guitton fails.
 |
| French cavalry prepare to charge |
Watheiz charges alone down the gentle slope across a stream and up the opposite gentle slope to strike Brunswick’s Pott (light cavalry). Pott recoils but pass their disorder test. Watheize in contrast fail their post charge test and is disordered. So from that mess, the French have failed to get the breakthrough that they were hoping for.
Kellermann draws the next Activation Marker, so can go again, but by this time, Pott is too far away for the heavy cavalry to reach in a charge move - assuming that is, that they pass their engagement test this time!
Kellermann consoles himself with moving the cavalry wing up to Sart-Dames-Avelines, threatening the Coalition left flank and potentially the army rear area. Brunswick is obliged to ‘dress back’ to deny this flank. This has at least prevented Brunswick usefully going onto the offensive.
Although daylight remains, the French have not done enough to win the day and the Coalition line is getting stronger by the hour. In a bold ‘now or never’ strike, Soye and Bouduin attack Quatre Bras and the surrounding fields.
A win here will swing the battle back to favouring the French, but the attack is disastrous and Reille will now lose precious time regrouping.
Turn 6 - 2030 hours.
But Reille does not get the chance to recover. The Coalition win the Initiative and decided to launch a limited offensive in the centre to take advantage of Reille’s disorder and exposed predicament.
As Coalition regiments throw themselves forward, Bouduin, Jamin and Soye all rout and Captain Tacon’s artillery battery is destroyed. It is a devastating result for the French, with Reille’s Corps now in tatters. As they fall back, abandoning Gémioncourt, Sattler retakes the farm for the Coalition.
With such a catastrophic French collapse, it is clear looking at the map, that the Coalition have won or that at least the French cannot hope to get a win or even a draw in the time remaining, so the game is called one turn early, but let’s look at the Victory Points anyway.
The French get 3 points for ejecting the enemy from fortified farms, 2 points for enemy units currently routing and 4 points for destroyed enemy units, for a total of 9 points.
The Coalition get 1 point for a capturing a farm, 9 points for destroyed units, 3 points for holding Quatre Bras, 2 points for holding Gémioncourt and 1 point for the earlier incident when they fired artillery at the French Guard Cavalry, for a total of 16 points.
To win, a side needs a difference of +7 points, which the Coalition get. So there we are, it not only looks like an Coalition win visually on the map, but the Victory Points confirm it (just!).
Conclusion.
For its size, this took longer to play than I thought it would, but was hugely enjoyable. The rulebook was practically in my hands throughout, yet, while that can often be annoying, I found it brought an extra level of engagement with the game as I eked out the nuances and depth of the design, though an index would have certainly helped my progress.
I felt the learning curve was worth it because the narrative worked and with there being such a lot of titles in this system, any investment in learning will be rewarded by access to a lot of future game time, with repeat play making the system more familiar. I’m also pretty sure that years ago, I would have eaten this system, but in truth I am just a little ‘slower’ these days. I doubt that I am alone!
Initially when reading the rules, the section covering ‘orders and no orders’, the counters of which are played face down and hidden, made me think that solo play might be problematic, but it just isn’t. It becomes fairly obvious where the limited number of orders need to be allocated and the random drawing of Activation Markers makes for delightful solo play, as the formations of both sides interact in a way that is beyond player control and gives a satisfying narrative. Overall I thought for a 2 player game that it gave a good solo experience.
I have kept all of the counters for the scenario out to reset the game to play again later this week, while the rules are fresh in my mind. Looks like July will be a Quatre Bras and Waterloo month ….. instead of June :-) So look out for an edit paragraph at the end of this post as I discuss the results of the second playing.
I was hoping that this would be a series of games that we could fit into our shortish face to face sessions, but I think it will be case of looking for the smaller scenarios or smaller scenario variants to do this. The bigger battles will almost certainly be out of reach for our face to face sessions, though there is a compact nature to these games, making them easier to be left set up for those with the space and facility to do that. It is certainly a kitchen table game in that regard.
I do like the fact that being chit draw, you can take a break from play at any time after a formation has acted, rather than having to play out a full turn. You could even leave it mid turn for a day or more and come back to it and it wouldn’t matter, you just draw the next chit, activate that formation and you are off again in a cycle of artillery fire, move, combat and rally with that formation.
In my game, it was the chit draw that brought the genuine surprise of Merlen’s cavalry striking the French flank, causing a local rout. The pair of activation chits that relate to Merlen were drawn consecutively and so Merlen effectively got back-to-back activations, allowing for movement followed by a charge before the enemy could act. This sort of thing gives engaging narrative, but also hugely helps the solo gamer to be faced with surprises and associated dilemmas to deal with.
Earlier, I mentioned terminology. One of the criticisms that I have read of the system is what has become termed as ‘rubber routers’ - that is, units rout, but before they reach the map edge, there is every chance that they can recover to disorder status and then from there recover to ordered status and effectively return to battle.
I think it helps here to think of the moment that a unit marked routed leaves the table or is attacked, further disordered and then destroyed, as being the true moment of irretrievable rout. Everything prior to that is the unit just locally fleeing or becoming non functional. In truth, even if a routing unit recovers early, it will likely take a good three turns for it to return to function and in game terms, that is 4½ hours later, which for a unit re-organising itself following action, has a certain plausibility to it.
Likewise, the game uses the term ‘forced march’. We tend to think of this sort of thing as additional movement that is likely to cause some sort of exhaustion penalty on the unit, but here, it is simply the doubling of a units movement allowance as long as they stay 5 hexes away from the enemy and in most other games, this would be termed something like ‘strategic movement’, which makes more sense as to what is really going on.
There is a lot of abstracted stuff going on that is reflecting the warfare of the time. For example, when a unit detaches a company to attack / hold a farmhouse, the parent unit is marked to show its strength is reduced - but also the parent unit cannot then shock attack, Nicely reflecting (I think) that the detached companies are most likely to be the light infantry and grenadier companies. There are other rule instances which clearly indicate design intent via abstraction to be accommodating the limitations / tactics / opportunities of the era. Units and formations act like they belong to the Napoleonic era and are not dashing around with the freedom that panzer pushers might enjoy.
The system uses a D10 to resolve checks and combat. Depending on the game design, a D10 can cause significant swings in the fortunes of combat and we get a bit of that here. However, I feel that it is employed for the good and that the intention is that the player is the army commander and that while attacks etc can be set up, 'the player' or army commander has little influence over the outcome, the men and commanders on the ground are dealing with that i.e. the D10 and associated modifiers. It is not too severe and this is just another layer of the system loosening player control - good!
This scenario comes with two variants. The first allows Ney to use the guard cavalry without penalty. I doubt that I will want to explore that as it seems an unlikely proposition. In future games, I will try and screen the guard Calvary from danger while making use of their guns, which can be fired without penalty.
The second variant is more appealing and worth exploring. It allows d’Erlon to arrive on the battlefield with I Corps later in the afternoon as a French reinforcement. The d’Erlon situation is one of the great ‘what ifs’ of history. His Corps, demanded by both Ney at Quatre Bras and Napoleon at Ligny, marched and counter-marched between the two battlefields arriving at neither, but clearly he could have been a decisive instrument if he had reinforced one of the battlefields - whichever one!
My starting question when exploring this design was whether this series could trump my Eagles of France (Hexasim) games as a ‘go to’ favourite. My first exposure leaves me sitting on the fence a little, I need to play it more, but I am hopeful.
From a personal perspective of needing a faster play game for our face-to-face sessions, it does have some faster play, but the bigger battles are still likely to spill over to another session and so in reality it doesn’t seem to reduce by much the hefty playing time that EoF has and we both like that system. But for my solo play, the depth of engagement with the battle is intriguing to me and so I definitely want to spend some more time with this. I prefer the intuitive way that this game handles the cavalry and a wider range of battles are already supported.
Both designs use combat systems that tend towards divorcing the player from combat outcomes and keeping them in the seat of being an army commander and in many ways, both systems set out to do the same things, but just with some different labels and mechanics.
Overall, I am very pleased that I bought this. I picked it up from ‘The Little Corporal’ at the Phalanx wargame show (UK). It was their first visit there and they had travelled a long way, so I hope they come back next year.
They have a good selection of games from Canons en Carton and Vae Victis (a French magazine - with English downloadable rules), so if this article has encouraged you to have a closer look and you order from them (link below), please mention the Phalanx wargame show. I do not benefit in any way from that (I pay for everything that I write about), but if the company relates the sale to the show, rather than it being a simple internet sale, it can only help in encouraging them to support the show circuit.
Note they also have a superb section set aside on their website that offers various nicely presented figure scenarios that can be freely browsed. There is a ton of work in there and I have not seen this sort of thing on any other company site - thank you. The link is below.
Thanks to all who have stuck with this post to read this far, you must be on your third coffee by now :-)
EDIT - I have played a second game. The French were tamed! by the end of turn 5 (out of 7 turns), so this is looking tough for the French …. or I need to handle them better! No wonder Ney demanded d’Erlon’s Corps. This time Gémioncourt remained in Coalition hands throughout. There was hugely less referencing to the rules this time around as the system embeds to memory and my progress was 5 turns in two hours, though it is a meeting engagement, with the forces building over time and the turns were getting longer. Once again a narrative filled game - Good!
There is a chit called ‘Reserve’ that the French can add into the draw cup twice per game. When drawn the French player can activate one division from any formation (so just part of the formation). This effectively will give that part of the formation a chance to activate a third time in the turn. I have been holding this back until mid game to help with crisis management at that time, but I may try using it earlier, so that the French can get moving before the Coalition reinforcements make the defences too strong ….. might this bring the French closer to victory!
As I think about this, all Ney had to do was to pin the Coalition and stop Wellington reaching the Ligny battlefield via the Quatre Bras / Thyle road - so perhaps another ‘what if’ scenario could create that, so that the French could take a blocking position in front of Thyle, rather than breaking themselves assaulting the Quatre Bras position - that may be a naive suggestion on my part. I might do some reading up on the prospect of such a deployment.
EDIT 2 - played face to face tonight. Always interesting to see how another player does things slightly differently. Mike sent the French cavalry up the left flank, while his main attack was weighted to the right. Wellington responded by reinforcing the Coalition left and the whole battle pivoted slightly ….. leaving Quatre Bras a little exposed for a while.
The French took 3 fortified farms including Gémioncourt, but did not reach Quatre Bras. Brunswick made 3 failed attempts to re-capture Gémioncourt. Again the Coalition position became too strong for the French to win and the game was called at the start of turn 6. We probably spent 3 hours getting to that point and this time, I seldom needed to consult the rules this time around - All Good!
Resource Section.
The Little Corporal (game dealer) LINK
https://thelittlecorporal.co.uk
The Little Corporal also do a lovely little series of wargame scenarios on their website, which are free to browse LINK
http://www.thelittlecorporal.co.uk/blog/
My sister webspace COMMANDERS is being re-configured to showcase various figure and boardgame systems that I am enjoying and give a flavour of where current ongoing projects are up to. LINK.
PLEASE NOTE THE COMMENTS SECTION BELOW HAS BEEN TURNED OFF FOR NOW, BUT THANK YOU FOR VISITING THIS BLOG AND READING THIS FAR, IT IS APPRECIATED.
ALSO THANKS TO THOSE WHO HAVE RECENTLY SIGNED UP TO FOLLOW THE BLOG, READER SUPPORT DOES ENCOURAGE THE WRITING OF LONGER ARTICLES LIKE THIS ONE - ALTHOUGH I KNOW THEY ARE NOT POPULAR WITH EVERYONE.
No comments:
Post a Comment
Thank you for visiting.