This is the opening to a 2 part scenario.
I have been putting together a new scenario to be included in the Two Flags - One Nation rules, the idea being that the gamer with starter size forces and limited terrain, can get an early game in.
Part 1 (above) has one infantry brigade per side. Part 2 deals with reinforcements in which each side gets an extra brigade.
Background.
8th June 1862, during the Shenandoah Valley campaign, opposing armies meet at Cross Keys.
The scenario examines the situation on the far left of the battle from the Union perspective.
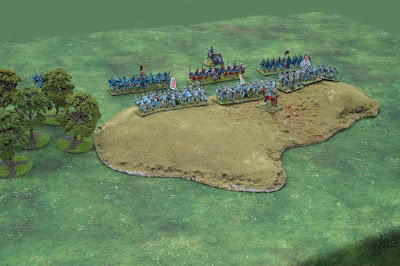 |
| The Bucktails are behind the woods |
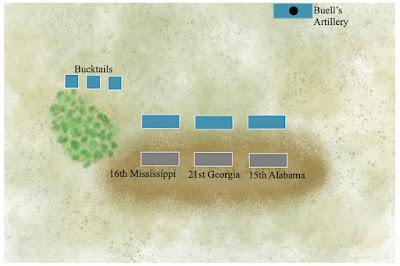
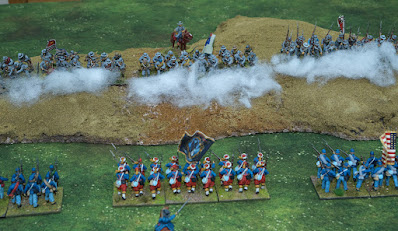
At around 11 AM, Stahal’s Brigade (Union) was probing towards a ridge, not expecting the enemy to have deployed so far forwards. As his regiments started to climb Victory Hill, they were taken totally by surprise as Trimble’s Confederates leapt up from the ground and discharged their muskets at just 50 paces distance, with devastating effect.
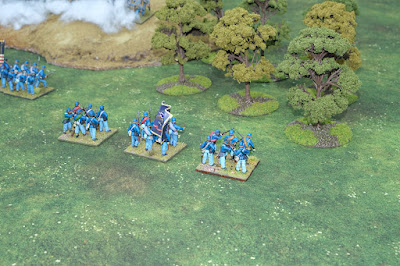 |
| The Bucktails in skirmish order |
The shocked Union, taking heavy casualties, turned and ran. Trimble counter-attacked, but had to call a halt when he noticed a fresh Union reinforcing brigade (Bohlen) moving up to support Stahal. Union artillery (Buell) had also arrived to support Stahal’s bloodied regiments.
In part 1 - The Bucktails set up in skirmish order and remain so for the rest of the scenario. Victory is based upon casualties, getting 1 VP for inflicting 5+ hits on a unit OR 2 VP’s for units receiving 8 hits and removed from play.
On turn 1 the Confederates get a bonus to fire to represent the effectiveness of their ambush. The Union suffer a -1 die roll modifier when taking a capability test for suffering losses to fire to represent their shock at being ambushed
In part 2 - Units stay on the table in the position that they held when the first scenario ends, together will all losses and disorder markers.
Union reinforcement’s come in on Stahal’s right (behind the Bucktails’ initial position) and Confederate reinforcements come in on Trimble’s right (behind 15th Alabama’s initial position).
The Union reinforcing brigade has 4 regiments and artillery, but they have limited capability, while the Confederate reinforcing brigade has just 2 regiments, but they are capable.
I played through part 1 to test both rules and opening scenario - this is how it ran;
The Confederate line fires and all three of the Union regiments fall back with heavy casualties.
Trimble follows up by charging the disordered Union line and makes good gains on both flanks, but in the centre meets strong resistance.
The Union flanks are close to being pushed off the table AND collapsing due to heavy casualties. Just one more push by the Confederates …… but, Stahal is rescued by a Random Event of ‘Confused Orders’, allowing him to move an enemy unit in any direction - it is enough to push 15th Alabama back out of charge range, giving the Union left temporary respite.
Slowly, the Union recover their position, significantly helped by their artillery arriving on their left and to their right, the Bucktails interfering with the Confederate exposed flank.
Both sides have 2 VP’s each (need 3 to win), so things are tight, but the Union left has been creaking with heavy casualties (7 hits) and during their Retreat Phase, they fail their capability test, gaining an extra hit and are removed from play (8 hits).
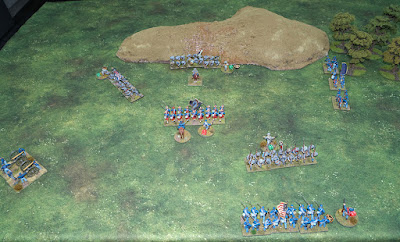 |
| End of play, deployed Union artillery on the left and Confederates pushed back in the centre. |
It is enough to push the Confederates VP’s to a victory.
Both brigades are actually now quite worn. As part 2 starts and the reinforcements arrive, I imagine that the Confederates will have to disengage and fall back to rear slopes of Victory Hill and await the Union onslaught - will the better Confederate troops hold out?
Hmm, tough task. In part 2, the winner needs 6 VP’s, but VP’s from the first game are carried over and taking that into account and the state of some of the units now, the Union are already on 4 VP’s and the Confederates are on 3 - so another tight session perhaps.
The Confederate left looks like it has a difficult job in extracting itself from its forward and isolated position. The arrival of the fresh Union brigade will certainly put them to test!
Resource Section.
Part II of this scenario, together with a link for the scenario download (PDF) is now up on the blog - LINK
https://battlefieldswarriors.blogspot.com/2023/03/part-2-victory-hill-scenario.html
My sister webspace ‘COMMANDERS’ is being re-configured to showcase various figure and boardgame systems that I am enjoying and gives a flavour of where current projects are up to.

That's a nice little scenario there Norm and a good idea to have it as a two-parter. Ditto being of a small enough size to make it easily accessible to those starting out but with enough of a challenge too. I'm certainly looking forward to seeinf Part Two and how the action unfolds as things are nicely poised at present.
ReplyDeleteHi Steve, unusual to get a working scenario out of so few units, but it is a historical situation and it really helps anyone just starting out with their forces. The option of part 2 is a good step up as it doubles units, so some gamers might just stick with the first part.
DeleteNice one. Are those boys of yours 15mm?
ReplyDeleteThanks JB - they are 28’s (Perry plastics), panning out to cover the whole scene has done something to their stature :-)
ReplyDeleteExcellent scenario Norm, I like the way you show an interesting game can be set up with just a few units in a small space. Could be done in other periods too - this one fairly shouts 'Napoleonic, redcoats on a reverse slope...'
ReplyDeleteHi David, yes, the scenario bets some credibility from being historically based, but the actual situation does have the ingredients for a broader, dare I say universal, application.
ReplyDeleteGreat batrep so far, Norm. I like this as a nice, introductory scenario to test the rules and the tight victory conditions make it a nail biter!
ReplyDeleteHi Steve, I was surprised how much tension there was, though I think with such few units, there is an increased case that every dice roll becomes important.
ReplyDeleteHi Norm, with thoughts of Double Jeopardy still fresh in mind, doesn’t giving the Rebs a bonus for ambush fire followed by the Feds having a penalty in Capability Tests equate to double jeopardy?
ReplyDeleteGreat looking scenario sir!
ReplyDeleteHi Jonathan, interesting as yesterday I re-examined the melee rules to look at the issue of Double Jeopardy for a charging unit as the sequence of charge is they test capability on the way in (half hearted), then face potential reaction (defenders capability test) and then do close combat, with a chance of further self harm if a 1 is rolled.
ReplyDeleteI decided that any Double Jeopardy that did exist was fairly balanced on the close combat causing damage on 5’s and 6’s but only self harm on a 1 - so self harm is represented, but dampened down and if the attack is half hearted, the reduced attack dice also means less chance of a 1 being rolled, so overall I am happy with that, but it is interested that your Double Jeopardy post has spilled over into some design consideration.
Anyway, as for your point here, yes is does, but in trying to reflect the ambush, which was such a devastating surprise, I feel it needs it as the ambushers only get +1D6, taking them from 4 to 5 dice and the 33% needed for that to be effective would not give that sort of result. Casualties were high because the ambush was launched at just 50 metres, so there is a case for an extra fire dice, but I feel the deciding issue was shock and surprise, which caused them to flee and so weakening capability would be essential to reflect that moment.
To remove what appears to be double Jeopardy, I could just have given the firers extra fire dice, but that could see units still bravely stand their ground or I could just give a penalty to the attackers on their initial capability test, but that way, you might get a break in contact, but the heavy casualties aspect would not be inflicted.
So I think in this case, Double Jeopardy is actually a nuanced way to best simulate a moment in time.
As an aside, the Union left took 3 hits and ran, but the centre only took one hit and ran - this played deeper into the game as the Union centre remained steadfast and threw the Confederates back when they counter-attacked.
All very interesting - thanks.
A nice idea to break the scenario into two parts.
ReplyDeleteHi Peter, the situation was a good find, it lends itself to both a two part game and an excellent introduction for anyone new to rules or with a starter collection - it fits the bill perfectly.
ReplyDeleteAlthough there are just a few units, there are unit differences that bring interest. We have some units more capable than others, some smoothbore armed and others with rifles and there is a ‘small’ unit thrown in there as well. Together with the artillery, it gives a good grounding in the rules without having to manage too many units / organisations.
A really interesting little scenario and I assume based on actual events (I am not an ACW afficianado) Personally, I think the "double jeopardy" pointed out by Jon, want, because the plus on the Rebs firing represented the close range, and the minus on the Yanks represented the shock of the enemy suddenly appearing and giving them a close range volley...they have a cumulative effect on the Union troops for sure, but they represent different things. The other way to do it would be give the Rebs +3 dice or something similar?
ReplyDeleteHi Keith, yes, a historical situation, which is a bonus. Interestingly, the double jeopardy thing falls directly from trying to replicate the history. I am guessing that if I had made this up as a contrived ambush situation, I probably would have just loaded the Confederate fire dice.
ReplyDeleteThis play test of the scenario revealed two things. A) that the Bucktails need to be an independent command and secondly, where the hill is placed is important - rather, where the Union are placed will determine where the hill goes.
reason - the Union need to be able to stay in play for 3 retreats, otherwise the Confederate victory points are too easily called and there isn’t enough time for their regiments to heavy casualties. They retreat 6” at a time, so need to set up around 20” into the table - but due to ambush and smoothbore ranges, the Confederates need to be within 6” of the Union line and since they are on the hill, this will determine where the hill sits!
A neat little scenario for small forces I just might give something similar a go with my slowly building Triple Alliance, which I haven't lost interest in it's just that other figures are more pleasurably to clean up and paint than Perry castings. I will look out for part two with interest especially to see how it turns out.
ReplyDeleteHi Phil, I know what you mean about figure prep. Multi-pose building annoys me and so do worms …. Some of which, despite best efforts see to go undetected until the paint brush is doing its work.
ReplyDeleteOnce I have gone through a few more play tests, I will put the scenario up, so that the various unit notes, values and special rules are available.
Nice to see a scenario for entry level forces Norm, well done. I don't share your propensity for overthinking games though. To me that's all they are now, too much mental effort tires me out and we seem to have fun anyway.
ReplyDeleteHi David, I am generally coming to that point of view for more of my gaming, though in this instance, the scenario is going to appear in a rule book, so much has to be justified.
DeleteThis is a great little scenario thanks Norm. When my pal and I get back to ACW we will try this one for sure.
ReplyDeleteThanks, I have the scenario in PDF format and there is a bit of nuance to it, so once it has been tested a few time, I will make it available, so hopefully it should give anyone else a good game straight off the bat.
DeleteWonderful work!
ReplyDeleteHi Roger, thanks for visiting and for the thumbs up.
DeleteAn elegant scenario Norm 👍
ReplyDeleteThanks Matt, it just adds to the spectrum of scenarios to meet time / space and collection needs. Too contained for your goodself I would think, but the principle of part I and Part II could certainly be scaled up for one of your bigger battles - with Day I and Day II being good candidates (Shiloh!) :-)
ReplyDeleteNice scenario and the 28mm chaps look great!
ReplyDeleteBest Iain
Thanks Ian, I played part II today and hugely enjoyed it …. Plus more toys on the table :-)
ReplyDeleteThere are PLENTY of times in the ACW that one side got the drop on another with a surprise volley. should be more scenarios where this happens. I have a few around here somewhere... (sounds of shuffling papers)..
ReplyDeleteNice looking ACW troops you got there. looking forward to part II just see more of them. 😀
Thanks Stew - I am just writing up the second game now. As part of that play, there was a separate incident, in which a single regiment got off a lucky volley and inflicted 4 hits, which is pretty nasty in the TF-ON system, so in view of what you say, I am happy that the rules can deliver it naturally as well as in a contrived scenario layout.
ReplyDelete