

Recently, ten gamers became involved in an e-mail based campaign that I wanted to run, themed on the Wavre battle of 1815.
As the game progressed, players manoeuvred and fought, limited by what they could see of the battlefield and whatever intelligence or orders were flowing into their headquarters.
The idea was that the players would manage the game from their maps, while I would transfer actions to the tabletop and play them out as figure games.
Throughout the campaign, I kept a diary of main events, so that at the end of the campaign, it could be shared with the players, so they had a wider understanding of their part in the ‘big picture’.
This post is specifically brings that diary before their eyes, but of course I also hope the twists and turns of the campaign and the notes that underpin it, interest the general readership of the blog.
Please grab some coffee and use the ‘read more’ tab for the rest of this post.
Firstly, I must thank the gamers who became involved, entered the spirit of the game and made sure it moved along by working with the umpire in a timely and kind way.
To make this work, I had to rely on my collection of Warlord Games Epic scale figures, which though largely unpainted, do provide all of the various troop types that will be needed for the tabletop battles.
The campaign engine is something that I worked on myself to fit the subject. The rules used for the tabletop battles were Shadow of the Eagles by Keith Flint.
From the outset, there were two main design philosophies. The first was this would be a heavily themed game, rather than an absolute exact replica of the battle. I have slightly compressed the fight into what will feel like a single day. Players do not know when this will end to prevent any last turn gymnastics simply because they know there will be no 'next turn' consequences.
Compromises were relatively few, but for example, I did not show Pajol’s cavalry corps arriving late evening and in fact only had one division of Gérard’s corps take part in the game, which was managed by the umpire.
Also, rather than having strictly timed turns, an event clock ran in the background that replicated the pace of some notable historical moments and the game proceeded via those event points being reached.
Secondly, making the players ‘believe’ in their role and suggesting what was known / believed / assumed historically at various times, would hopefully make them act in line with the historical narrative, but not bind them to it.
One way this was done was by altering victory point values of locations during play. So for example at the start of play, the victory locations in and around Wavre are high, while the crossing lower down at Limale is very low, hopefully drawing the commanders attention away from that crossing, which historically was not given attention until the evening.
Later in the game, Limale is suddenly given a high victory point value and those at Wavre lowered, to redirect the French commander's attention, though the Prussian commander is not told of this, so he will likely still believe that the French priority is at Wavre, until intelligence comes in suggesting otherwise.
As the below narrative unfolds, it will be told as a historical account, but at times when things happened that were beyond the immediate control of the players, I will make an entry prefaced by the term [system], so that the reader will get an immediate insight the workings of the campaign that players didn’t have.
Enough!

Why are we here?
Two days ago, the French under Ney, had fought the Anglo-Allies, under Wellington, at Quatre Bras and a few miles away, on a second battlefield, the French under Napoleon had fought with Blücher's Prussians at Ligny.
In both cases, the French took the battlefield, but both Wellington and Blücher escaped with their forces still functional and they retired, staying roughly aligned to each other, on the understanding that their armies should unite to defeat Napoleon.
To prevent this, Napoleon split his army. He would engage the Anglo-Allies and destroy them, while his large right wing (40,000 men) under Grouchy would pursue the Prussians, pushing them further away from Wellington’s position, to prevent them joining forces.
As we start our campaign game today, Napoleon has already engaged with Wellington at the Waterloo battlefield and on the right, Grouchy has caught up with the Prussians near Wavre.
What Grouchy does not know is that three Prussian Corps under Blücher have already crossed the bridges at Wavre and are marching west towards the Waterloo battlefield. They left Thielmann’s Corps behind at Wavre as a rearguard to cover the bridges and it is just this corps that Grouchy is dealing with today.
Important - The River Dyle is heavily swollen from the storms of recent days. Roads are muddy and the Dyle can only be crossed at bridges, so they are crucial to campaign decisions.
2 PM on 18th June 1815.
Thielmann, the Prussian Corp commander, had thought that his French pursuers had broken contact and had started to order his brigades to pull out of Wavre and follow Blücher to Waterloo, leaving just a small rearguard behind - however, all rather last minute, advanced French elements were discovered approaching and Thielmann quickly changed the corps orders to one of defending the town and the river crossings.
Unfortunately on a misunderstanding, Borcke’s brigade did leave the area and headed for Waterloo with Blücher, but before doing so, he left some small battalion sized garrisons at the Bas Wavre crossing to the north (location 17) and to some defensive positions on the far side of the Dyle (locations 16 and 15) as rearguard security.

There had been some disagreement within the French command. Earlier in the day, the distant sounds of guns could be heard, clearly Napoleon was engaging the Anglo-Allies some 9 miles away. Both Vandamme and Gérard urged Grouchy to break off the pursuit of the Prussians and instead cross the Dyle lower down and march to the sound of guns. Grouchy adamantly refused to agree, stating that his orders from the Emperor were to pursue the Prussians and that is what they would do.
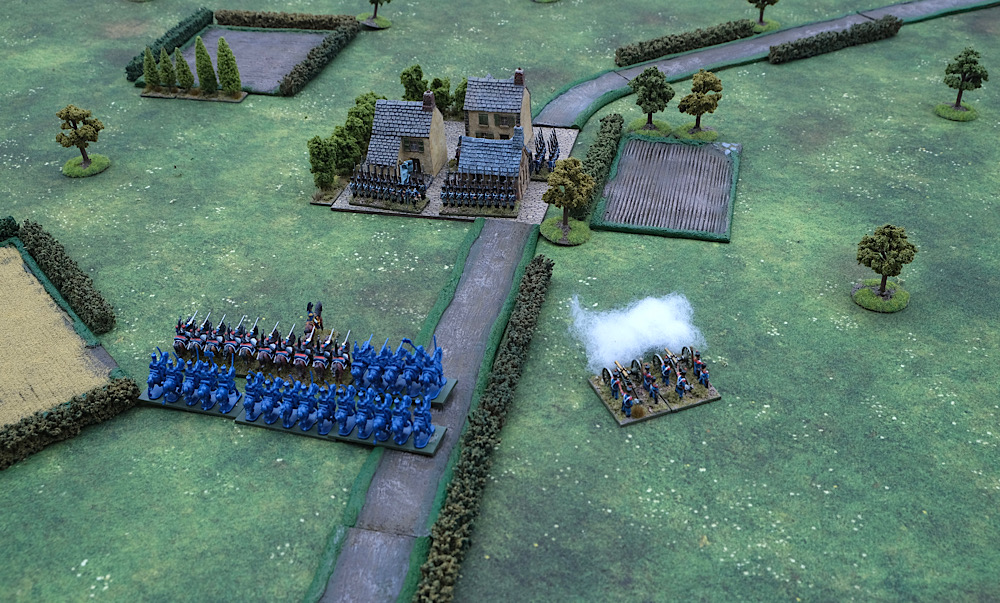
So we find ourselves in and around Wavre. The Prussians have taken up position behind the swollen Dyle, but they have a few units across the Dyle covering East Wavre (location 16) and Aisemont Location (15).

The French (Vandamme’s Corps) are strung out along the main highway, with Lefol’s 8th Division in the lead on the road junction (location 11) and Exelmans’ cavalry out to the right on the minor roads, with 4th Dragoons in the lead. Even with the weather now improving, these secondary roads are still muddy and hard going.
As each corps commander appraised the situation and set their battle plan, they sent orders out to their divisions (French) and brigades (Prussians).
Thielmann (Prussian) was pre-occupied by the threat at Bas Wavre (17) to the north. Here a single battalion had been left behind by Borcke with instructions to dismantle the bridge, but it was not known whether this had actually been done.
In response to the potential threat, Thielmann moved his cavalry towards the area as flank security and to establish exactly what was happening at the bridge.
He was satisfied that Wavre itself was adequately defended and ordered the troops there to destroy the bridges and if that was not possible, to improve their defences. Destroying the bridges was not an immediate option to the local commanders, as the Prussians still had garrison battalions on the other side, defending the east end of Wavre (16) and Aisemont (15). Regardless, Kemphen started preparing demolition charges on one of the two stone bridges at Wavre (22).
Vandamme (French) was keen to the secure crossings as quickly as he could before the enemy defences were firmed up. He ordered his cavalry on the right wing to force march through De Cheremont farm (14) and onto Bas Wavre (17).
Lefol, who expected to be thrown directly ahead to attack at Wavre, instead was ordered to force march westward via Le Manil (12) to attack the crossing at Moulin de Bierges (23), just below Wavre (22, 21, 16).

Both these forced marches were made along secondary roads, which were very muddy, making the task a little harder.
Neither commander saw the crossing at Limale (36) to the south as being of a present concern, nor were they centrally placed to their forces, so there was some delay to those units furthest away in getting their orders.
[System] There is a small chance that orders will be delayed. This is tested on a die roll. In any case, Orders that travel more than two locations are subject to a one turn delay.

Above - You can see that the Prussians have fortified the bridges at three locations (deep red markers). Forced marched units that become 'weary' have a bright red counter and the yellow counter shows force marched units being tired (better than being weary).
Two initial contacts were made. At Mulin de Bierges (23) (below Wavre), Stulpnagel was holding the bridge with 3 battalions and his guns. Lefol's lead units arrived (5 battalions and guns), weary after the forced march and noting the defences, he decided that the attack would be both futile and costly and pulled back. The artillery from both sides had a brief engagement, with the Prussian guns suffering some losses.

To the north, Exelmans' cavalry arrived 'weary' at Bas Wavre, to find the bridge already destroyed!
[System - the game starts with that bridge intact, but with orders for it to be dismantled, which is done by die roll. In two test games, the bridge had not been destroyed by time the French arrived, allowing French cavalry to cross and pose a greater threat to the Prussian left].
Exelmans demonstrated against the village with some fire from his horse artillery, but the cavalry had also suffered from the forced march on the muddy roads and were 'weary', so with the crossing now useless, they retired.
[System - Force march can leaved units in good order, tired or weary. Tired is a temporary status with a combat penalty, but weary is much more significant - units suffer a penalty for both combat and morale and unit cannot recover from 'weary' unless a 'rest' order is given].
Vandamme's choice of force march had almost brought success. His cavalry only just missed an opportunity to capture Bas Wavre, which would have given their dragoons a fully functional right wing position on the far side of the Dyle and if Lefol's entire Division had not become weary, assaulting Moulin de Bierges early could well have proved decisive.
But it was not to be and the situation had just become a little harder for the French, especially as the heavy rain had returned.
Thielmann was visited by an aide, his mount breathless, with letters from Blücher, explaining that his forces were approaching Plancenoit and that contact had been made with Napoleon's right.
Blücher was convinced that the battle would be won at Waterloo and he urged Thielmann to hold the French back at all costs, to ensure the 'Waterloo' victory.
He was concerned that Thielmann was considering blowing the bridges, as he felt that "should we get the great victory at Waterloo, we shall need those routes open to counter-attach Grouchy and push him back to France".
Thielmann acknowledged the communications and replied, respectfully asking that Borcke's Brigade be returned to him, as a reserve in the first instance and then to support any counter-attack.
Thielmann was not yet aware of the French contact at Moulin de Bierges.
[System - at this point it is worth highlighting the good coms between local players and how the 'player isolation' kept them in the dark from the bigger picture, for example this is a communication via the umpire from one player to another to "To ***: I have also barricaded houses and begun working on demolishing the bridge. No sign of enemy.
They may strike further
downstream. We may have to move rapidly that way. Just a hunch.
I have cavalry patrols north of Wavre (20)."].
As Habert's 10th Infantry Division (French) moved up, Vandamme instructed him to attack the eastern part of Wavre (16), on the French side of the Dyle, in readiness for the French to assault across the Dyle at the Pont du Christ stone crossing (locations 16 into 22).
With news just in from his cavalry patrols that the bridge further north at Bas Wavre was already destroyed, there was some urgency in getting across the Dyle 'somewhere'!
The eastern part of Wavre (16) would give direct access to both crossings into both upper and lower Wavre.
.JPG)
Habert's patrols reported that the buildings ahead were held by two battalions of infantry, though in truth there was a single battalion of fusiliers there.
[System - all patrol reports are subject to see if they are accurately made. Mostly they are, but there is scope for under and over reporting].
The French 34th Line Infantry regiment opened the attack, with their 1st Battalion. House to house and street fighting raged, with the Prussians losing possession of the buildings briefly, only for them to re-enter the lower half of the settlement.

12 pounders from the Prussian side of the Dyle tried to support the defenders, but the 34th put in their second battalion and the Prussian Fusiliers were eventually overwhelmed, surrendering after the loss of their colonel.
At last, Vandamme had something to cheer, a foothold in Wavre, but his forces still faced fighting over those two bridges to break into the rest of Wavre.
The clock moves forward.
[System, the game is not paced by game turns, but rather by the passage of historical events. Grouchy had just received an earlier order from Napoleon to 'Press the Prussians before him'. Grouchy, vindicated in his decision to keep pressure on the Prussians made sure that Vandamme and Gérard (commander IV Corps - not yet in play and played by the umpire) knew just how right he had been! The event increases the Victory Point values associated with Wavre from 8 to 10 and is intended to draw Vandamme deeper into this objective - Thielmann is not told of the increased value, but he is likely to feel the extra French tempo here].
At Thielmann's headquarters, news filters in of the destruction of the bridge at Bas Wavre (17) and of the successful French attack at the eastern end of Wavre (16).
He sends an order to Kemphen to blow the bridge at the lower end of Wavre, so that the French are forced to funnel their attack towards the upper Wavre bridge.
With his left cavalry wing now free of the threat from Bas Wavre, Thielmann splits them, keeping 2nd Brigade as a local reserve and sending 1st Brigade south, down as far as Limale (36) to protect that crossing there.
This movement is not without hazard as the Wavre roads are heavily congested and the weather has deteriorated further to being atrocious, making roads harder to use, but a local guide agrees to show them the back routes via Point du Jour (31).
[System - the guide was created by a special event]
The realisation of the importance of Lemale (36) is noteworthy as it is the most lightly guarded crossing and the French are actually already close by with Lefol's 2nd Brigade resting at Trou Dehoux (8).
By knocking two of the five bridges out, Thielmann hopes he can better defend the river line, though leave enough avenue open for the counter-attack opportunity that Blücher feels will come once Napoleon has been defeated on the Waterloo field.
[system - the blowing of bridges, particularly stone bridges, gives the umpire a dilemma, my research shows that 'destroying bridges was not a Prussian strongpoint'! So I need a sub system to dampen down the speed / ease / enthusiasm of destruction of the stone bridges .... for the sake of the game!].
 |
| Three main crossings at Moulin de Bierges (23), lower Wavre (22) and upper Wavre (21). The French now have eastern Wavre (16) |
Grouchy's order from Napoleon seems to have put new heart into the French efforts. Lefol, with his 1st Brigade recovering from their forced march weariness has turned back to Moulin de Bierges (23) and assaulted Stulpnagel's 31st Infantry regiment.
There was a robust defence, with the separate attacks of 1st, 2nd and 3rd battalions of 15th Light Infantry being individually repulsed at the bridge, but one final push overwhelmed the defences and the Prussians withdrew to the heights (24) behind them.
 |
| French column prepare to bulldoze their way over the bridge |
For all of Thielmann's plans to choke off the French advance over the Dyle, Vandamme had now gained his first foothold across the river, but could he hold it?
Lefol's immediate problem was his isolation, the rest of his division was back at Trou Dehoux (8) and Habert's division was becoming fully engaged at Wavre. He was fearful of a prompt Prussian counter-attack, though this dreadful weather might slow down enemy movement or even the news of the crossing travelling to Thielmann any time soon.
Further North, Exelmans' 9th Cavalry Division, frustrated by the loss of the Bas Wavre bridge, moved down to De Cheremont farm (14), but with Habert now in the eastern part of Wavre, the Prussian Garrison at Aisemont (15), was now behind French lines and a thorn in Vandamme's side.
Exelmans was ordered to attack. Tippleskirch's Landwehr garrison did not take much encouragement to surrender, no doubt feeling somewhat isolated by their fellow comrades, who had effectively closed the Dyle bridges.
 |
| the fight at Aisemont |
Horse artillery, opened the battle while the 5th Dragoon Regiment dismounted and flushed the defenders out. Everything on the eastern side of the Dyle was now in French hands.
In the eastern sector of Wavre (16), Habert had a choice of two bridges to assault, one leading to lower Wavre and the other to upper Wavre, but he didn't have enough troops on immediate hand to attempt to take both.
He decided to demonstrate against the lower bridge (22), with 34th Line Regiment, to pin the defenders in place while putting his main effort into the Pont du Christ crossing (21) with 88th Line Regiment.
 |
| The attack against the lower bridge |
The assault on the lower bridge met its objective perfectly, pinning Kemphen in place.
 |
| The assault on the upper bridge (Pont du Christ), note the Church of Saint-Jean-Batiste in the top right. |
At the northern end of Wavre (21), He opened the attack with 88th Line Infantry, but a lone regiment was not enough for the task, so his 2nd Brigade had been ordered up to support. Whether it was due to the very muddy roads, only the 22nd Line Regiment would in fact arrive in time. Nothing was certain in this important engagement. Oberst Luck of Prussian 11th Infantry brigade had meticulously set his defences.
Habert combined his grenadier companies to lead the attack. It took three attempts to break into the town, but the Grenadiers were eventually able to flush the Prussians from the Church of Saint-Jean-Baptiste and the rest of 88th pushed the Prussian Landwehr down the main street, causing one battalion to rout and the other to escape the town.
Habert's two prong attack had paid off - just. His artillery had taken high losses from Luck's 12 pounder battery, which had earlier taken time to double their ammunition allocation, so were not suffering supply problems to the same extent that the French were, due to the ongoing downpour.
The Grenadiers from the 88th had taken such heavy casualties that they no longer presented a meaningful force within the regiment.

Thielmann now had much to react to. The French controlled two crossings on the Dyle, Moulin de Bierges (23) and the northern part of Wavre (21). Kemphen's position in lower Wavre (22) was about to become very interesting!
Thielmann ordered Stulpnagel to counter-attack Moulin de Bierges at once, stating that he would move to his position and co-ordinate efforts with supports that were also making the battlefield.

As it turned out, neither he nor some of the supports reached the crossing before Stulpnagel was obliged to launch his attack. This opened a little cautiously, as his 31st Infantry were somewhat bruised from the earlier encounter, additionally Major von Welling's 5th Kurmark Landwehr Regiment was untested.
The attack got off to a very successful start with Lefol's 15th Light Infantry in the hamlet suffering quite badly. The tempo of the battle grew as the Prussians became increasingly bold and 1st battalion of the Landwehr, overran the French guns! with the gunners making a run for the safety of the buildings.
Casualties were very heavy on both sides and just as Stulpnagel came close to calling off the attack, suddenly the Mill fell and French soldiers started pulling back over the bridge.
Moulin de Bierges was back in Prussian hands, though at great cost. Stulpnagel's 31st Infantry Brigade was 'shattered' and could no longer be operationally relied upon.
Lefol's 1st Brigade had also suffered and was in quite a state, plus he had lost the division's guns!
Thielmann now only had the crossing at upper Wavre to worry about. It would be easier to concentrate his troops there, but unbeknown to him, General Oberst Luck had decided, on his own initiative, to launch an immediate counter-attack at upper Wavre.
His troops, particularly the 4th Kurmark Landwehr, had been sorely tested earlier when General Habert had ejected them from Wavre, but Luck was hoping that he could counter attack before the French became established and he had kept good communications open with Kemphen, who he hoped would be able to send some support.
If a success, this would mean that at all the crossing points would be back in Prussian hands and that it might take the French hours to recover from that.
At lower Wavre (22) Kemphen was becoming frustrated at the delay for his order to blow the bridge to be executed. He demanded answers from his chief engineer, who explained that the severe weather and rising river levels had dampened some of the gunpowder.
He advised that he had set teams to dig up the cobbles on the bridge and create a rubbled / uneven surface that would be difficult for infantry, injurious to horses and impossible for artillery, though to be fully effective would take a few more hours.
He suggested that further fresh gunpowder could be taken from the guns to increase the chance of an effective explosion. Kemphen, concerned of imminent enemy assault over the bridge and wanting his guns fully functioning, gave him a 60 minute window to asses the plausibility of using the artillery gunpowder supply to that effect.
To his left, he could hear the action further north at the top end of Wavre .... Luck was putting in his counter-attack against Habert.

Habert was coming under attack from two directions. Luck from the north with two regiments of Landwehr, plus artillery and from the south, a regiment of Landwehr, sent by Kemphen to support the counter-attack, a total of nine battalions.
The French left held up well against Kemphen's Landwehr. Shooting from the village and the harassing skirmisher fire from the orchard, eventually forced the Landwehr to retire.

On the right flank, things were very different. On seeing the threat from Luck's battalions, the reserve (a Swiss battalion) was pushed forward to deal with Luck's Landwehr, but they were somewhat shockingly repulsed, falling back to the village and couldn't be encouraged to re-enter the fray!
Hobe's 7th Uhlans (Prussian) had responded to the Sound of Guns, and their arrival immediately put the French right under threat. One infantry battalion went into square and another, already weakened was hit in the flank and ridden down by the cavalry.
[System - the initiative shown by 7th Uhlan was mention in despatches by Thielmann, accordingly this unit, post battle, had its 'motivation' rating raised from regular to superior].
As the church (Sainte Jeane-Baptiste) fell to the Prussians, all seemed lost, but 4th Landwehr had taken a lot of casualties and were not up to the task of taking full advantage of the moment and the timely arrival of the French 34th Line Regiment restored the situation. The Prussians fell back and the French held onto the settlement .... just!
Vandamme still had his crossing, but Thielman over the past hour had prevented further penetration.
At the lower bridge, Kemphen's chief engineer was struggling to destroy or even damage the bridge. The artillery gunpowder had failed to materialise and enemy sniper fire had prevented his men from further work on the bridge surface.
[System] an event is rolled, the time moves on to 1800 hours and Grouchy advises Vandamme that he has new orders from Napoleon, sent some hours ago, requiring the wing to move directly to the Waterloo battlefield to assist the Emperor. He opens his campaign map and explains that ....

The red coloured locations (39 - 47) down the left side of the map are now active. If captured by the French, each can give 8 Victory Points, up to a maximum of two locations.
Further the VP value of Limale (36) increases to 12 and the four red locations in and around Wavre (16, 21, 22, 23) reduce back to a value of 8 VP's. Thielmann of course is not aware of this development].
Grouchy sent riders back down the Namur - Brussels road to advise Gérard, IV Corps commander, of the same.
At the Waterloo battlefield, the fight for Plancenoit was going in the Prussian favour. Blücher had been discussing the strategic situation with his staff and commented that all Thielmann had to do was block Grouchy, while the Prussians win at Waterloo ... even if that cost Thielmann III corps to do so!
At Wavre, both sides were frantically trying to gain an advantage. Thielmann's forces were taking heavy losses, as indeed were the French, but Vandamme still had Berthezene's fresh infantry division in reserve and his cavalry wing was still in excellent shape.
It was this infantry division that was pounding down the lane from Le Manil (12) to attack Moulin de Bierges (23) and would once again put Stulpnagel and his battered force to the test.
Thielmann suspected a counter-attack would occur here. He was enroute to the hamlet with a reserve horse battery and had ordered Hobe's cavalry to move to Bierges (24), as their lead elements were close enough to reach Moulin de Bierges (23), but time was of the essence.

Kemphen on his own initiative had previously ordered some cavalry and infantry to move to Bierges (24) to support Stulpnagel, but Thielman, seeing the build up of French forces at Wavre as the greater threat had ordered these units instead go to the road junction (25) behind Wavre, so that they were placed to give ready support to either Kemphen or Luck, whichever the French chose to attack to set their break-out from Wavre (21) and (22) in motion.
Kemphen's men were already on the march to comply, but within the hour, the order was reversed and Kemphen was told to instead march again in the direction of Moulin de Bierges (23) and be ready to march to the sound of guns. Delay was building into the Prussian response.
The only thing initially going in Stulpnagel's favour was that Berthezene's approach was cautious. Vandamme, since receiving Grouchy's order had advised the brigade commanders not to take unnecessary risk at the Dyle crossings and to spare the men until proper assessment of enemy strengths were made, suggesting that any attacks should be worthwhile and not incur heavy loss.
Vandamme likely thought that Gérard's IV Corps, being nearer to Limale (36), would be tasked with crossing there and that the burden of crossing the Dyle would now be shared, but Gérard was still marching up the main road towards Vandamme's position, he had not received Grouchy's order to march on Waterloo!
Was Thielmann about to get the bit of breathing space he needed?
As Berthezene opened the attack at Moulin de Bierges, French confidence was high. The defenders had been battered over the course of the previous two battles and their expectation of holding out alone was low.
However, true to his word, Thielmann had moved to Bierges Heights (24) to co-ordinate the counter-attack and as support arrived there, he sent them straight down into the village below. First to arrive were 19th Horse Artillery, followed by 5th Uhlan cavalry.

As Berthezene's forces struggled to break into the defences, columns in the distance of Kemphen's 2nd Landwehr could be seen approaching and the French saw little use in continuing the attack and retired.

Above - after several hours of fighting, upper Wavre remained the only bridge that the French had breached. The map shows the concentration of force at Wavre and by comparison, that lack of presence down at the lower bridge, Limale (36) ...... covered by the 'G' counter (Stengel's Garrison), opposite Le Motte (7).
Thielmann's personal intervention at Moulin de Bierges had certainly ensured that the Prussians were able to put up a co-ordinated defence at the vital crossing, but his movement further south had taken him away from a more central position in the corps, leaving Oberst Luck, commander of 11th Brigade somewhat isolated up at St. Roch (20).
Indeed, even the cordial co-ordination between Luck and Kemphen was now under strain, due to the French presence in upper Wavre forcing messengers between the two Prussian commanders to a travel a more circuitous route along the muddy back lanes.
Suddenly, a single mighty explosion sounded across the battlefield. Kemphen's engineers had at last managed to blow the bridge that linked lower Wavre with its eastern neighbour. The central span had been blown wide apart and was no longer usable as a crossing point.
This immediately liberated Kemphen from having to defend a threat from the eastern part of Wavre, though it could be said that the French too were free from the threat of Prussian interference from that quarter and that their focus as a result could be sharpened at the prospect of breaking out from upper Wavre, which took on a renewed significance.
It would give the French a bridgehead to break out from into the relatively lightly held Prussian line at this point, but also a Prussian opportunity now presented itself in assaulting this French bridgehead. Oberst Luck and General Kemphen could attack from two directions (again) (22 and 20) .... if only each were not so isolated from the other they could better co-ordinate their efforts.
The crossing at Limale (36) further south, offered the French a second opportunity to turn the Prussian line, but the potential of this was not the prime focus of either Vandamme or Thielmann at the moment, as they saw the area of upper Wavre being where the greatest immediate threat lay.
Worryingly though for Vandamme, a message to him from Gérard made it clear that Gérard had not received Grouchy's order about moving to aid Napoleon, Gérard was wasting valuable time marching towards Wavre, which would only add to the jam of Frenchmen stuck on his side of the Dyle.
He sent messengers to Gérard advising him of Grouchy's order and stating that he would "strongly support Gérard's movement towards the crossing at Lemale (36) via La Motte (7)". He also told Gérard that he believed the bridge at Moulin de Bierges had been blown (based upon rumoured speculation from another general) and it was a short while before he discovered it was in fact the lower Wavre bridge that had been destroyed.
With the bridge at lower Wavre blown, both Vandamme and Thielmann saw upper Wavre as being the crucible of the next stage of the battle. Thielmann was convinced that the French intended to break out from upper Wavre (21), especially as French dragoons had been spotted assembling there.
For his part, Vandamme thought that Upper Wavre would become the focus of Prussian attack and he wondered whether he would even be able to carry on holding it.
In truth, up ahead at junction (26) on the main road, the area was weakly held by a couple of Prussian cavalry regiments. Habert's patrols discovered this and he suggested to Vandamme that together, he and Exelmans' lead cavalry unit could push up and take that junction. Vandamme gave them the latitude to proceed with an attack if they established it was safe to do so. The only potential threat was Luck's brigade up at St. Roch (20).
This attack if properly resourced, could become a major problem for the Prussians as Exelmans' two cavalry divisions were hanging around behind Wavre, waiting for an opportunity to burst forth and unhinge the Prussian defence.
The second problem for the Prussians was that Lefol's powerful 2nd brigade, supported by Berthezene, was about to fall upon Moulin de Bierges in a determined effort to retake the bridge and open the way to Bierges (on the heights - 24) and beyond.
Then, there was a further ticking time bomb that the Prussians obviously didn't know about ..... Gérard (French IV Corps) with his lead division (Hulot) was now slowly making towards the lower crossing at Limale (36), would Stengel's 19th Infantry regiment (Prussian), garrisoning the hamlet and bridge, be able to stop them?
The next hour would be a testing time for the Prussians.
At Moulin de Bierges (23), Stulnagel addressed his regimental commanders. He told them to "Hold and defend to the last man - The French must not gain a bridgehead here! We shall prevail".
Lefol understood the importance of the battle and with promised support by Berthezene, he launched his assault. His 2nd Brigade was relatively fresh and a powerful formation with its six battalions, but without Berthezene's guns, Lefol was worried.

To his word, Berthezene arrived with 12th Line Regiment leading and the 17th Foot artillery.
Fighting over the one lane bridge was difficult and both sides suffered heavily - not least, Berthezene's artillery, which had to pull out after accurate fire and suffered much damage from the guns of the Prussian 19th Horse Artillery.
It took five separate assaults over the bridge to break into the village, but once the lead French troops got amongst the buildings, Prussian troops began to rout and as fleeing units crashed into other units, they too routed, like a sort of contagion.
The Prussian forces fell back up the road to the heights and the village of Bierges (24). It was difficult to know whether the Prussians would still have the cohesion to hold this part of the line together, but Lefol had some cause to hope that at least he wouldn't be immediately counter-attacked and ejected back across the bridge as had happened just a few hours earlier.

Further north Exelmans and Habert discussed how best to press on up the main road to take the next major road junction (26). The consensus was that with the intentions of Luck still uncertain, that they should make a combined effort with Harbet's infantry leading and 13th Dragoons supporting.
The French had been pinned at Upper Wavre for too long and the prospect of dividing the enemy force and getting behind them was a tantalising prize.
Habert sent two regiments (6 battalions) north, to the road junction (26). He was accompanied by a regiment of Exelmans' dragoons.

As the column snaked up the road, the dragoons were attacked by the Prussian cavalry, but they held their ground and counter-attacked, forcing the Prussians to retreat with losses and the French safely reached the road junction (26).
Oberst Luck, increasingly isolated at St. Roch (20) and unsure whether his messages for support had even got through to Thielmann, ventured towards upper Wavre, anticipating meeting both Kemphen and cavalry to assault the village, but on finding neither there, he demonstrated by firing off a few rounds of artillery and then promptly withdrew back to St. Roch once the enemy guns had found his range.
Thielmann's line was now ruptured in two places, with the enemy present at both points in some strength. He had Hobe's cavalry covering various rear points to detect and deter enemy movement breaking through to the roads beyond that could carry units to the Waterloo battlefield, but night might yet become his greatest ally.
At Moulin de Bierges (23), Lefol had bagged many Prussian prisoners, particularly from 5th Kurmark Landwehr, who were notably demoralised after being involved in repeated assaults. Interviews with these soldiers revealed that 5th Kurmark was close to collapse, which gave some hope that a fight for the Heights at Bierges (24) might be a less costly affair than Lefol had previously thought.
[System - A random event threw up that a randomly selected force in the game would get accurate intelligence about their enemy. Of all the forces that could have potentially benefited from this event at this moment in time, it was Lefol].
Thielmann had little doubt that one more push by the French would likely break Stulpnagel's position and he had sent orders that should he be attacked and be forced to retire, then he should move to Limale (36), where Stengel's fresh garrison could offer some support.
As the time neared 8.30 PM, a message arrived at Thielmann's headquarters from Blücher, who was engaged with the French in the plancenoit area, near Waterloo.
Disappointingly, the message said that Borcke was currently fighting and could not be disengaged at this time to return to Thielmann's command. The communication was timed at 5.30 PM, so Thielmann knew he could not expect help from Blucher any earlier than in the morning and the message gave no indication of whether victory over there was even likely!
Gérard's lead division (Hulot) was just approaching La Motte (7), putting him close enough to strike at Limale (36) before nightfall. The significance of Limale was starting to take shape.
Elsewhere, with the advancing evening and his situation serious, Thielmann looked at having one last roll of the dice to curtail the expansion of the French bridgeheads. He ordered his cavalry to concentrate on some key points, but their dispersal offered no guarantees of that happening in time and his orders to the isolated Oberst Luck were hardly likely to reach him in time. However, at this moment of crisis, his III Corps did what it could. His main hope was that Kemphen would attack from lower Wavre (22) into upper Wavre (21) and curtail that aspect of the French advance.
As for the French, Lefol had not passed on the information to Vandamme concerning the possible wavering of Prussian 5th Landwehr. Fearing counter-attack, as had happened just a few hours earlier, he had started to prepare defences.
Vandamme had given Lefol some latitude in making a choice, stating that he should join Berthezene's attack on Bierges (24) if he could, without compromising the security of Moulin de Bierges.
The result would be that Berthezene would attack the Bierges heights (24) alone - in the face of an enemy that though teetering, was still adequately equipped with cannon.
Berthezene by nature was attack orientated, but Vandamme's earlier communication (likely based on his belief that Gerard's IV Corps would cross the Dyle lower down and move towards Napoleon) that attacks should be measured with the avoidance of unnecessary loss and Lefol's insistence on defence, caused Berthezene to believe that the corps objectives were now only to take Bierges (24) if possible, but the protection of the Moulin de Bierges (23) crossing was the priority and accordingly, he approached the battle with a 'measured' stance.
[System - Players choose a 'stance' before a battle of being either aggressive, measured or retire. This determines the casualty level that a side will accept before it breaks contact].
Had Stulpnagel been thrown a lifeline?

Berthezene marched into what was probably the closest fought battle of the day so far. Stulpnagel's forces, close to exhaustion, put up a stubborn fight. Then the arrival of Prussian 9th Hussars, looked like they would just tip the balance in their favour, but the French held, recovered and pressed on.
Then came the tipping point. Likely the sight of the arrival of Berthezene's 73rd Line Regiment sealed the French success, as the exhausted Prussians abandoned the village and retreated down towards Limale (36).
The Prussian line had been cracked open!
To the North, Habert and Exelmans were discussing how to develop their advance onto junction (26). Habert sent a messenger to Exelamns;
"To Exelmans from Habert:
We must push on! I favour advancing on the road junction at 25 but equally we could attempt to get into the enemy rear via 28. What do you think?"
Habert agreed.

Then one of those cruel twists of fate that befits a campaign occurred. Up until this point, Oberst Luck had twice struck towards upper Wavre in the belief that he would likely be able to support any attack that Kemphen was making from lower Wavre into upper Wavre (21).
However, being cut off from the bigger picture and senior direction and not knowing what Kemphen intended, he took it upon himself to make a bold move and strike east and force march to Bas Wavre (17), cross the Dyle and then move south to attack the French flank and rear. It would almost certainly catch the French off guard.
His troops got as far as Bas Wavre, where he met Dittfurth's Fusiliers, who explained that the bridge had been dismantled by order during the afternoon, while in the face of a French cavalry attack and that it was beyond repair.
Oberst Luck had no idea that the bridge had been destroyed. Deflated, he had to turn around and march back to St. Roch (20), though at least his troops had not become fatigued by force march and he could ensure St. Roch remained secure.
The cruel irony was that at the same time, Kemphen was indeed launching an attack into upper Wavre, an attack that he had been ordered to put everything into - Luck's absence would be felt.
Kemphen was partly bottled up in lower Wavre (22), but having blown the bridge over the Dyle, he was free from the threat of attack from that direction and now able to push up into upper Wavre with more troops. If he could take that area, then the French troops that had already passed through and were pushing into the Prussian flank and rear, would be cut-off.

The 2nd Swiss Regiment (French) had entrenched behind the stream that Kemphen had to cross. Here, he took many casualties, but his troops moved to bypass the defences and soon their numbers started to tell. The French position collapsed. The Prussians had closed off this avenue of advance ... for now!
Those French units that had already crossed at this location and pressed deeper into the enemy lines, were never-the-less, still formidable and pushing the Prussians (mainly cavalry detachments) back wherever they met them.

Above, this is roughly what the situation looks like by 9 PM. Both Thielmann and Kemphen see and feel threat around Wavre, as the Prussians there are starting to look isolated - though equally, advanced French units that have already crossed the Dyle there, have also been cut of from the bridge crossing at upper Wavre (21).
What Thielmann doesn't know yet is that the French are approaching Limale (36), (see the bottom blue square in the map above), though messengers are on the way to him.
The light had started to fade with the approach of dusk and with it came the urgency to gain battlefield advantage. Thielmann felt sure that an attack could be expected at Wavre (21) to reclaim the crossing and also below at Limale (36). Though he anticipated the attack on Limale would come from his side of the Dyle, from the direction of Moulin de Bierges (23), when in truth, the real risk to Limale was about to come earlier and by direct assault across the river, from Gérard at Le Motte (7), with the whole of IV Corps potentially following up.
Seeing the French penetration in the north as a risk and with their line of communication cut (at Wavre (21)), Thielmann co-ordinated an attack at the road junction (25). When his assembled units reached the junction, it was deserted. He had missed the French.
Had they moved north to cut the main road, the Prussian line of communication or were they intent of moving further west?
Together, Exelmans and Habert had indeed moved further west and attacked Junction 30, which according to their cavalry patrols, was defended by a single Prussian dragoon unit.

That was the case, though when the French attacked the junction, some additional support did show up, but it proved to be a minor inconvenience to the French, who forced the Prussians to retire. The French were getting closer to one of the exit locations in red at the map edge.
Thielmann's suspicions that the French would want counter-attack against upper Wavre (21) were in part correct. Habert was assembling his forces in the eastern part of Wavre, ready for a night assault, later, over the bridge, but he had sent some skirmishers and again working with Exelmans' dragoons and horse artillery, probed and harassed the upper Wavre position, just to keep the Prussians on edge.
Interestingly, while there, the cavalry saw columns of infantry entering upper Wavre from the north, it looked like the town was preparing to heavily defend.
In truth, this was Oberst Luck just moving through Wavre as part of his route march to get to Junction (25) and assist Thielmann's attacks, but perhaps this sighting would deter a night attack by Halbert.

At Bierges and Mullin de Bierges, both Lefol and Berthezene were content with staying put and fortifying their positions, protection of the crossing being their priority. Berthezene was mindful that up ahead, the enemy had both cavalry and guns and that he had neither, but the Prussian defence was so weak here, that the combined infantry battalions of both Lefol and Berthezene could have likely brushed them aside.
Stulpagnel had been asked to demonstrate against Bierges (24), but his force was so weak, that light skirmishing against Berthezene's left flank (12th Line) was as much as he could do.
Importantly, a little further south, in a quiet corner of the battlefield, Gérard assaulted and took Limale (36) before darkness fell. He had secured a crossing that would allow his IV Corps to cross the Dyle the next morning.
Only Stulpnagel was close enough to become aware of this action and it would be much later during the night that either corps commander would hear the news and it would be doubtful that any response could be made before daylight.
During the night, the weather remained miserable, but for those that tried to sleep, exhaustion and the silence of the cannons, made good bed-fellows. Messengers criss-crossed the landscape, trying not to get lost, so that by dawn, both commanders would have a good assessment of their current situation.
Thielmann had ordered all formations to stay in position overnight and be vigilant. He was convinced that during the night, the French would again attack upper Wavre (21) in the hope of re-establishing communication with Habert's infantry and Exelmans' cavalry that were pushing west.
He warned Kemphen than an assault on Wavre might equally come from Moulin de Bierges and that he and Oberst Luck should be prepared through the night to meet an assault on Wavre .... wherever it should come from!
He did see an opportunity if Wavre held, to force the French advanced elements to surrender.
Vandamme in fact had no intention of allowing attacks at night, but Thielman was right, a strong assault was being planned, but it would not be made until daylight and Vandamme wanted everything thrown at it.
He had just received news from Gerard, that IV Corps had breached the Dyle further south and taken Limale (36), so Vandamme knew he was free to concentrate everything in and around Wavre, whilst the Prussians would be stretched between Wavre and Limale.
But, everything was about to change over the next few hours. Both commanders were receiving reports directly from the field at Waterloo that Napoleon had been fully defeated.
Interestingly it was those units belonging to Habert and Exelmans that had pushed to road junction (30) near Point du Jour that received the news first, due to their advanced position. They were also able to tell the messengers that the way to Wavre was blocked by Prussian forces, so that the messengers diverted south to make in the direction of Bierges (24) - a path that Habert and Exelmans also immediately took, as escape was now their prime consideration. Their tired soldiers obliged to march (and tired horses carry) through the night.
On arrival at Point du Jour (31), their way was blocked by three regiments of Hobe's cavalry and his guns. The French attacked, but were thrown back in disorder, their troops tired, they halted for the rest of the night.
Hobe's cavalry, which had been in action all day were 'weary' and not at all inclined to pursue in the dark.
On receiving the news from Waterloo, Grouchy realised that his wing would have to immediately disengage if it were to escape the clutches of a victorious Prussian army in pursuit and orders were hurriedly sent out to that effect.
Thielmann likewise was in a dilemma. Though it was apparent that the allies had won at Waterloo, his immediate situation was that he was in immediate contact with the French who had gained a positional advantage and who had superior numbers. To avoid any unnecessary loss that he considered was bound to happen, he too ordered his corps to disengage and move to safety.
[System - this was in fact the historical view of both commanders, who mutually broke contact. Grouchy was later credited with a skilful retreat].
With daylight breaking, both armies were actively disengaging, which was broadly done without issue .... however, those troops of Exelmans' and Habert's trapped behind Wavre, with their cause utterly lost and all routes of escape closed, were compelled to surrender!
 |
| Positions at the end of play (night). The trapped units locations are marked with a cross. |
The game and battle had come to its natural end. Time for victory to be decided in an interesting situation of both sides disengaging. Neither side might feel like victors, but the Prussians could take comfort from the fact that they had held the enemy, giving time for the allies to win at Waterloo, plus a significant number of prisoners were now in the bag!

Victory Points
The French get 28 points for the capture of eastern sector of Wavre (16), Bierges (24) and Limale (36).
They get a further 4 points for causing shattered status on enemy units and a further 52 points for the number of casualties inflicted to give a total of 84 Victory Points.
The Prussians get 16 points for holding upper and lower Wavre.
They get a further 4 points for causing shattered status on enemy units and a further 47 points for the number of casualties inflicted, to give a total of 67 Victory Points.
So on the face of it, we have a French win at 84 to 67 points .... however, in the final count, the Prussians have bagged themselves a good number of prisoners overnight, which get counted at half points. This comes to an additional 23 VP's, pushing the Prussians to 90 points Vs 84 points for the French.
I think this is close enough for all players to feel they got a good result at the end of play. Well done everyone.
Conclusion. (yay ... you say!)
I am sorry for the extraordinary length of this post, but I feel the players deserve the full story and anything less would not have served as well.
Being in the position of umpire and seeing the 'big picture' first hand, has been fascinating and fun. There were certainly a number of moments in which a different outcome would have altered the course of the game.
Perhaps none more than the early destruction of the bridge at Bas Wavre. Had Exelmans' Reserve Cavalry Corps seized that, then there would have been some fascinating cavalry battles on that flank between the French cavalry and Hobe's cavalry reserve, when the latter was still concentrated.
Likewise, an earlier permanent taking of the bridge at Moulin de Bergies to the south of Wavre, would have caused the Prussians to dislocate their defences, which were primarily anchored to Wavre, to deal with a penetration there. Had both these things happened, the Prussians would have been stretched, responding to the threats to both flanks.
Kemphen's frustration at not being able to blow his bridge, pinned his brigade in place for much longer than he had likely cared for. Though interestingly, French intention had always primarily more concerned with the upper stone bridge, Pont du Christ.
As umpire, my inclination (due to the accounts read when researching) was not to allow the stone bridges to be blown, but equally I did not want to stifle commanders intent. I think the resulting delay was a compromise that helped the narrative along.
From the outset, the Prussians are outnumbered, but the French force is still on the march and stretching some way back, so it will take a time to concentrate. But historically, this was always about a battle of delay by the Prussians and I think we preserved that.
Then there is the question of what to do with the French cavalry (Exelmans) if the Bas Wavre bride (17) gets destroyed early. I know in a few recent playings of a boardgame that I have on the same subject, it is easy for them to get neutralised and they need to be re-deployed, otherwise they will just stand still ..... all day!
In our game, they joined other French forces in the jam behind Wavre, just waiting for an opening, so that they could 'burst out' through penetrated enemy positions.
Another option would be to get them moving back south early on and swing them towards the Limale (36) crossing at the bottom of the map - or even divide the two cavalry divisions to work on both wings, which is pretty much what Thielmann initially did, but the Prussian cavalry reserve got drawn into several 'finger in the dyke' type tasks, dispersing them ... but in the last minutes of the game, they were certainly in the right place when the stopped Habert and Exelmans escaping.
As for the weather, what can I say! Each turn it was subject to dice testing and on another day in another game, you could equally have it sunny all day. The mud did delay some orders and some movement and on the tabletop battlefields it also frustrated some movement - sometimes at critical and intriguing moments, such as when Hobe's horse artillery was trying to get into position to rescue the moment, the guns spent two game turns stuck in the mud!
This campaign diary may bring the players a few surprises. The players involved in the tabletop battles were given maps, photo's of the wargame table and a fairly detailed write up of each battle, including their losses etc. The Corps commanders would see none of this - instead, they wait in their headquarters hanging on the word of every bit of information that flows into their headquarters, so that they can plan.
In some instances, news of something would get delayed and come to their attention a turn later, so sometimes, they were behind the curve in being able to respond, as of course it was / is in real campaigning.
The rules for the tabletop battle, Shadow of the Eagles, by Keith Flint and published by Partizan Press, have been very enjoyable and flexible to use. I found it easy to bring rule elements into the admin side of the campaign to manage losses and represent loss of cohesion over the course of the battle. I think I shall keep using these for my napoleonic games.
On the table they have managed small two unit cavalry actions out to a couple of brigades per side with ease and bringing game conclusions to a head in a reasonable amount of time.
Running the campaign has been a huge and time demanding task, squeezing pretty much everything else out of daily life.
At this point I must pay special tribute to the two corps commanders who handled a lot of information and e-mail flow, more than I imagined would be likely at the outset, but as the campaign and characters within it took on a life of their own, this 'activity' just blossomed - so thank you so much, you have gone above and beyond.
There were 19 tabletop battles fought, plus other minor actions fought by the system and of course the writing up of this campaign diary.
However, it has been hugely enjoyable, as I have become drawn ever deeper into the evolving events and unfolding narrative and despite the work, which frankly, I (and I suspect others) am glad has come to an end, it will certainly be a wargaming highlight of the year for me and probably for a few years to come.
Above all else, I thank the players for the time and effort they have put into this and to their resolve in keeping the whole thing moving in a timely way. All entered the spirit of gentlemanly play and added a narrative style to their communications that just enhanced the experience for everyone else, not least me.
Each of the players will have experienced different levels of involvement, depending which sector of the battlefield they found themselves in, but my hope is that they each enjoyed their role, and the sense of isolation within a smaller section of the battlefield and being uncertain as to what was going on in the grand scheme of things.
As gamers we get used to seeing the full table or full gameboard all of the time and without realising, become attuned to knowing too much ..... and wanting to know too much! I hope the limitations on 'the all seeing eye' brought some delightful frustration to play.
Thank you to everyone who made this thing work and so enjoyable.
Norm.
Resource Section.
There is a very short video that shows some of the battlefields that we fought over. Link
My sister webspace ‘COMMANDERS’ is being re-configured to showcase various figure and boardgame systems that I am enjoying and gives a flavour of where current projects are up to. Link.
Best game I’ve been involved in for as long as I can remember. Norm, your organisation of this campaign was marvellous and the sense of responsibility yet dislocation from events I felt was highly immersive. I made the decision early on not to do any research of the battle, but I suspect that if I had I would have been more cautious and not allowed Exelmans and Habert to exploit as far north as they did. Apologies are due to the aforementioned generals for letting them get trapped like that and special mention should be made of Lefol and Berthezene who ground down the Prussians and secured a bridgehead at great cost to their divisions. Shame I never got to start on my pontoon bridge, but a hat tip to my Prussian nemesis who must have been struggling in the dark like I was. Well done everyone, (JBM, formerly known as Dominique Vandamme, III Corps).
ReplyDeleteHi JB, thanks so much to your good self and everyone else for the work and commitment given to this.
ReplyDeleteSitting in front of the full map and seeing gaps and numbers etc, I could see opportunities come and go, get seized and get lost as the situation evolved.
Pushing deep for the French, especially once the exit locations activate for VP’s seems important. The units that were captured only really came unstuck because we hit the end of the game with upper Wavre back in Prussian hands and since your intentions were to wallop the place the next morning ….. who knows!
The changing victory points during the battle is a very clever idea to help keep the historical significance.
ReplyDeleteHi Peter, yes it worked very well and was an interesting exercise of itself in how to put others gamers immediate focus in the places that you want it to be, without using straight-jacket style special rules.
DeleteIt was a gas, truly a fine game. And a fine write up. I've run a couple email campaigns and appreciate just how much work you did. Kudos.
ReplyDeleteBlind man's bluff, with weapons. Oberst Luck tips his hat.
Thanks Vincent, I really enjoyed your narrative, such as bringing up additional supplies of gun powder and loop holing walls. It all brought a lot of enjoyment to me.
DeleteThe narrative style likely influenced by Matrix games. I ran a couple email Matrix games of the storming of two redoubts at Yorktown during the height of the pandemic lockdown. The second went off the rails, with the French storming party adopting ballet slippers to aid their silent advance, etc. I also ran a couple non-matrix games some years before with only 4 players based on Bonaparte's first campaign in 1796. I truly am amazed at running such a large game with 10 players. Again, kudos.
Delete:-)
DeleteIf that bridge had been up, I would have wandered into a pile of French.
ReplyDeleteWell, I loved that manoeuvre and the circumstances that brought you to doing that. It was a great little campaign moment and also helps bring that emotional element to the table, i.e. probable genuine despair, angst, frustration, resignation etc as your troops had to turn back.
ReplyDeleteI must admit it came out of the blue to me because as I could see everything, I had automatically discounted it as a possibility and if nothing else highlights the difference between the all seeing eye in games that we normally play and the fog of war that these games create.
You may have wandered into a pile of French, but I think the reaction would be such shock that it would probably have changed their focus on play for the rest of the game while they responded and tried to discover how big the threat was i.e. what was behind you. ... Splendid.
First and foremost can I thank you Norm for the time and effort you put into this and to the Prussian Generals who supported me in this tense, frustrating and most enjoyable campaign.
ReplyDeleteAs Thielmann the fog of war produced more frustrating moments than I have ever experienced. From the outset I was concerned about the two extreme crossings hence my ‘fixation’ on Limale I had expected a push there much earlier.
The French breakout from Wavre was unexpected but once I realised that they hadn’t sent a large cavalry formation then I was satisfied we could contain them whilst seeking to take and hold Wavre especially as the Prussian cavalry seemed to be getting the better of their French counterparts.
Stulpnagel’s Landwehr outperformed all my expectations, and General Kemphen’s troops were an anchor throughout. I was unaware of General Luck’s meanderings but his timely arrival at Wavre in the late evening proved crucial. General Hobe most probably had a frustrating time but it was important not to over commit the cavalry too early and his troops appeared in the right places at the right time and generally bested the French. As you can guess I thoroughly enjoyed this and to discover the JBM was my opponent has made my day.
Hi Graham, the thanks is much reciprocated as the amount of work that your good self and JB had to shift ... grew! that was a consequence rather than an intention, though is an indication of how much the players were getting drawn into the moment.
DeleteLuck getting cut off for a while was a nice touch. The French cavalry I am sure would have been through Wavre and out the other side in greater numbers earlier, but rather like your side of Wavre, congestion and muddy roads conspired to frustrate commanders.
And yes, poor Stulpnagel, he had more than his fair share of drawing up battle plans :-) but despite being battered and bruised, he still pull a couple of rabbits out of the hat, that meant Berthezene and Lefol could not take anything for granted. I could hear his men groan when one more 'ask' was made - brilliant.
It was fun playing von Stulpnagel, as time and again we were in action against the French, which really kept me on my toes and in the thick of it so to speak. So trying to 'play the part' of the commander asking his troops to fight and to encourage them to do so added to the experience IMHO:).
DeleteI now intend to have a coffee and re read the war diary in more detail 😁
ReplyDeleteYou are Thielman, and I claim my ten pounds. Lol. How fantastic…we finally crossed swords after all this time. By the way it doesn’t hurt so much to lose when you get bested by the best… Well done on a great win mate.
DeleteA two coffee read :-)
DeleteA very close result.
DeleteWell I think I can safely say that I really, really enjoyed this! So a big Thankyou to Norm and all the other players for making this som immerisive and such fun too:). I've read this post twice now to really get a good view of what happened and you can so there were several points where things could have turned out very differently. I love the little 'event's that add a nice bit of flavour to the game.
ReplyDeleteAs von Stulpnagel I really only had to concentrate on defending the crossing at Moulin de Bierges and Bierges itself. I did not expect my forces to be able to hold on for long, but how wrong was I?! Some incredible feats of arms by the Prussians kept the French at bay, until sheer weight of numbers told. But it was great to see things from the French point of view to put the actions into perspective. Luckily for me and the Prussians the French didn't push forward from Bierges when my troops were rather weak, but then I would have stayed in Bierges too to hold the crossings rather than risk advancing. Not having a God's eye view of things really adds to the drama.
Would I have done anything differently? Hindsight is a wonderful thing but I should have kept my 6th Uhlans with me rather than send them scouting towards Limale as I wanted to know what was on my right flank. They might have made a difference, but we'll never know
Hi Steve, thank you. As you know from the number of battle reports etc, much went on for individuals that cannot be covered here .... in case the post turned into a book (now there is an idea :-) ).
ReplyDeleteI thought the cavalry move to Limale was important when it happened, as it raised its importance to the Prussian side. Your first big battle cost you your best troops, so what followed was all the more significant for that, those battles sat on a knife edge, I was never sure which side would win until the last throw of the dice.
I did like the 'surprise' appearance of 9th Hussars and Hobe's horse artillery struggling through the mud to protect your left.
I'm sure your new 1809 project with the Shadow of the Eagles rules will bring a lot of pleasure.
I do think that this would make for a good magazine article. Having no knowledge of what was to my right, really forced my to send the cavalry there, as I was worried that the French would cross at Limale and then be able to roll up our flank towards Wavre. Having to make these sort of decisions really enriched the experience for me. The little surpises like the 9th Hussar's coming to the 'rescue' was great when reading the account of that particular action.
DeleteWhat a great undertaking, well done. The account of the overall battle as a series of smaller actions down to battalion /battery/squadron level was fascinating. Just like being there!
ReplyDeleteThanks Martin. The players got quite detailed AAR reports with potential intel after each battle, but this diary can't replicate all of that, so for some gamers, what they got would be different that what a neighbour commander would be getting. It was interesting to see some of this information go on to be shared between local commanders.
ReplyDeleteFrom early participant returns, looks like you pulled off another successful PBEM game. Great job!
ReplyDeleteThe notion of having variable and time-dependent victory points is a very interesting concept. I can see how this works in a limited-intel, umpired game. How would this work in a multi-player, F2F or remote game? Would you withhold these victory point shifts from the players until the time was right and then spring it on them? Very interesting…
Hi Jonathan, I think the changing of emphasis on location by changing VP's works better in the closed environment of play by e-mail because one can start to move to the new demands, but the other side might not notice that change in emphasis for several turns ... if at all. While face-to-face, there would be an instant recognition that the enemy were doing something else, especially if reserves moved etc, plus body language and what eyes are now focussed on are tell-tale indicators.
DeleteIt is certainly effective, originally I was worried that the players focus had been shifted too far from Limale .... but in hindsight, the whole thing interlaced with the historic account rather nicely.
Norm,
ReplyDeleteAgain, I can't thank you enough for allowing me to take part in this, and for all the hard work and time you put into running it for all of us. I've now participated in two of these with you, and they been some of the greatest wargaming experiences I've ever had.
I was Berthezene; I don't have much to add. Being at the tail end of the French column and wanting to jump into the fight, I almost wandered west without orders, 'marching to the sound of the guns,' to 37, but I didn't want to be 'that guy' running around doing whatever he feels like (and I didn't know the overall scheme of maneuver and I was scared that if I pushed that way I might create a traffic jam), so I sat tight and patiently awaited orders which, of course, was the right thing to do ;)
Regarding the actions at Moulin de Bierges (23) and the Heights (24), those were really see-saw battles where not much was seeming to go our way. We (Lefol's division and mine) were able to brush the Prussians back, force a crossing, and secure the heights, but it was by the skin of our teeth, and we ended up down several battalions each (I think Lefol lost an entire brigade?), without cavalry, and without even our own guns!
Once the Heights were captured, I wasn't really sure what was going on in the overall scheme of things, whether I was holding down the left flank of the push on/through Wavre, holding the door open for units east of me to move west, or both, and then I was feeling pretty beat up (no arty/cav), the Prussian cavalry had popped up time and again to punish us (in the village at 23 and once we crested the Heights at 24), and I found myself staring down at more Prussian guns and cavalry (in 31 and 32). Additionally, initial reporting was that the Prussians atop 24 fell back to the south (towards 36), so it appeared the Prussians to my west were new formations.
That was really the only thing I questioned after reading the campaign diary; we dug in, refused our flanks, and patrolled in the local area (expecting a Prussian counterattack to seize the Heights then attempt to wrest control of the crossing back), but I wish I'd patrolled more aggressively to the west to identify the Prussian formations and their strength, which perhaps could have revealed an opportunity to exploit.
Anyway, super cool, I had a great time, and can't wait to jump into the next one ;)
V/R,
Jack
Hi Jack, thanks for stepping up and getting involved. I enjoyed your formation very much. I knew your character was to 'get up there' and knew the frustration of standing still would drive you mad and as much as I was willing you on, I just love that creation of an emotional connection to a game that has you chomping at the bit, but with the hand of restraint on your shoulder.
DeleteIt was really interesting at the start when I thought you might stray west and walk into an early Limale fight. Half of me was worried about going so much off script (historically) so early and the other half excited at the prospect of the campaign going in a new direction, unforeseen by me .... and I had everything in front of me - superb.
up at the Heights, Stulpnagel was asked to attack you, but his force was in a dire state and the best he could do was skirmish, but I think it is brilliant that you interpreted Stulpnagel' retreat south as there being fresh forces there - you just couldn't get a person to think that in a face-to-face game.
If I were a betting man, I would have put money on you exploring west from Bierges (24), and so it is this aspect of a players decision being influenced by what they think might be around them and what actually is going on, that gave me the most fun in the game.
All good.
Hi Norm, Great report, and great game. Thanks for taking the time to write this up on top of all the effort that must have gone into preparing and running it.
ReplyDeleteAARs can be dull affairs - 'he threw a double six which meant ...' or cringemaking sub Conan style prose, which I won't even attempt to parody! But this was the a triumphant Reithian performance, informative, educational and entertaining!
Congratulations to all involved.
Thanks.
Guy Farrish
Hi Guy, firstly thanks for recently signing up to follow the blog - greatly appreciated and thanks for the thumbs up on the Campaign diary. In one way it is a tale of two accounts. The players got a fair overview AAR of each battle that concerned them, but of course that is invisible to the general reader here, as I just concentrated on the 'bigger picture', but wanted to go deep enough that players would properly recognise their actions.
ReplyDeleteIt has though, i must admit, made me re-evaluate how i go about future AAR writing and I think I will err towards the 'overview' narrative approach, with system notes, which I think works well.
What? No cast of characters included? What am I supposed to do? Read the comments to find out who was who? 😀😀
ReplyDeleteNorm, thanks for hosting the game and I’m gratified to see that you enjoyed the experience. I can’t imagine the effort it took to manage 10 players over email. I couldn’t manage 10 players in person even if they all were my best friends. And the breakneck speed that this went on must have eaten all your time. Did you take some time of of work?
😀
My favorite part of playing was the fog of war where most of the time had no idea where the enemy was or even my friends.
I didn’t research the battle ahead of time bc I didn’t want to spoil that and it’s a nap battle so I’m not really interested anyway. 😀
As Excelmans; the bridge being blown at 17 so early in the game really forced a traffic jam trying to get across another way. When my first div finally got across I had them turn towards the East and the final objectives. I assumed that the majority of the enemy would be going that way as well. Turns out there were more enemy to the East and I didn’t even think to Scout that way, so got cut off. I mean I WAS planning on my smaller second div to cross the river and head that way but it was too slow.
So a big that you again and I had lots of fun. My wife thought it was funny and one night asked me if I’d remembered to order my units.
😀
Hi Stew, glad it all hit the right spot. It did consume a ton of time, but there was still enough time to sleep …… so obviously I remain a slacker at heart 🙂
ReplyDeleteGood to see that Mrs. Stew is showing the first signs of wanting to get into Napoleonics, you should paint her an Austrian army for Christmas, as a very special surprise, I have a good feeling about that🙂
Yes, the fog-of-war is superbly preserved with these sort of things. The constant, constant rain and all of that mud, was of course no friend of your horses, but once you mostly got through Wavre, your teaming up with Habert, resulted in a fair bit of nice action for your dragoons.
The ending was quite dramatic and fitting that your counter-part Hobe (Prussian cavalry commander) was just at the right place at the tight time (or the wrong place in your memoirs).
I would have loved the bridge at Bas Wavre to have stayed open early in the game, just to see the mass cavalry battles that would have resulted for the tabletop, had you crossed there and clashed with Hobe’s cavalry while it was concentrated.
All good, thanks for supporting the game and for spending time writing orders and doing maps instead of reading to the kids 🙂
Hi Norm, let me start by echoing the comments above - this was a superb effort by you and a thoroughly enjoyable experience for me as a player. I have run a few small campaigns in the past and I have an inkling of the amount of work that went into this one.
ReplyDeleteThe fog-of-war you created was frustratingly good and led me into a sort of tunnel vision where I imagined that things were going swimmingly well for all the French forces. This was fostered in part because Vandamme (understandably) was not able to relay every bit of detail of the 'big picture' back down to me as a General of Division as indeed he wouldn't have done in a real campaign.
After my initial success in taking Warve A (16) I was much more nervous about storming the bridge into Warve B (21) not having any idea how the rules would handle this sort of event on the table. I was genuinely excited to hear that my troops had pulled this off!
This together with my limited understanding of the wider battle led me to become overconfident and suggest the ill-fated push on up the road with Exelman. I do feel that I have to take most of the blame for the resulting surrender of some of my forces and the associated VP's gifted to the Prussians.
I only hope the emperor can salvage something from the situation!
GdD Habert, 10th Infantry Division
Hi, glad you enjoyed it, you had a good old romp on the other side of the bridge 🙂
ReplyDeleteI think you were right to push and worked well with Exelmans to give the Prussians much to worry about.
At Wavre, both sides were concerned at the others potential. It was very easy to get fixated on the bridges as they are so important initially, but once captured, I feel that something needed doing with them, so pushing on was absolutely the right choice.
From my seat, it was fascinating that yours and Exelmans’ drive effectively cut communication between Oberst Luck and the rest of Thielmann's Corps, which generated an interesting interplay of delayed communications and Oberst Luck moving towards Bas Wavre. It also became a significant distraction for Thielmann. It added much to the account.
The ending took on a life of its own. Hobe's cavalry blocked your escape, but even if you had attacked again, his orders were to fall back towards Limale i.e. he would still be in your way, blocking your escape.
An earlier French advance from Bierges (24) might of made Hobe’s situation more perilous and perhaps opened an avenue of escape to the south for your good self and Exelmans, but of course it is all of the ‘what if’ intrigue, moments lost and gained, that makes the campaign so enjoyable.
Thanks for all the work you put in. We were lucky to get 10 such good and helpful players together into one place and the varying time zones didn’t seem to impact at all.
Wow Norm! Sounds like it was a lot of work but ended in lots of fun for everyone. Thank you for completing the report and I hope you don't mind if I steal some of your ideas. 😊
ReplyDeleteHi Ben, it was an intense couple of weeks, but one of those things that delivers so much and adds to the wargaming list of memorable of experiences.
ReplyDeleteI would be more than pleased if you saw some ideas there that are worth recycling :-)
Well, that was certainly an epic adventure Norm (no pun intended!) It's taken me three or four visits to actually read right through your War Diary and get a half idea of what occurred - you certainly seem to have attracted the glitterati of wargaming bloggers to participate in the experience with you! A tremendous effort on your part bringing this all together, as evidenced by all the words of praise from the participating players. I am sure you gave a quiet sigh of relief as the guns fell silent and the remnants of Grouchy's force trudged off towards Paris!
ReplyDeleteHi Keith, yes, I am a bit frazzled, like stepping off a moving bus! But the whole thing was a fantastic experience. There were just so many interesting moments, many not captured by the diary. A great insight into how fog of war can both give and steal opportunities in equal measure.
ReplyDeleteFantastic stuff, thoroughly enjoyed reading that - as you say, full of surprise and incident. It has given me a lot of inspiration for how you might tackle certain battles. Very well done to you and your players.
ReplyDeleteHi, thanks. The interesting thing that the campaign diary raises, is just what a different game each of the players were having from each other, but it takes the diary to shine a light on that. There were many ‘favourite’ moments that cropped up, but I think the isolated Oberst Luck deciding to move to Bas Wavre and beyond, but finding the bridge destroyed was the cherry on the cake for me in terms of what an e-mail campaign can create.
ReplyDeleteAs you say, those literally different viewpoints make so much difference. What I also found very innovative though was those 'floating VPs' for want of a better expression. I have been trying to work out if that mechanic could be expanded into a more generalized command and control system. Still pondering, but very interesting idea.
DeleteYes, I think that is a useful mechanic, though specifically it worked for us because neither side expected such a dastardly manipulation of the game 🙂
ReplyDeleteMany thanks Norm, what a brilliant account of what was clearly a fantastic game for all concerned! 'Blog Post of the Year' by a mile, I reckon ( if there's a 'wargames blog awards' I'll nominate you!).
ReplyDeleteYou clearly did an amazing job running it, and all the players had a great time. Really interesting how the format gave them a more 'authentic' command experience than a conventional face-to-face game.
Well done to all concerned - btw why not add a 'cast list' if the participants don't mind?
Hi David, many thanks for the thumbs up. Yes, it did bring an element of ‘authentic’ command experience, that I must admit (just like last time when I did such a thing), my ordinary gaming will seem a little flat by comparison for a while, perhaps in face to face gaming, as players we could delay telling the other person that reinforcements are arriving and plot their movement, until such tomes that they can be seen.
ReplyDeleteAs to the cast of fine and sporting players - I though it best to allow those involved to reveal identities here if that is what they want, I know some already have.
That was a fascinating account of a well-organised game - the limited intelligence (quantity and quality) forcing decisions to be made on incomplete picture is what wargaming really should be all about.
ReplyDeleteHi Rob, thanks. There was much more going on than could be written about here, so a lot of that ‘incomplete’ picture stuff going on and you are right, it is what wargames should be about and in truth, I will miss that as I return to ‘ordinary’ wargaming.
ReplyDeleteThat's easily sorted, run another one but do it over a longer period with slightly fewer players to reduce the interactions / correspondence to reduce the burden. You could even just run a single event like a battle - the fog of war is quite enough to make even one battle quite entertaining.
DeleteI have a fully written up Battle of Midway game that could likely wear that hat!
DeleteI'm ready to play that whenever it is available. Failing that, I'd like to host a game of it.
ReplyDeleteIt good to see that you enjoyed the Wavre enough to feel that :-). I put the game out for gamers late last year and didn’t get enough takers. Hopefully the success of the Wavre game will change that next time it is offered. There were a few who didn’t get drawn out of the hat for Wavre, so I would like them to be offered an automatic seat at the table for the next game - so perhaps the numbers will be more likely the next time.
ReplyDeleteEpic post and sounds great, I'm reading Digby Smiths Leipzig at the moment and strategic bridges marches and counter marches and confusion all ring true, it sounds like you exploited the medium to really successfully convey the isolation and fog of war of the various commanders,all round excellent!
ReplyDeleteBest Iain
Hi Iain, thanks, yes, I feel the players and myself got a feel for battle and the inherent problems that limited intel brings, also highlights some player characteristics in the same way that real battle does to generals.
ReplyDelete