
This week, in my face-to-face game, I was introduced to the ACW boardgame, Brothers at War, published by Compass games and designed by Christopher Moeller.
The game looks at four small battles from 1862 and offers a total of 13 different scenarios, covering those four battles.
The first thing that struck me was that this game provided the ideal engine to create some figure games for the table without the need for much conversion as the units are generally representing regiments and gun batteries.
In addition, the game is very tactical and itself has something of a figures feel. Anyway, as is my wont, I took a very local slice of action from a situation created in the boardgame and took it to the table.
Please use the ‘read more’ tab to see the rest of this post, which basically follows how the figures game played out.
Last week, we played our first game of Brothers at War at Mike’s. He chose the introductory scenario, Garland's Last Stand from the Fox’s Gap battle. Mike took the Confederates, who have a brigade of fairly low powered units (Garland), plus a very weak cavalry brigade (Rosser).
As the guest, I was given the Union, as they have the responsibility of attack. They start with one brigade (Scammon), which has three regiments and two of them are powerful.
The bigger picture is that this is a 9 turn game (each turn represents 20 minutes). The Union get another brigade (Crook) as a reinforcement on turn 4 and the Confederates get a brigade (Anderson) on turn 8.
It is for the Union to work at getting a victory and this is done by capturing one of two locations, Wise House or Hutzel Farm.
Can the Union act quickly to secure the objective(s) before Confederate reinforcements arrive?
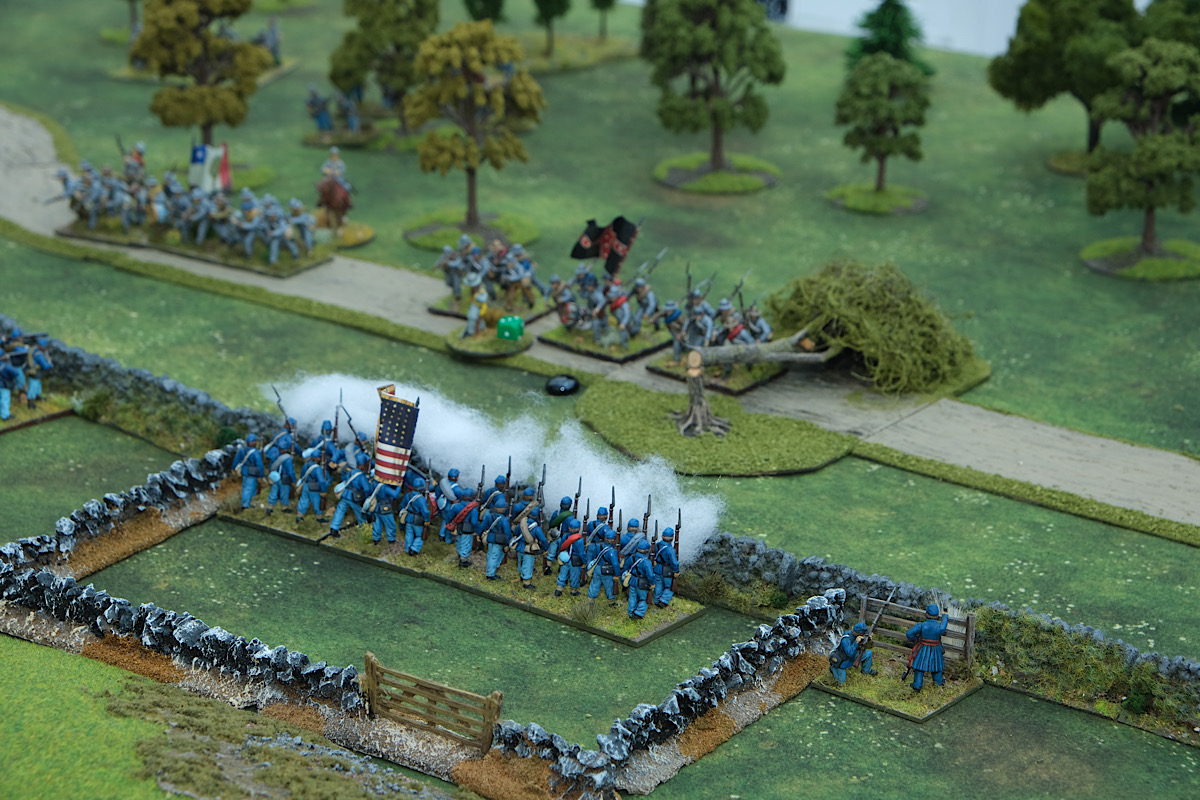
A couple of turns in and the game had given us this situation. The Union having taken up positions behind a series of stone walls are preparing to launch their first assault against Garland, the Union reinforcements have not arrived yet.

30th Ohio had previously thrown out a skirmisher screen to secure part of the wall, giving time for the rest of the regiment to move up next to them.
At this point in the game, the necessity was for Scammon to deal with Garland’s brigade and frankly the odds look in their favour to do that and in our boardgame, it transpired that Garland was eventually dealt a devastating blow, losing the brigade.
 |
| Click for detail |
For the figures game, I am refreshing my memory with the Black Powder II rule set from Warlord Games, so this small engagement is just the ticket. The boardgame has a system of hits and saves, which of course is a bedrock of the Black Powder system, so that gives us a tie between the two games.
 |
| Wise House and field |
The boardgame uses chit draw to randomise the order that brigades activate in, so at the start of play, I will roll a D6, to see who will be Player 1 for the game ….. it could be a very short game if the Union win that roll!

Special attributes and notes:
The Confederate artillery is underpowered, so I will handle it as a half battery (small unit). The Union 23rd Ohio and 30th Ohio are notably big units, as are the Confederate 5th North Carolina, so they will be designated large units.
The Confederate 5th Virginian Cavalry will be handled as a small unit. In play, they start dismounted with a horse holder base.
The boardgame has some cards that bring in various random events. I will deal one of those cards to each force just as a token recognition of that element of the game and fudge them if need-be to properly assimilate them to the BP rules.
Black Powder is designed for big games on big tables, but this game will show how flexible the rules are - just three Union units, this is the sort of thing that most collections can stretch to, so something for everyone here.

The Game.
The Union win the die roll for 1st Player and immediately this looks like it could be a short game as 30th Ohio get off a devastating volley against 23rd North Carolina, both shaking and disordering them.

The Confederates pull back into the woods. This obliges 30th Ohio to advance. If they are to see off Garland’s brigade, they need to attack. On the Confederate right, 5th North Carolina advance towards the cornfield to attack 5th Ohio, but in view of how the game is unfolding, this is an unwise move that really only serves to stretch Garland’s command as most of the Confederate line is retiring.

It is not long before 5th N.C. are obliged to fall back to take up cover behind the wall of the ploughed field, though Pelham’s artillery is trying to get forward to support them.
30th Ohio make a very determined effort to follow up 23rd N.C. As they close on the wood edge, they not only take fire from 23rd, but the 5th Cavalry have worked their way to the wood edge on the Union left and the cavalry pour fire into 30th’s flank.

30th become disordered and continue to suffer casualties. In the end, they are forced to retire back to the safety of the wall.
While this was going on, Pelham had brought his artillery up, but before they could unlimber, 12th Ohio, jumped the wall and ran at the guns, seeing them off, in full rout.
 |
| Pelham's guns are struck while trying to unlimber! |
This was just an odd, bright little moment in an otherwise failing Union attack and 12th had to almost immediately fall back to the wall to keep the Union front aligned.
With Union now back at their starting positions and the Confederates not wanting to leave the woods, it looked on the face of it like a stalemate, but it was a victory for the Confederates, as they had survived and their reinforcements were not far away.
Conclusions.
This was an enjoyable little action that took a couple of hours to play out. Initially it looked like an uneven match, one that only the Union could win, but, there we are!
It is easy to think that 3 units for the Union and 5 for the Confederates is unlikely to give a decent game, especially with something like Black Powder, which is designed for multiple brigade encounters, but there was plenty of nuance going on here and most units managed to hang on longer than I would have thought likely.
The Confederates managed to play their card (Rally Round the Flag), but the Union didn't (a skirmisher related card). I'm not a big fan of cards, but I do like Random Event tables ... so work that one out! :-)
Usually the temptation when setting up throw down ACW scenario is to put loads of snake fencing out, so it made an interesting change to have so much stone walling instead. This feature makes for a natural defensive line and anchor point for the Union in both the boardgames and the figures game.
I have since bought a copy of the boardgame for myself, so will go back to those rules now, have a full re-read, which after our recent playing, should embed themselves to memory pretty easily. I rather fancy that the next post might be taking a closer look at the boardgame system.
Resource Section.
My sister webspace ‘COMMANDERS’ showcase the various figure and boardgame systems that I am enjoying and gives a flavour of where current projects are up to. Link.
Great looking game and we frequently play Blackpowder/ pike and shot with eight units a side which gives a nice sweet spot for a relatively rapid game. I'm enjoying the cards in V&P which I didn't think I would! The board game sounds just the job for a scenario generator!
ReplyDeleteBest Iain
Hi Iain, I would agree that 8 units gives a good game. In a couple of his period specific books, Neil Thomas fixes all army sizes at 8 units. I think I would like to see the cards come into the hand at about half the rate that they currently do, so say, just draw on odd game turns. Some are quite powerful.
DeleteGreat stuff to I like the way you take a chunk of a boardgame and transfer it to the table. BP is with a little imagination and preperation a fine horse and musket set. Hoping to get the Triple Alliance out next week for a spin with it.
ReplyDeleteHi Phil, this game in particular seems well suited to doing that sort of cross-over thing. As I get to grips with the boardgames, I think some interesting figure games will flow from it, I noted that your Triple Alliance numbers had grown to gaming size - nice.
ReplyDeleteAlways interesting when you find a board game which can be transferred to the tabletop. The tabletop size and number of troops ( your pocket armies concept) does really limit the options and opportunities.
ReplyDeleteHi Peter, I often see moments in boardgames that will translate to the table, but this particular game seems particularly suited to that.
DeleteI am okay with the more limited scope that pocket armies brings because, they deliver the length of game that works with a sore back and my boardgames are giving me those battles that I want to see at the higher levels. It all seems better suited to my particular needs / wants.
The tabletop actions of parts of the battle can be viewed as part of a campaign with the battle being treated as a campaign?
DeleteYes, that would work. I think it is the Sons of Napoleon rules (Warren Kinrade) that has your table as part of a bigger battle and so things and ongoing fighting just outside of your table, can have an impact on your own game.
DeleteWhat a great looking game sir!
ReplyDeleteThanks Michal, it’s been a while since these hit the table.
DeleteLove a few units a side, and this is a lovely looking game - I'm tempted... PS. Brothers at Arms, Brothers in Arms, or "Brothers at War"?? :o))
ReplyDeleteHi Steve, I quite like all three titles :-) amended, thanks. There is an 1861 set in the design phase with the 1st Bull Run obviously getting the most attention. Hopefully if that comes out, then there are goodly number of scenarios and situations just for one ruleset. There are quite a few videos on YouTube that would certainly help with any buying decision.
DeleteA lovely little game there Norm and some great photos too. Love the board game map as well. I find BPII works perfectly well for smaller actions, which are ideal for mid-week games, where time is oft our enemy. Whilst big games are nice with friends, I feel they only work well if you've got enough players to handle the mulitple brigades etc. I find these days that a couple of Brigades with support is enough for me to manage, with anything larger becoming a bit of a struggle in terms of keeping a handle on all that's going on.
ReplyDeleteHi Steve, I stand for figure games, so length of game is a factor for me these days, so keeping the numbers low helps with that. I was actually surprised just how much game there was in the BP play, they did well. The opening volley by 30th Ohio (large Unit) caused 4 hits and a disorder and the Confederate unit only saved 1! I thought at that moment it was all over!
ReplyDeleteI used half measurements, even with the 28’s, due to table size and all went rather well.
The actual boardgame also gave a lot of nuance in this small action and I am looking forward to getting that back to the table.
This little action looks very familiar. As others have said, your table looks superb. Why the choice of BP rather than your own rules?
ReplyDeleteHi Jonathan, I am trying to get into the Hail Caesar rules, so thought it worthwhile trying to kickstart the trilogy of HC / P&S / BP, though I admit, part way through, I had wished that I had gone with TF-ON, simply because the scenario seemed a good benchmark for sustainability of units and that is an area of my rules that I like.
ReplyDeleteThe game certainly provides a good scenario. The work put into making a table top game was well laid out. Thanks for showing.
ReplyDeleteThanks, it will be interesting to see some bigger actions play out with say a couple of brigades per side.
DeleteGreat post the battle looked splendid and shows how BP can be flexible enough to be used for small games. Both your last two posts yet again are tempting me with games that suit my style.
ReplyDeleteI’ve just bought With Hot Lead and Cold Steel which I hope to try out this next week they look interesting
Thanks Graham, I was surprised just how rewarding this small action was. hope to hear of your thoughts on WHLaCS, which seem quite well supported by the author.
ReplyDeleteI think you would like the Stalingrad game. I will be working on the the Brothers at War game this week, to get it fully under my belt.
Hey Norm, I have recently been looking at transitioning Board games to the table top- your post goes a long way to convincing me! A good boardgame- 'up-gunned' to the table with figures and terrain- even if it's a grid can be a great game- thanks for sharing!!
ReplyDeleteHi John, glad the post struck a chord - I can see more of the same from this game being highlighted in future posts.
ReplyDeleteLooks like a perfect sized game for a solo effort Norm and if BP work ok for only a few units, then so much the better.
ReplyDeleteHi Keith, I ran the boardgame again today for the third time, so the rules are fully under my belt now. For this first scenario, I think I would go bigger on the table and represent the whole action. That is two Union Brigades and two Confederate brigades plus their cavalry brigade, which is very small. Going back to the smaller game of one Brigade per side, I think the Bonnie Blue Flag rules would also be a good match.
ReplyDelete