
Antietam is the latest offering from White Dog Games and is designed by Michael W Kennedy. It is immediately interesting for describing itself as an introductory wargame, presenting the system with just a four page rulebook.
Having been pleased with their introductory Borodino game last year, which got a lot of game out of a short rule set, I was keen to get this to the table.
The rest of this post looks at the system, giving way to some After Action Report highlights and using turn 1 to example the mechanics and turn sequence.
Please use the ‘read more’ tab for the rest of this post.
The game comes in two formats, folio or boxed, so there is an opportunity to save a few pounds on purchase of the folio package and off-set postage costs, always a helpful thing.
The first thing that strikes you when opening the game is the map. It is lovely, very painterly in style and done by the hand of Jose Faura. It is slightly smaller (27'' x 21'') than a standard boardgame sized map.
The counters, sized at ⅝ inch, are done on a sort of wood pulp board, so are thick and sturdy, though a tad harder to cut from the frame than standard cardboard counters. They are nicely presented, with the combat factor being large and kinder on older eyes.
As stated, the rules folder is just four pages long and illustrated, so this is a very readable document.
There are two set-up cards, a player reference sheet, terrain chart and a full colour 4 page ‘Hooker Attacks’ mini scenario, which goes through a turn, giving examples of play - further reinforcing the game’s credentials of being introductory friendly.
Scales - Units are generally brigades and artillery sections, with each combat point of the counter representing 200 men, 400 horse and 6 guns. Stacking limits are basically one infantry or cavalry counter with one artillery counter or just a pair of guns. We are not told the hex scale, but comparing it to another game that I have on the subject, this looks to be equalling around 250 yards to the hex.
The rules follow basic principles of board wargaming, with a sequence of play that goes - Player 1, Rally, Movement, Artillery Bombardment and then assault. Player 2 then conducts the same sequence.
Combat is semi mandatory, that is, you must attack every enemy unit that is in a Zone of Control, but outside of that, all of your units do not have to attack. Terrain can effect what is and what isn’t in a Zone of Control, for example units in woods need not attack or be attacked Vs a unit in open terrain, but would against another unit also in woods terrain. I think this is representing the effects of being in skirmish order.
Combat results always create an effect to one side or the other, whether that be retreat, step loss or exchange (losses to both sides). It is quite a bloody chart, which no doubt seeks to reflect the carnage in this particular battle.
There are line of sight rules, since artillery can bombard over a distance. Some terrain blocks line of sight and elevated ground can assist artillery, by seeing over blocking terrain and by extending artillery range.
Some terrain is classed as ‘defensive’ and will double the defenders strength. The Sunken Road is an example of this, as are woods.
The only rule that we might think of as a ‘special rule’ is that the Union player is allowed to try and locate a ford across Antietam Creek. One ford per game might be found.
This pretty much all comes together to give an nice introductory game, allowing the game to proceed without needing the rule set in your hands.
The only thing I found to be at odds with that goal is the way that combat odds are calculated. This might be more a reflection of my maths abilities, but I found the presentation, for an introductory game to be more awkward than needed, with the main issue being with the rule that says when working out an attacker ratio that does not exactly fit one of the odds columns, move up OR down to the nearest column that does match (example 14 to 5 would move up to become a 3:1, not down to a 5:2). Traditionally (and easier) combat odds are typically just simply rounded down, so you know that if you fail to reach a certain column, you just use the next one down.
There is an example in the play aid that shows a 5 to 8 attack, which it then also bizarrely described as a 0.625 attack, as though that helps us somehow, so presumably in this introductory game, we are using a calculator. Anyway it is a straight-forward 1:2 attack, but it is the ‘move up or down’ to the nearest column rule, that causes an extra level of unnecessary maths and checking.
In play, I simply ignored this and so for example, if something fell between a 1:1 attack and a 1:2 attack, I just automatically used the 3:4 attack (yes, I know!) which sits between the two, without worrying whether the ratio was actually nearer either of the other columns.
Anyway, that aside, what of the game? (please note, I don’t review games and this is not a review site, I just write about things that I have actually enjoyed playing).
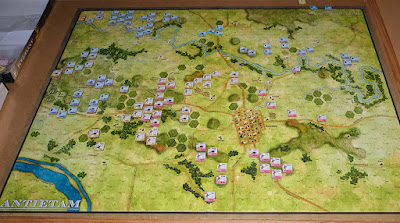 |
| At start - the Union are in blue on the top half of the map. |
The Confederates have two large corps, which are always active every turn. The Union have six corps of various size and strength, but each turn they can only select two of them (plus their cavalry) to be active.
On Turn 1, the Union will always go first, thereafter, the players will roll a die to see who goes first each turn, with the effect that players can end up with a back-to-back turn.
Here is an exploded view of turn 1 for the Union player;
RALLY PHASE - being Turn 1, there is nothing to rally. The way it works is that units that have taken losses and been flipped to their weaker side, can attempt to recover back to full strength. The unit cannot be adjacent to an enemy. A die is rolled per unit testing and simply on a result of 4 - 6, the unit recovers to full strength.
It is fast and easy. The process applies to all units equally as none are rated to show morale or experience differences.
MOVEMENT PHASE - Movement rates are 4 movement points for infantry, 6 for artillery and 8 for cavalry (also 8 for horse artillery). I have decided to activate 1st and 2nd Corps for turn 1 as they are the largest and nearest to the enemy.
The Union really need to think about concentrating their forces before launching an attack, so this turn will largely be one of manoeuvre. However, there are advantages to capturing Nicodemus Heights, which anchors the Confederate left flank.
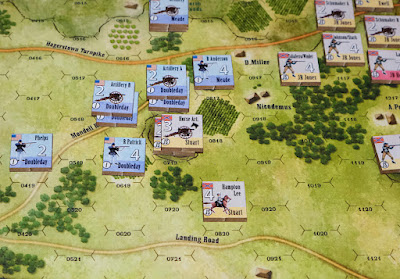 |
| The stack with the Yellow artillery is sitting on Nicodemus Heights |
The heights are currently held by Monford’s cavalry and some horse artillery. Doubleday’s Division moves down across Mondell Road to attack the heights. Hoffmann, Gibbon and Patrick, together with divisional artillery, move to the base of the hill ready to assault.
During an enemy movement phase, the non-moving player can automatically withdraw their cavalry or guns if an enemy comes adjacent. In this instance, it is clear to the Confederate player that the Union are about to put in an over-whelming attack, that will cause significant harm to the occupants of the hill and so as Patrick (the third Union unit to do so) moves adjacent to the hill, the Confederates make the decision to interrupt the Union movement phase to withdraw their cavalry and guns back two hexes, abandoning the heights. (We will see later what might have happened if the attack had gone ahead).
ARTILLERY BOMBARDMENT PHASE - Doubleday’s artillery can no longer see the cavalry that retreated from the hill, so his guns will stay silent. However, elsewhere, there are targets of opportunity. Rickett’s artillery fires at Mannings Brigade. The guns have a range of 6 hexes, but the target is only 4 hexes away, so the long range penalty does not apply.
The combat is worked out as a ratio and uses the standard Combat Table. 2 artillery strength points fire at Mannings 4 strength points to give a 1:2 ratio. The Union roll low on the Combat Chart and only get a AR + A1 result, which means attacker retreats and attacker suffers a step loss (flip the unit to its weaker side). However, in bombardment, results that harm the attacker are never actioned, so this result is ignored.
Further down the line, Meade’s artillery fires at Shumaker’s artillery, which gives a 2 strength point attack against a 2 strength point defence …. which is a 1:1 attack ratio. The Union roll a ‘5’ and cross referenced with the 1:1 column on the Combat Table, gives us an ‘Exchange’ result. Normally an exchange means both sides suffer a loss, but since bombarding artillery ignore results against them, in this instance, just the target suffers the loss and the Shumaker artillery flips and drops from strength 2 to strength 1.
ASSAULT PHASE - In this final phase, all Confederate units in a Union Zone of Control must be attacked, however being so early in the game, no units anywhere are adjacent to an enemy.
If the cavalry had not withdrawn from the hill, they would be fighting in this phase, as they would have been adjacent to the Union troops, so let’s just do that as a pretend exercise.
The Union have a total of 18 attack points, the Confederate cavalry and guns have a value of 5. This gives a combat ratio of 3:1, which is the top column on the Combat Chart - the most dangerous!
The Union roll a ‘5’ (high is good) which gives the result DR + D1. This would have forced the defenders to retreat and for one of the units to also suffer a step loss. The rules say that infantry or cavalry must absorb the loss before the artillery, so the cavalry unit would have flipped from their 2 strength point side to their 1 strength point side. The attackers can advance one unit after combat if they clear the target hex. In this case, Gibbon would have advanced to capture the heights.
It now becomes the Confederate part of the turn, who will execute the above four part sequence of play. Once done, we can move to turn 2 and the players will roll to see who goes first.
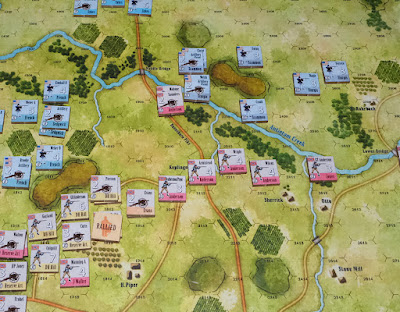
As the Union try to envelope the Confederate left below Nicodemus Heights, McLaws Division moves up and counter-attacks, blunting any further Union advance. Worse! the Union start being pushed slowly back by McLaws, stretching Doubleday’s line.
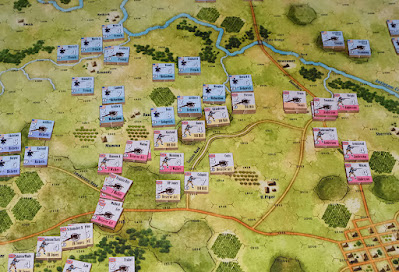 |
| In the centre, the Confederates have put their defence ahead of the Sunken Road and they absorb Union II Corps assault. |
Union II Corps launch their big attack with Sedgwick’s and Meagher’s brigades against the high ground in front of the Sunken Road and they are bloodily repulsed. This is a big Union set-back.

At Turn 5 (see photo above) around Nicodemus Heights (just below the die) on the Union right, Meade is starting to struggle against the heavier Confederate numbers. This turn, the Union decide to activate I and XII Corps, so that Meade can shrink his line to concentrate higher numbers on this flank, while fresh XII Corps can move into the gap that will be opened between I and II Corps as Meade relocates.
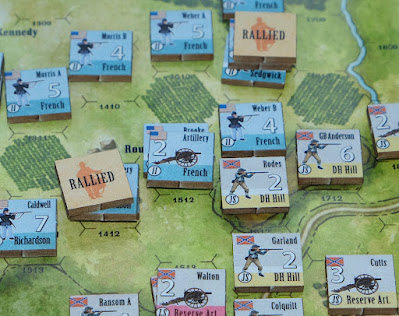 |
| A good situation to take to the figures table |
Of note (above) - I will likely transfer this little incident to the tabletop in a couple of weeks time. French’s Division from Union II Corps attack DH Hill’s Division that is defending the high ground just in front of the Sunken Road. Brooke’s Brigade with artillery and supported by part of Weber’s Brigade, attack uphill against Rodes’ Brigade.
In the game an ‘Exchange’ result is rolled, so both Brooke and Rodes take losses and each flips to their weaker side, but critically, Rodes keeps hold of the position.
I will pursue this to see whether it can make an interesting figures game, by breaking the brigades down into their regimental components.
We are at turn 7 and the Confederates under McLaws retake Nicodemus Heights. Meade has lost the Phelps and Magilton brigades and overall is pretty beaten up and stretched.
Turn 8 - 1st Corps counter-attack against Nicodemus Heights, but this hotly contested piece of ground ends with a bloody ‘Exchange’ result. However, the Confederates are now too weak to hold it and they withdraw in their own part of the turn.
IX Corps (Wilcox, Scammon, Sturgis and Rodman’s divisions), located on the other side of Antietam Creek, are activated and moved towards the ford at Newcomer House, intending to cross Antietam Creek. This is a powerful force if it can be successfully deployed.
Overall, the Confederates are maintaining a good defensive line and the Union are finding it difficult to fight their way in to reach their scenario objectives.
Above - The Confederates push Mahone forwards to Newcomer House to block the ford and though they are initially successful, Union forces (Ewing) move around them, crossing above them at Middle Bridge and striking Mahone’s flank and doing great harm.
Turn 12 - XII Corps take heavy losses throwing themselves against Longstreet's position at Dunker Church.
The only glimmer of hope for the Union at this point is that IX Corps are now across the ford and set to crack the Confederate line above Sharpsburg, where the line it is at its thinnest. Amazingly, the Confederate line holds.
Becoming desperate, the Union II and IV Corps repeatedly assault the Dunker Church position, but it holds, with both sides wearing each other down (Exchange results).
Turn 16 - In the final moments of the game, IX Corps break through above Sharpsburg, but they don’t have the forces on hand to effectively prosecute any advantage and the Confederates are able to block their path by throwing in three brigades from AP Hill’s Division, a reinforcement that had been delayed, but which had just arrived in the nick of time to salvage the line and with that, the 16th turn ends.
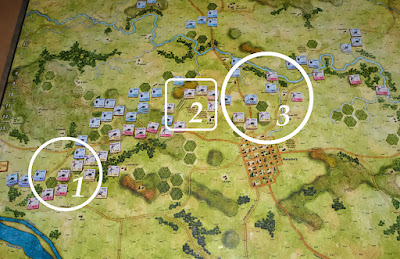
Looking at the situation on the map and guessing where another two or three turns of fighting might take things, I am feeling that we may have got a fighting draw, but on checking the scenario Victory Point Schedule, how wrong was that, this happens to be a significant Union defeat!
On the above map, zone 1 is the fight for Nicodemus Heights, zone 2 is the Sunken Road and zone 3 is the attempted breakthrough above Sharpsburg. In between zones 1 and 2, we have Dunker Church, Hausser Heights and the West Woods, all worth a shed load of Victory Points. This area was never really in any jeopardy, but two Union corps broke themselves against those positions!
The VP schedule describes the win as “The New York newspaper headlines say ….. Lee wins big fight in Maryland - McClellan asked to resign!”
Conclusion
The game play was very enjoyable and gave a good narrative. Primarily much of this comes from using an easy system and the interplay between various terrain features, with each side seeking positions of advantage and leverage. Certainly playing across such a nice map increases enjoyment.
The map geography drives the situational aspect of the game, with that semi mandatory assault rule and the fact that woods do not exert or suffer zone of control restrictions, bring nuanced moments are across the map.
Woods and the Sunken Road offer defensive terrain, which doubles defensive values and artillery cannot attack defensive terrain. I found this made the Sunken Road too difficult to take with a head on assault, given the strength of the average Union formation and the severity of the Combat Table when attacking at the lower odds.
However, I think for my first game, I did not use the Union as well as they should be used and since the game ended with the Union ‘close’ to some additional victory point objectives, I feel that there is scope to pull a better Union performance from this.
Only being able to activate two different corps in any one turn (plus the cavalry), does limit Union effectiveness, but it strikes me that the Union would be better served by spending the first five turns or so, bringing their formations closer to the battle line and only then starting to attack. So as they burn a corps out, a fresh corps is immediately on hand to press the defenders, who will also be worn.
In the last turn, the Confederate casualties did start to rack up, but even so, losses in the game were around 3 to 1 in the Confederate favour and I think this was because they had too much opportunity to recover strength between the various Union waves of attack, which would have been limited had the Union concentrated before attacking.
I do like the rally rule which allows the first step loss (only) to be potentially recovered, which feels like it is showing that first step loss to be more about cohesive breakdown and disorder, rather than being purely casualty based. It allows units pulled out of the line a chance to regroup, which obviously takes time.
One thing that can feel strange is the consequence of infantry and cavalry always suffering the first loss, rather than any artillery they may be stacked with. This means that as the game progresses and infantry are lost, there can seem a greater proportion of artillery remaining in the game, though it is fairly low powered.
I do like the random dicing each turn for which side goes first. It can help open the game up when a back-to-back turn results, plus the player can take advantage of any retreats that their artillery caused in the previous turn - otherwise the retreats are not so useful, as the retreated units can just return to their previous position in their own movement phase, when turns do not create a back-to-back situation.
Two questions I always have about anything called introductory is how useful is it to new players and can practised gamers enjoy it?
The game is very good as an introductory game. That 4 page rule set means players are playing and not reading rules or remembering exceptions. There is good interaction between both sides and players have to think about the suitability of each position on the map in terms of threat and advantage.
It does lose a bit in my view, because the combat process is a bit more mechanical than it needs to be and there are two mistakes in the example of play folder, but overall, it will hold up as an early wargaming experience.
For the regular player, there are the benefits of an interesting situation, wrapped up in just a four page rule-set, that gives a big battle experience that will fit into a single gaming session.
One thing I would like to have seen added is a single fly sheet with designer notes and tips on one side and a brief history of the battle on the other. The latter would help explain why only 2 Union Corps can be activated at a time and the relevance of some of the victory objectives.
Anyway, the bottom line is, will I bring it back to the table? - Yes and soon. Being able to pick up a game with a four page rule read is becoming increasingly attractive for getting the game to the table even on my lazy days!
EDIT - as of 13th Feb 2022, WDG have put a revised set of the rules up on their website, which can be downloaded. See Resource Section below for the link.
Complexity - they say 4 out of 10. I would score it at around 3. That 4 page rulebook does need a careful read though so that small points such as the difference between attacking woods to woods and non-woods to woods are noted. The game is easily run off the play aid card.
Size - This is an ideal kitchen table game. The map is slightly smaller than standard, all the counters are on the map (not on a reinforcement play aid card) and the game runs off a single quick reference sheet. The boxed version is 1" deep.
Solitaire - The back of the package does not rate solo playability, but having played my first game solo without any hitches at all, I would rate it as good, in the same way that many 2 player games play fine solo. I didn't come across anything that would be a barrier to solo play.
Time - I can't be accurate on this, as I had it set up over a couple of days and kept coming back to do a turn or two and then spent time writing up notes, but from my experience, I can see this playing in a single session of under 3 hours. The Union can only activate 2 formations, plus their cavalry each turn and the Confederates are largely holding a defensive line that does not require a great deal of movement,so turns move along quite quickly. the next time I play, I will edit here with a time.
Resource Section.
I think these games are print on demand, so the company can make modifications fairly regularly to deal with any errata that crops up. My set has the following errata;
1. The set-up charts wrongly list Jones’ Division as having artillery.
2. The two ‘Evans’ counters have the wrong information on their flip side, each seems to have the rear of the counter that actually belongs to the other unit.
3. The ‘Hooker Attacks’ example booklet has a couple of errors. On page 2, the attack by Hartsuff is correctly shown as an A1 result (casualties), but is wrongly executed as an Attacker Retreat result. Also - In the final example, 'Manning B' is used again (it has just fought in the previous combat) in error, this should be 'Ransom B'.
Further, it has Lawton at strength 4, but it is strength 6.
West woods are a victory objective, but they are not named on the map. They are the the 12 wooded hexes that lay between Dunker Church and Hauser Ridge.
My sister webspace COMMANDERS is being re-configured to showcase various figure and boardgame systems that I am enjoying and give a flavour of where current ongoing projects are up to. Link.
Mathematically rounding rather than just rounding down is pretty common nowadays. With a bit of use it is also not that difficult to do, and with practice the calculator is superfluous. I tend to actually like it because create more variability and does not always penalize the attacker. Funnily enough, I am playing Compass 'Fortress Europa' on VASSAL and my opponent is always trying to mathematically round, instead of rounding down as per rules...
ReplyDeleteHi Arrigo, thanks for dropping by. I agree that using the round up / down rule produces more nuance within a given situation, however, I had a few moments when I just couldn’t do the sums in my head, so went for a general house ruling of always rounding down. I imagine that overall, the impact will be fairly low, though obviously if playing an opponent … they might not think so :-).
DeleteMy main thought though is that for an introductory game, everything should be designed with smooth play in mind. I have yet to meet an introductory game that does a better job than Frank Chadwick’s Battle for Moscow.
I sold my Fortress Europa before playing it …… my loss I think!
"Lee wins big fight in Maryland - McClennan asked to resign!”
ReplyDeleteThe New York newspaper editor ought to be fired for spelling McClellan's name wrong. I can see George, saying, "Look Mary, the President has complete confidence in me. I am not being asked to resign."
Interesting looking game and an informative review. I agree that the map looks good although your handiwork on your Piggy Longton map would give the artist a run for the money.
Hi Jonathan, your comment had me racing for the box in an ‘oh no!’ moment.
DeleteMcClellan knew how to spell his name, as did the New York newspaper …. Unfortunately I renamed him :-) text correct now, thanks.
You are too kind re the Piggy Longton map, but I do have a soft spot for painterly style maps and of course the caveat is that a nice map will almost certainly win me over!
This comment has been removed by the author.
ReplyDeleteI'm writing this as I sit in Virginia, surrounded by roads and towns named after Lee, Jackson, Mosby, even Jefferson Davis.* But I grew up in upstate NY, and I knew McClelland Blvd as a major street long before I knew he was an historical figure. So yes, I spotted that McClennan thing right away as well. :)
ReplyDeleteNice write up. I still need to get this to the table, along with its South Mountain add-on.
* Imagine streets named after Guy Fawkes in London.
Hi Paul thanks for visiting. If only he had been called Smith or something - I likely would have got that right :-)
ReplyDeleteI think the Antietam game that you are thinking about is the one by Worthington Publishing that did South Mountain as the Kickstarter bonus. It plays at exactly the same level, so it would be interesting to do a comparison, it is a while since I played it, but it does rate the units for morale differences, which I like.
Oh dear, now that is embarrassing! The silver lining is that now you have me looking into a new ACW brigade series.
DeleteThere is too much goodness :-)
DeleteThis read very well Norm and I will look forward to the use of figures to recreate the Turn 5 situation
ReplyDeleteHi Keith, I think I will get more out of a second game as I now have a better idea of how to use the Union. I am hoping that the situation of than moments translates well to the figures table.
ReplyDeleteThanks for the review Norm and it does seem a good introductory game. The map is a joy to behold and certainly adds to the appeal for me. I could see this map being used as a general game with home made scenarios for it, or maybe that's just me wanting to get more bang for my bucks!
ReplyDeleteI look forward to that action transferring to the table as and when time allows, as this is something that I enjoy seeing.
Hi Steve, yes, the map sells itself and I hadn't thought about it, but one could just put a playing card over any part of it and then transfer what is under the card, to a table .... much like Piggy Longton!
DeleteI have yet to have been disappointed by moving a situation to the table, I just need to establish how strong Rhodes actually was, to see whether the unit will withstand the rigours of a scenario.
That is a great writeup, thanks Norm.
ReplyDeleteThanks Martin, hopefully it will help anyone making buying decisions.
DeleteL confess that it is decades since I played, let alone owned, a board wargame but this sort I think I could manage.
ReplyDeleteRoss, I think there are plenty of figure gamers who could enjoy a small stash of boardgames that sit at this level of playability and size.
ReplyDelete
ReplyDeleteAntietam is one of the ACW battles that is so cool to wargame scenarios from parts of the battle but is hard to do as the battle overall. Mainly bc the Union player always seeks to undue Macs big mistakes of attacking in piecemeal and being passive. Games have to hamper the Union in someway (like being only to activate 2 corps) which the player then just tries to work around naturally to get the advantage of the greater numbers to crush the CSA. Not to mention that the Union could of attacked again on the next day….
😀
Hi Stew, that’s a nice concise assessment. I am putting this game back to the table and then will play the Worthington Publishings design that I have. It has also had me dig out the ‘Burnside’s Bridge - Antietam’ book by John Cannan from the Battleground America series. So January is turning into an Antietam month.
DeleteI have just been looking at the Pickett’s Charge rules and that has the Sunken Lane as its example scenario.
Thanks Norm for your detail review. Antietam is one of my ‘favourite’ battles as there is so much of interest. But agreeing with Stew the challenge with many ACW is accommodating the unknown factor of the confederate forces and resilience against the odds. Often it is hard to see how the Union sides managed to snatch defeat out of victory ! But hindsight where you can actually see the enemy forces and realise that you outnumber them always makes it much easier. More FOG of war needed I think 👍
ReplyDeleteHi Matt, I must run this again to see whether I can get the Union nearer to the wins on the Victory Point schedule. I fancy this game uses the 2 Union activations, an unfriendly combat table for the attacker and victory objectives that are hard to reach to collectively give the Union a tough task. I suppose that is one way to simulate the difficulties of the Union without additional rules overhead (in keeping with an introductory game).
DeleteI suppose it is a bit like re-creating Gettysburg, where everyone knows by heart the schedule of arrival, the numbers and the locations, while the emotional heart of the game should in fact have the players being drawn into a meeting engagement of the unknown.
Superlative narrative and analysis as usual Norm! You spoil us! Antietam is a classic and is one of the ‘battlefields to visit’ on my bucket list. Would love to walk the sunken road and visit Dunker whilst ruminating on what might have passed in those very same locations that fateful day.
ReplyDeleteMike, the Antietam Battlefield is, indeed, a bucolic and serene place for a walk and thought. Assessing lines of sight is a useful exercise at the Bloody Lane. I recommend a visit.
DeleteThanks Mike, for those battlefields that remain largely untouched, even the best maps can only be bested by a personal visit to the battlefield ….. Which makes me smile, as I have visited and walked the Bosworth battlefield several times and got to know it ………. Only for the latest research to show that it was actually fought some 2 miles away :-).
ReplyDeleteInteresting little game and it does have great visual appeal
ReplyDeleteGary, it is an enjoyable game, I also have two of their introductory titles which might appeal to you, Borodino and Crisis on the Right - Placenoit 1815.
ReplyDelete