
In the last post, part I of the Victory Hill scenario was played out, representing the clash between two brigades on the Union left flank in the developing Cross Keys battle - 1862.
Now we are ready for part II of the scenario. It is the next hour and each side has a fresh brigade entering the battlefield as a reinforcement. Our interest now switches to the capture of the hill.
The Confederate reinforcements are capable, but the Union reinforcements are ‘limited’ … though they have twice as many regiments!
The game was halted at the end of part I and the surviving forces stayed in place, together with any hits and disorder they may have accrued. Also the victory points earned were kept. If coming to this fresh, the reader may want to first visit the earlier post that sets the background and covers part I of the scenario.
LINK to that;
https://battlefieldswarriors.blogspot.com/2023/03/victory-hill-cross-keys-1862.html
I know a couple of people have expressed an interest in playing this and so I have uploaded a copy of the scenario to my DropBox account (thank you DropBox) as there is a bit of nuance to the scenario, plus the OOB is set out. There is a link in the Resource Section below.

As a reminder, here (left) is how the situation looked at the start of Scenario 1, with the Confederates laying in ambush on the hill.
And below is how Part I ended - a bit of a mess, with both sides pretty much exhausted and the Confederates falling back onto Victory Hill - except for their left flank (16th Mississippi), which has managed to get itself isolated amongst the Union line.

For Part II, the Confederate remain as being player one and so their reinforcement arrives first, with Elzy’s Brigade, comprising of just two regiments (13th & 25th Virginia), but at least they are capable.
This is followed by the Union reinforcements (BG Bohlen) arriving in their part of the turn. They have four regiments and artillery, though all of the infantry are classed as ‘limited’.
Here is an overview of the play through of Part II.
 |
| Elzy brings up two regiments of Virginians as reinforcements |
The Confederates finding themselves immediately outnumbered, take the decision to fall back behind the hill and force the Union to advance against them.
 |
Unfortunately for 16th Mississippi, who is still engaged with the Union line, they dare not disengage initially, but after putting up good fire, they see off the regiment to their front (45th New York), giving themselves some latitude to fall back towards the hill, just as Union reinforcements approach them.
 |
| The Bucktails work their way uphill, onto the Confederate exposed flank. |
Other than 16th Mississippi, the rest of the Confederate force have pulled back behind the ridge, which certainly frustrates the Union gunners on the left, who limber up and move around the side of the hill to get themselves into a flanking position.
 |
| Bohlen’s reinforcement advances on the hill as 16th Mississippi fall back before them. The Confederates are mainly behind the ridge. |
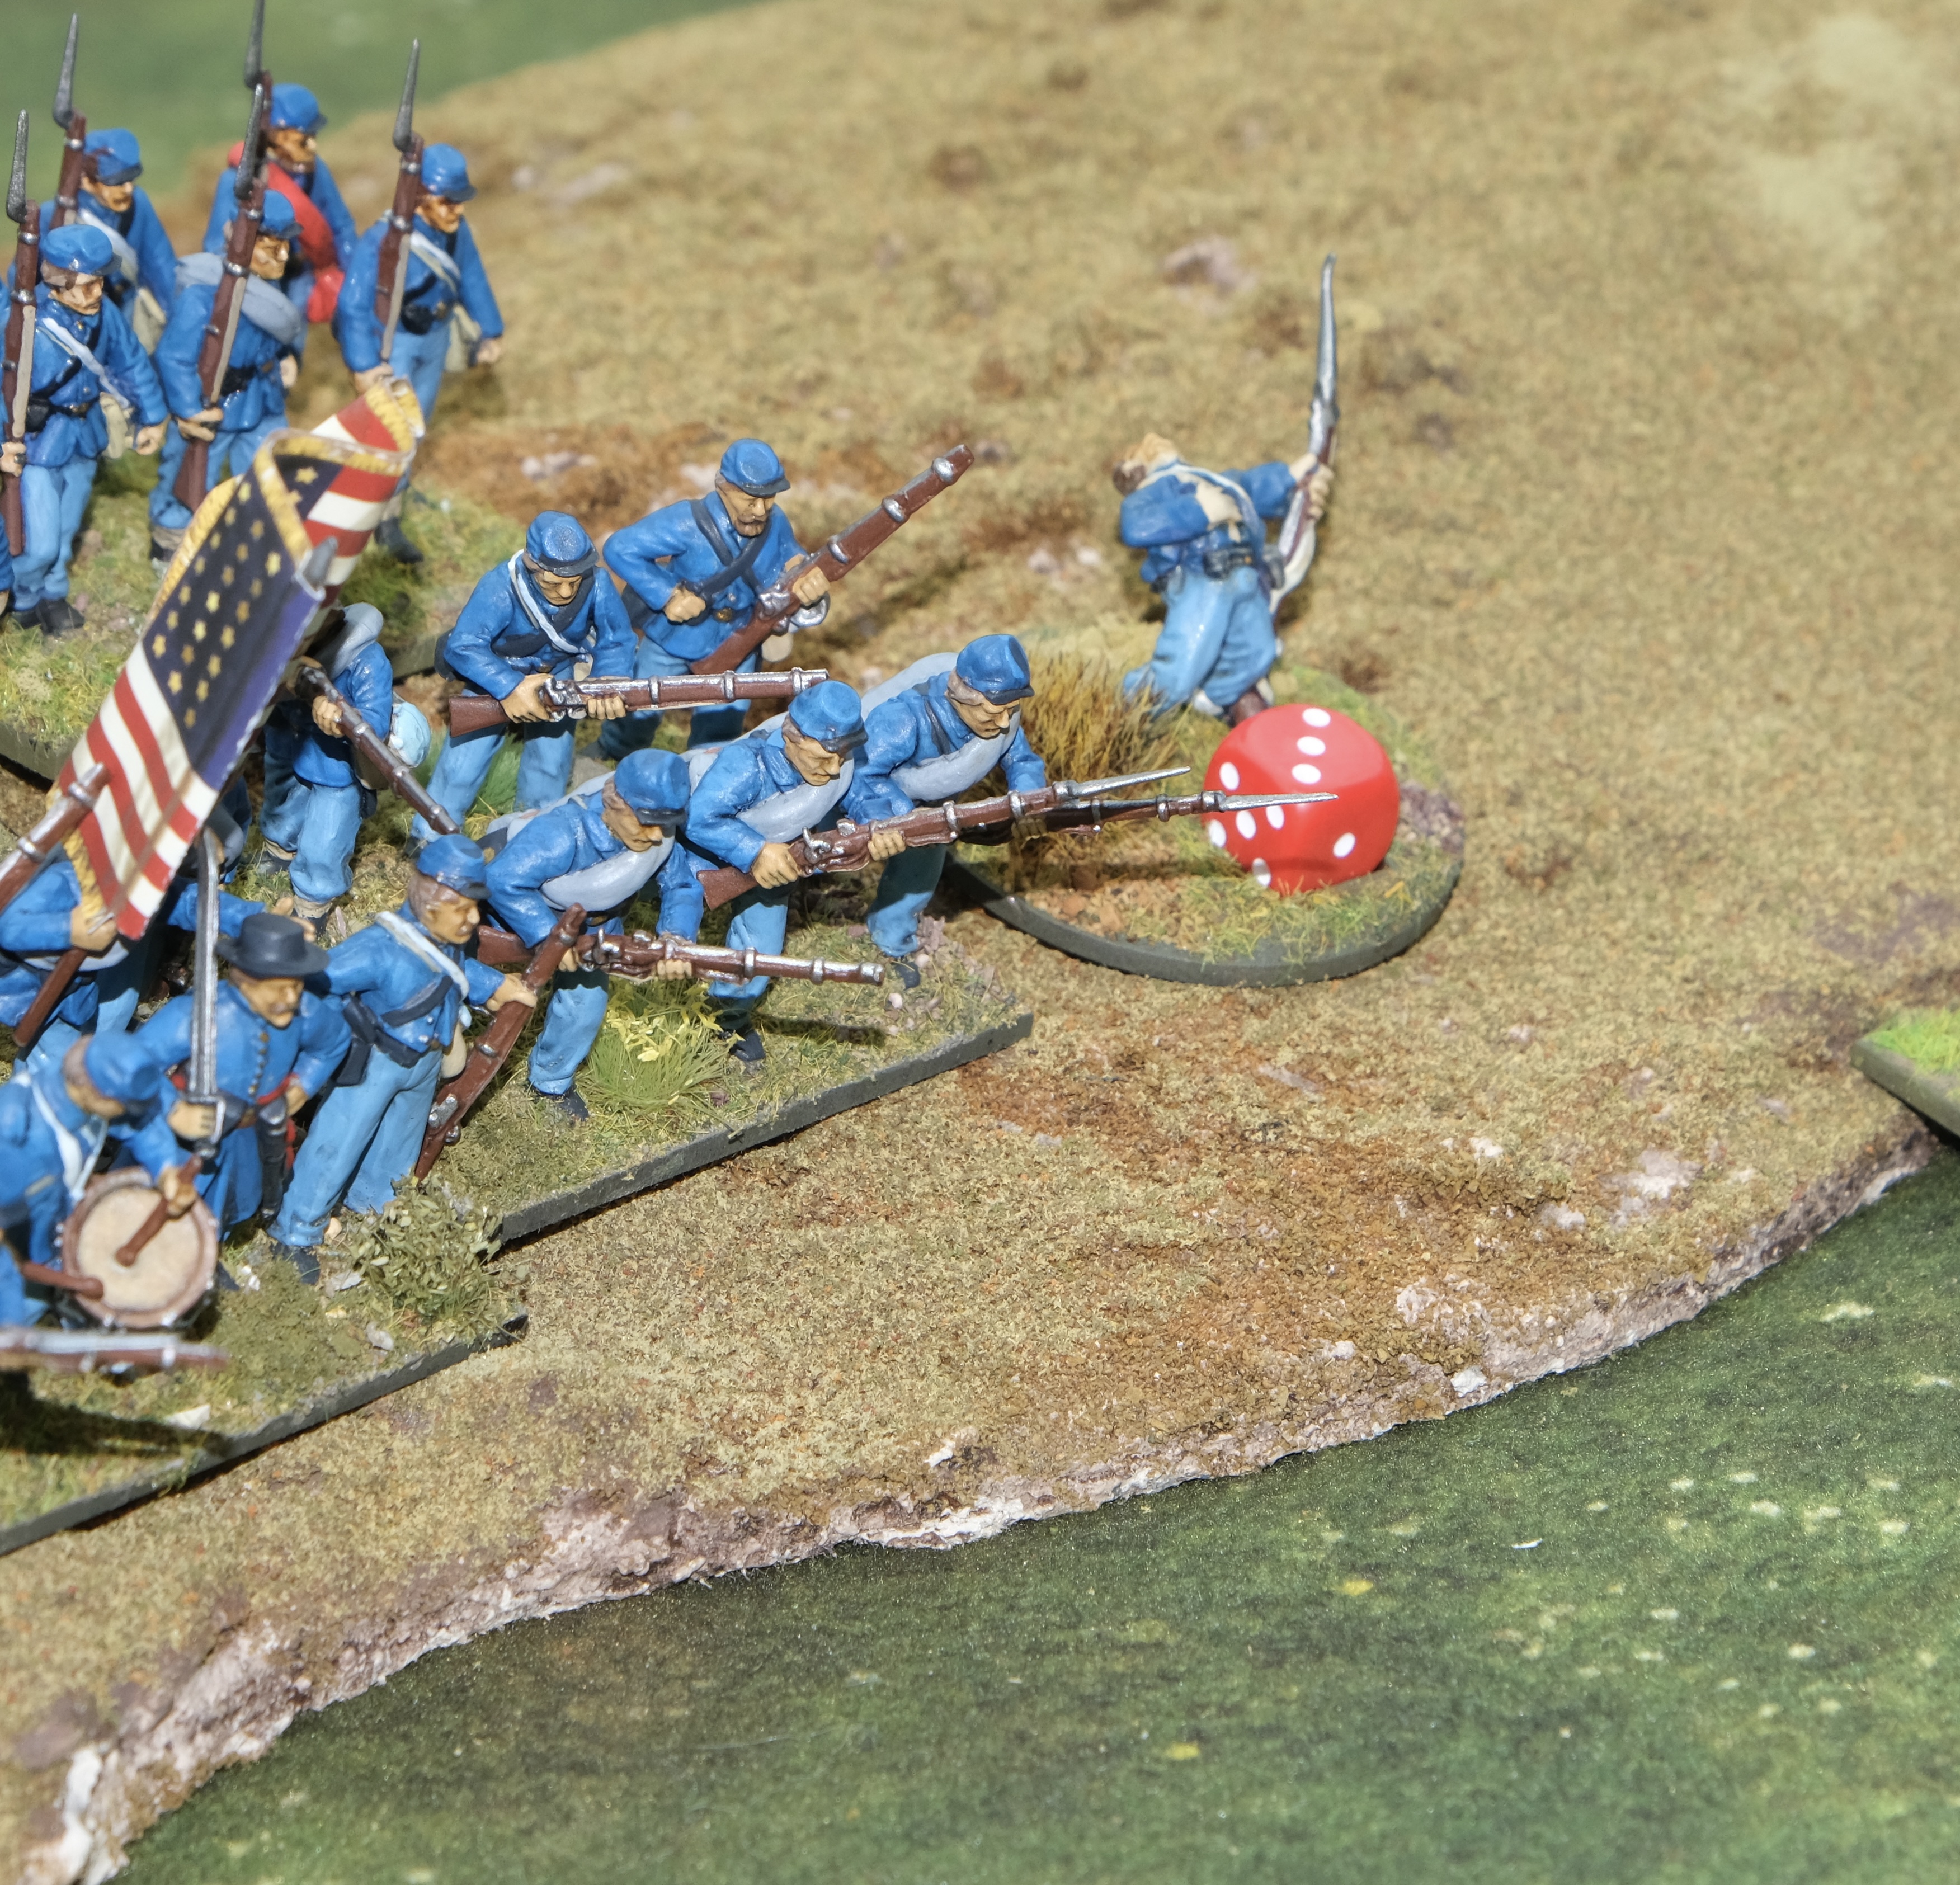
There is a lot of blue heading towards the hill position and the first clash, occurring on the Union left, sees 8th New York push 15th Alabama off the hill, but Elzy has worked his way across to the Confederate left, moving up the hill and crashing straight into Bohlen’s Brigade.
 |
| First clash, Union left pushes the Confederates back. |
The difference in soldier quality in part is making the difference, with the Union pushed back in some disorder and with significant casualties.
 |
| Elzy (top left) climbs the reverse of the hill and will smash into Bohlen’s advancing regiment. |
But the undoing of the Confederate position was already in motion. In the centre, they had taken so many casualties that they were clearly wavering and ready to run, while on the Confederate right, an assault against the just unlimbered Union artillery turned into a fiasco, as the attackers wrecked themselves assaulting into the face of canister - leaving Trimble dead on the field!
 |
| Union artillery delivers devastating canister, throwing back a Confederate assault. |
Despite the apparent success of Elzy locally on the Confederate left, the rest of the Confederate forces were fleeing the field and it was the Union who would claim the victory.
Conclusion
For a small game, the scenario(s) offered a lot of excitement as the minutiae of the rules made local things matter, such as a half hearted charge being repulsed or when the ‘notable’ unit failed their re-roll or when the diminished 21st Georgia was ready to run, but rolled double six on their Retreat Test and stood their ground instead and then of course there was the death of Trimble.
I have tweaked the scenario as I have gone along, not by much, just to help with a bit of balance and by making the hill an objective, so that it becomes worth fighting over.
At the end (turn 7), two of the Union regiments were on four casualties each, so another turn of pressure from Elzy would have likely pushed them to 5+ casualties, liberating one or two more victory points, so I think in the end, while this is a tough one for the Confederates, the Union cannot take too much for granted.
I also found a need to tweak the main rules as I feel that artillery has been over powered (and might still be!)
Anyway, it seems to be doing its job of being a good starter scenario for gamers working with new rules or who have smaller collections - and it is a historical situation, so worth examining for its own sake.
It will have a couple of more play tests and then take its place as the intro scenario for the TF-ON rule book.
By the way - if you are having a problem posting a comment because you get an error result, just press the ‘publish’ button 4 times (I know, but that’s how it is! ). On the 4th time, it will publish. I’m not sure what that is all about, some minor bug of some sort, but I am occasionally getting it, even when replying on my own blog (using Safari).
EDIT - I ran the full scenario, both parts, again today, using Epic scale figures. I kept the terrain footprint the same and also used the same measurements. Units were 3 bases wide (180mm). Quite a different game. The initial ‘destruction’ of the Union didn’t happen, though they were eventually fought off. Then the steam roller of the Union reinforcement arrived, but in the 7 turns could not eject the Confederates from the hill. The Confederates won on VP’s at the end of the scenario.
EDIT - There is a lovely write up of this game by a fellow gamer whoc converted the scenario for Rebels & Patriots. LINK
https://leadadventureforum.com/index.php?topic=140550.msg1792435#msg1792435
Resource Section.
This scenario, including order-of-battle, is available in full as a download PDF from my DropBox account. LINK
https://www.dropbox.com/s/a325mauhge1g3u2/Victory Hill.pdf?dl=0
My sister webspace ‘COMMANDERS’ is being re-configured to showcase various figure and boardgame systems that I am enjoying and gives a flavour of where current projects are up to. Link.
Good looking and entertaining scenario and if it's a close run thing it's a bonus!
ReplyDeleteBest Iain
Hi Iain, yes it was certainly entertaining, lots of little moments that simply can’t be included in an overview account, but which did tick the boxes.
DeleteExcellent stuff a great advert for smaller engagements. Thank you for posting the scenario I have downloaded it for future use, now I really must get that Paraguayan battalion completed.
ReplyDeleteHi Phil, we just need the weather to warm up, so that we can spray prime outdoors.
DeleteGreat looking scenario sir!
ReplyDeleteHi Michael, the Shenandoah Valley battles seem to be a rich ground for picking out small engagements.
DeleteNorm, I have a question regarding troop ratings. Are there only "Limited" and "Capable" in this ruleset ? I am looking to use this scenario with Rebels and Patriots and that has 3 grades of line infantry plus modifiers for how they are armed. I am going to have to fiddle with it
ReplyDeleteHi, no, there are three grades. Limited, Capable and Superior, so if you treat Capable as regular (or seasoned - hover the rules describe the bulk of average trained units), then the other two sit either side of that, less able and more able.
DeleteI might for example if show the Iron Brigade, have it or at least part of it as being superior - most stuff will be Capable, but the Union will have a good bit of early war stuff as being limited (or green in some rules).
To help further, unit frontage is 6”. There are two weapon ranges for small arms, Short Range (6”) and Long Range (12”), smoothbore muskets can only fire at short range, Rifled Muskets can fire out to long range (with half the amount of attack dice).
Movement is 12” as standard, halved for any proportion spent in difficult terrain.
Command radius is 12”
Units that charge to contact (not really charging, just that last 50 metres or so of assault) test capability (i.e. morale), if they fail they attack at Half Hearted (-3 dice). Then the defenders test, if they pass, they can react, most likely with fire, which might be enough to throw the attackers back - if units remain in combat after all of that, a round of close combat is resolved.
Also in the rules, units cannot gang up, other than having a supporting line to their rear, so one unit might fire on the defender in the fire phase and in the assault phase, another unit might attempt close assault and they might be supported by a line behind them. Hope some of that helps in your conversion.
Well a fine second stage to the battle Norm and a great advert for smaller engagements, which make it much easier for players with limited time, space and forces. It shows you don't need loads of figures/bases and big table to have plenty of action. I must try this out with my MDF figures at some point using BPII and the GH! supplement:).
ReplyDeleteHi Steve, I think it would work well for BP. I did find a lot of things going on that were interesting, but as you know, once you try to write something up, all that detail can make for a rather long report, so I sanitised most of it to a general outline of play. I think BP would give those same moments of interest, even in such a small game.
ReplyDeleteLooks an interesting scenario Norm.
ReplyDeleteThanks Ray, an easy slice of history.
DeleteThe follow up action certainly changed things around a bit Norm....and interesting to read when you replayed with the Epic figures, the results were different again!
ReplyDeleteHi Keith, it was interesting to see the Union steam roller and still the Confederates managed to hold out ….. so there is hope for them.
DeleteGreat to see Norm and opportune as I have been thinking about the Shenandoah campaign and how I might play the main battles ? Good food for thought . I get the comment problem too 4 seems to do it for me ?
ReplyDeleteHi Matt, I have just picked up Seven Days 1862 - an easy play boardgame from Worthington Publishing, which I hope gives some situations that can be transferred to the table.
ReplyDeleteGreat ACW action. You know I am a fan.
ReplyDeleteIt’s kids the classic mash up of fewer but better CSA against more numerous but worse USA. 😀
And I had no problem commenting.
DeleteThanks Stew, there does seem to be a dynamic balance to the scenario due to the things you mention.
Deletethe comment thing seems very hit and miss.
It had been a very long time since my ACW armies have been out and even longer since I used TF-ON. What has changed in your hex-based version? Anything?
ReplyDeleteWhen I did the original conversion in Aug 2021, as I recall, I took an opportunity to tweak the system and filter those changes back into the hex version - since then, there have likely been a few small change that have not made that backwards transition.
ReplyDeleteHeadlines are that;
Skirmishing became a recognised formation, with extra rules needed such as units charging at skirmishers get a bonus to their pre-charge capability and skirmishers attempting to react to a charge can attempt to get back into line. There is also a new row on the close combat table matrix for skirmishers.
Disorder now accumulates and is automatically gained when entering difficult terrain (not diced for). The penalties for disorder remain exactly the same, i,e, the unit is treated as though it only has 1 disorder marker, but the more disorder it has, the longer it will take to shake it all off.
Brigade artillery is now bound by command radius when moving.
High ground impacts on pre-charge capability test
It is now easier to get a killed Brigade Commander replaced, but the units in that command all suffer 2 disorders, so delay is now switched from a focus of getting a commander back, to the impact of units recovering from the disruption of command loss.
I need to spend a bit more time with the rules to get my full grasp back, so that I can be sure that the inter-action between all parts is working without any unanticipated problems.