

A few posts ago, I covered the Beaver Dam Creek Scenario from Worthington Publishing’s Seven Days Battles game.
I have since played the Gaines Mill scenario and today I am putting the scenario that combines two the battles into one continuous action, onto the table. There is also a small deviation when a slice of action in the boardgame gets transferred to the figures table.
The game runs from 1500 hours 26th June through to 2000 hours 27th June, with twenty-five hourly turns.
Previous posts (mentioned in the Resource Section below) give detail of the game system, so this replay is really just going to give a fairly quick overview of the two day battle.
Please use the ‘read more’ tab for the rest of this post.
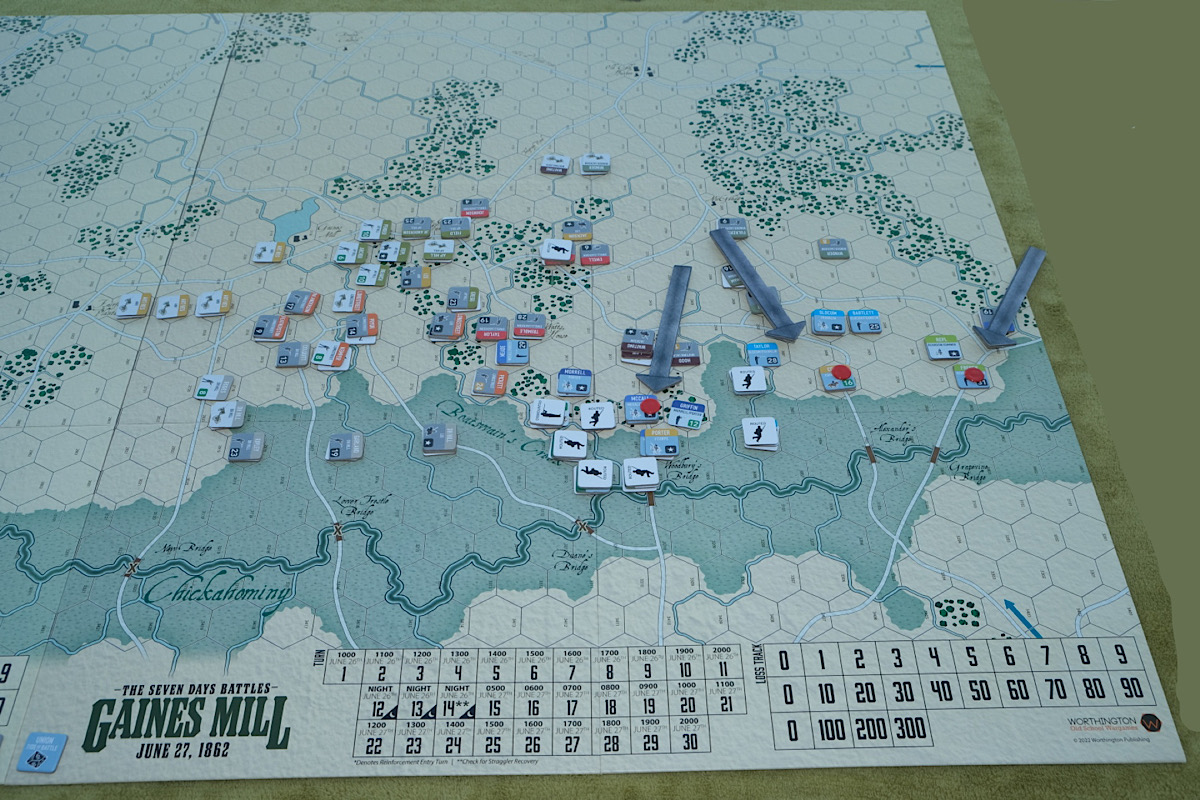
The single scenarios of Beaver Dam Creek and Gaines Mill are each played on a single board. The combined scenario uses the two boards side by side to give a nice expanse of the battleground.
 |
| Click for larger view |
The Union start set up on the board. They consist of Porter’s three divisions (V Corps), two of which are set up behind Beaver Dam Creek. This is a really important feature in the game, as units in the marsh firing out (i.e. typically the Confederates) have their firepower halved, while units (typically the Union) firing at units in the marsh get a +2 on their die roll (D10), so the Confederate initial head on attack across the marsh becomes something of a killing ground for them.
At the far end of the board, there are three intact bridges. These form the Union’s line of communication and must be protected. They are valuable objectives for the Confederate. The tempo of the game therefore revolves around the Union holding Beaver Dam Creek for as long as possible, inflicting heavy losses on the Confederates and then falling back on their bridges, to deny them to the Confederates.
Added into this mix, we have Jackson’s three fresh divisions arriving on day two on the Union right.
At the end of play, victory will be determined by a mix of losses and objectives held / taken.
One element of the system that I will raise here is that unit strength points are based on the number of men in the brigade at 1 point per 100 men and so we have some fairly powerful units here. Casualties are taken in point losses, so the strength of units reduce point by point with losses (strength loss markers are used). When a unit reaches half strength, it is ‘shattered’ and cannot enter an enemy Zone of Control, so as formations degrade, their offensive capability reduces and fresh divisions take on an importance of their own.
1500 hours - 26th June 1862
AP Hill’s Division is the first Confederate Division to arrive and they put in an immediate attack on the Union right - it is a disaster, with half of AP Hill’s division fleeing with heavy losses and AP Hill killed by artillery fire.

General Lee then arrives with two more divisions, DH Hill and Longstreet (above - the arrow on the bottom right of the map shows the entry point). They manoeuvre to attack the Union left and here, they are also repulsed.
(1900 hours) AP Hill’s (replaced leader, but we shall still reference his division by the original leader name) division, mostly recovered, moves back to make a 2nd assault. This time they try to move around the Union right, to envelope them, see left arrow below. They have some success and have at least negated the marsh, though Sykes’ division (Union’s third division) is now released and starts to move down to reinforce the Union line, see the below arrow top centre.

As darkness falls, the Union flanks have managed to hold, but in the centre, Longstreet has crossed Beaver Dam Creek and is put significant pressure on Sykes.
 |
| Longstreet (centre) crosses the creek |
During the night, the Union pull back slightly to better organise the line, though their left is still firmly anchored on the creek and DH Hill has taken very heavy casualties trying to force it.
The Confederates have failed to make the progress required of them (costing them a 10 Victory Point scoop by failing to reach an objective hex).
By Morning (27th) some 900 stragglers have returned to the Confederate line, while the Union see 300 men return, mainly to their right flank, where they are much needed.
0500 hours 27th. With the two lines arrayed against each other the Confederates attack right along the line and take terrible casualties.
Lee orders his right (DH Hill) to disengage, they still have not taken the creek and their losses are growing. The centre and left will press the attack, but still the Union hold, though Sykes (Union centre) is killed.
0800 hours - The Confederate attack is starting to waver in places, but to their relief, the Union start pulling back slowly due to their own losses, which have particularly fallen heavily on Syke’s (replacement leader) centre.
[Game losses to date are 80 strength points for the Confederates, representing 8000 men and 55 for the Union (5500 losses). Though this is in the Union favour, their smaller force can’t cope that well with the losses. I don’t know how much Porter knew, but at 1400 hours Jackson’s fresh divisions will enter the game and fall on the Union rear right (see the top left arrow on the map below). This could destroy Porter’s Corps - however, a natural point of necessary retreat for the Union has been reached, so they may escape the worst of Jackson’s arrival, whether knowingly or not].
 |
| Top left arrow is where Jackson will arrive |
0900 hours The Union flanks are taking serious punishment and over the next hour or so they pull back. Their exposed centre (Sykes Division - replacement) will have to conform and do likewise.
 |
| This action from the Union far right is transferred to the figures table. Note the unit at the bottom is shattered (flipped) and has its morale value in green to reflect lower morale. |
1100 hours, (see above photo) the Confederate brigades, Branch and Gregg have attacked the right of the Union line (Martindale), hoping to turn it. I decided to take this moment in time and play the action out on the tabletop. Martindale (Union) currently has around 12% loss, Confederate Gregg is at 25% loss and Branch at almost 50% loss. To reflect this, I reduced the number of regiments within each brigade fielded (thank you Wiki for the orders-of-battle), proportionately. The game had woods to Martindale’s front right and both sides had an artillery battery to their respective rears. Martindale would be attacked from two directions.

In the boardgame Martindale suffers a 2R result, which means two strength point losses (200 men), a retreat of two hexes and then a morale test to see if the unit routs a further 3 hexes (it doesn’t). Though within the hour, the already weakened Branch’s brigade will shatter!
 |
| Confederate artillery |
Martindale set up defensively, with two of his regiments covering his right flank. The Confederates attacked - Gregg happy to engage in a fire fight to the front, while Branch formed up his regiments in column to assault the Union flank.

The flank attack came close to success, but was rebuffed, while Gregg was likewise repelled with losses. Reorganised, Gregg launched a second assault, but his tired troops could not break into the Union position.
 |
| Branch assaults with two regiments |
The Confederate artillery battery was forced to pull out due to accurate Union counter-battery fire and then Gregg’s 14th South Carolina regiment, who had suffered the brunt of the casualties broke and fled.
Moments later, Gregg’s 13th South Carolina started to disengage due to losses, as did Branch’s 7th North Carolina ….. the Confederate attack had stalled and Martindale was left in control of his positions.
1300 hours, back to the boardgame, the Union left is routing, with the whole of V Corps generally reeling backwards, but the price has been high for the Confederates and Rodes’ Brigade (DH Hill) has shattered, followed by the brigades of Archer and Branch (AP Hill).
Porter moves his headquarters back to the Fairfield Plantation.
 |
| Jackson arrives and is about to unhinge the Union defence. |
1400 hours, Jackson’s three fresh divisions start to arrive. Had Porter’s Corps not been falling back so freely, the way would have been wide open for Jackson to advance towards the bridges unmolested, but now Jackson is brushing against the Union’s right flank.
As it was, Porter was stretched really thinly in his effort to conduct an orderly retreat. As Jackson’s fresh divisions joined the fray and were ‘all over the Union’, the Union casualty levels started to rise exponentially.
Porter had one piece of good news, Slocum’s Division had arrived via the bridges and he was setting about creating a second line of defence along them.
1600 hours - the Union was getting really squeezed and the casualty gap between Confederate and Union was rapidly closing. It would be touch and go, but Porter saw a glimmer of hope that his corps could make the bridges before the trap on his retreating forces closed.
1700 hours - Meagher and French Brigades (Union) arrive at the bridges, but would it be enough to hold the objectives!
 |
| The Union are getting pressed against the bridges |
1800 hours - the casualty numbers had equalised [at this rate, it would be be the occupation of the objective hexes that will determine victory].
 |
| The Confederates are SO close to those objectives! |
2000 hours - the final turn (turn 25!) and it looks doubtful that the Confederates will take any of the bridge objectives, it is extremely close, though many of the Union brigades are ‘shattered’ and so are just as likely to run as they are to stand!
At the end of play, the casualties are very close. The Union have suffered 169 casualty points (16,900 losses) and the Confederate, 171 losses. So the Union get 171 victory points for losses inflicted, plus 5 VP’s for each of the three bridge objectives that they still hold, giving them 186 Union VP’s versus 169 points for the Confederates.
These bridge objectives are worth double points to the Confederates at 10 VP’s each, so had they won just one or two of them, then we would be looking at a draw (one) or a win (two plus). This has been one very tight game.
Conclusion.
There were a couple of important points in the game that could well have changed the outcome. Firstly, the Confederates did not do well enough on day one (26th). Their losses were too high and they did not break the Union position. There were 10 victory points to be gained behind the creek for doing better, in our tightly contested game, that would have made a difference.
Secondly, the Union probably fought too long and hard at the Creek on day one. They took many losses and because of their delay in retiring, came close to being caught out by Jackson’s arrival in their rear / flank, nearly getting trapped and cut off from the bridges.
Converting one of the actions to a tabletop game was a nice distraction. I suppose I could have brought the result from the figure game into the boardgame one way or another, but since the boardgame outcome was so tight, it was probably a good thing to keep them as separate entities.
The boxed set has two more battles from this campaign as individual scenarios (Glendale and Malvern Hill) and then a single big scenario, like the one we did today, that brings both of those battles together, into a bigger event, so I would like to have an early look at them.
Resource Section.
The previous post on the Beaver Creek Dam Scenario. LINK
https://battlefieldswarriors.blogspot.com/2023/03/the-seven-days-battles-1862.html
A closer look at the game system using the Antietam Bloody Lane scenario. LINK
https://battlefieldswarriors.blogspot.com/2020/09/antietam-1862-bloody-lane.html
My sister webspace ‘COMMANDERS’ is being re-configured to showcase various figure and boardgame systems that I am enjoying and gives a flavour of where current projects are up to. Link.
That was an excellent game. I'm not surprised the Union stayed too long at the stream, delaying actions are incredibly hard to get right.
ReplyDeleteHi Martin, I think if playing again ….. I would probably end up doing the same! The strength of the position is quite something … hard to let go.
DeleteExciting game! As Martin says delaying/fighting retreat actions are very difficult - no doubt in real life as well as in games!
ReplyDeleteCouple of questions - 1500hrs 26.6 - 2000hrs 27.6, 25 hour long turns?
I presume one of those turns is a night turn that is longer than an hour as we've got 29hours?
Is Porter fixed in place until a particular turn or loss level? Or is the difficulty of withdrawing from combat without letting the Confederates pour through sufficient to slow a withdrawal before Jackson arrives?
Like the game generating a tabletop action.
Hi Guy, night is represented by just 3 turns sitting between 2000 hours and 0500 hours (and only the Union are allowed to move!)
DeletePorter is not fixed, but the position is the strongest on the board and just behind the position is an objective hex worth 10 VP’s to the Confederates if they capture it on the 26th. The Union fear is that once Beaver Dam Creek is breached, the Confederates will easily reach the objective hex and so the temptation is to hold the creek line for as long as possible on the 26th at least.
What surprised me as a player was that there was a big gulf between the casualty scores of the two sides, favouring the Union, but once the Union were reeling back, their casualty level just took off!
Splendid AAR Norm , I love the idea of converting to miniatures but it is a big commitment and I assume would break the flow of the board game. Ps love your graphics…I might try that green background 👍
ReplyDeleteHi Matt, that made me smile because I was quite taken by your black background and was going to give that a go :-)
ReplyDeleteFor board to figure conversion, I usually see the potential of a situation and just record it for a later conversion as yes, it is disruptive to play and gaming space for doing that is not always available.
A fine game there, boardgames not my thing but an enjoyable read none the less, I liked the miniatures insertion too. I have owned two board games in the distant past, a WWII eastern front, can't recall the title and a Vauban siege on.
ReplyDeleteThanks Phil, it was nice to have a chance to do a cross figure / boardgame post. There are some good choices of boardgamer for the ‘non-boardgamer’ who just wants an odd title to dabble with.
ReplyDeleteThe downside of them is that many have their own unique rules, so one is learning a new system each such a game is bought / played. These days, I am going more for boardgames that have series rules, so one lot of learning for more play. This particular set already has an Antietam and a Shiloh game in print and there is the promise of a Gettysburg being done.
Interesting report Norm and it looks like it is a great boardgame with the added bonus of a miniatures game in the middle!
ReplyDeleteI think Porter defending the creek is understandable if he is unaware of Jackson turning his flank. It would seem (at least on day one) that he is winning the engagement against superior forces. I think your playing of the situation is correct.
Hi Ben, yes the wargamers ‘all seeing eye’ is present here, as the scenario clearly lays out Jacksons arrival and a Union player becomes aware of that …. A day in advance! I suppose the best way to play would be to host a face to face game as the Confederate player and in briefing the Union player, simply tell them that the Confederates do have several divisions off to to the west (?) which are about a days march away - as that probably is the most that Porter might have situationally been aware of.
ReplyDeleteBut in a face to face or solo game in which Jackson’s predicted arrival is known to the Union player, it is difficult to see how the Union would get fully caught out ….. though I nearly did! :-)
This is another situation that highlights the benefits of an umpire run campaign with fog of war taking centre stage to deliver good command crisis moments.
I played in a recent umpire run game where there was fog of war on both sides, which really added to the fun of the game. I like the idea of a general note to the effect of Confederate troops to the West, to keep the Union player with one eye out there, as would most likely have happened.
DeleteThere is a boardgame based on Gettysburg. It has the correct order-of-battle, but units will not necessarily come on in their historical places or at the historical time scales. The designer was trying to defeat the thing that ‘everyone’ knows how / when the troops will arrive and how the battle is likely to develop. Instead, he said, this was a MEETING ENGAGEMENT and that is how it should be played, with reinforcements only being revealed as they arrive …. From whichever direction that may be!
DeleteIMHO that is a great way to approach historical actions, as it really brings so much uncertainty and fog of war to the game, and makes the grey cells work overtime. Maybe something to try with figures and slightly smaller scenarios at some point, although this could be done using the BBC scenario.
DeleteNorm, have you played Guns of Gettysburg?
DeleteMy wargaming oppo had the game and we played either part if the first day or may be it was an intro. It did shake up the ‘arrivals’ thing, but I was not keen on the system itself, so we never got back to it. I suspect it has since been sold!
DeleteAnother fine zooming in and out of an action there Norm, which is the sort of thing I would enjoy. Space and time permitting one could do it with say Bloody Big Battles scenarios, then focussing in on another table for a specific and interesting part of the game.
ReplyDeleteI like the fact that there is a lot of re-playability in this scenario, given the post game thoughts, especially the poor start that the Confederates had. I certainly love the Seven Day battles as there is a lot of variety to be had with each action.
Hi Steve the individual actions are very do-able, but carry enough dynamic to give a very ‘full’ game. The Beaver Dam Creek scenario has 1 Union Division, comprising of 3 brigades, which, especially in the smaller scales, is quite do-able on a domestic table. likewise, the Confederates have 3 Brigades - it starts to get busy in the combined game when Jackson (Confederate) brings on another 3 brigades, but a Single starter box of epic could cope with it (would also need some cavalry)
DeleteI don't know how you resisted taking nearly every contact on the game board over to the miniatures side. yeah, it would of taken forever, but would of been like watching an ACW movie with the plot shifting around to different characters.
ReplyDeleteOverall, nice ACW action. 😀
Hi Stew, now there is an idea :-) It’s funny how doing this sort of thing brings a lot of life to that one particular incident and yet as an incident in the boardgame it was not really any different from the other few hundred similar incidents.
ReplyDeleteGreat in depth AAR and I like the conversion to miniatures in amongst it, a close game is generally a good game and maybe the Union needed to hold them as far away as they could, as long as they weren't flanked it's all good?!
ReplyDeleteBest Iain
Hi Iain, it was one of those games that I immediately felt like re-running just to see if if would play out any differently. If this pairing sat in a bigger campaign setting, the Union would not be able to take any chances, falling back on the bridges and exiting would be a priority.
ReplyDeleteA wonderful report of a nail bitingly close game, Norm, with the added bonus of a nice little figure scenario in the middle of it all...great stuff!
ReplyDeleteHi Keith, yes, I was pleased with the game and with getting a figures game falling from it. Nice combo.
ReplyDeleteJust read this and have to say it really gripped me Norm! Nice idea to transfer part of the game to the table.
ReplyDeleteOne question. Is the Union fall back required automatically by the game or is it triggered by prior knowledge of Jackson’s arrival o some other event?
Thanks Mike, no, the Victory Point conditions and strength of the Confederates and the losing of Beaver Dam Creek combine to ‘compel’ the Union to fall back.
ReplyDeleteBeaver Dam Creek is a significantly defensible position, once breached there is little reason to stay there. There is a single hex objective for the Confederates worth 10 VP’s on day one, so the Union have strong encouragement to hold the creek and defend that VP hex until late on day one - once that moment passes, attention switches to the VP’s that can be earned by defending / attacking the three bridges at the other end of the board and so the focus of both sides is to do that.
Union fallback to these positions would be one of panic if they didn’t know about Jackson’s outflanking manoeuvre. I think unfortunately in the game, the Union player has too much information about Jackson’s arrival and can fall back to prepare for it, if the game was played with an umpire and the Union not told at all about Jackson, I think they would be significantly defeated.
It would be better to have some sort of middle ground in which the Union commander is simply told that the right flank is vulnerable to off board outflanking - as I assume his real world situation awareness would give him such an inkling - but the Union are uncertain when and where, would bring a greater emotional connection to the game for the Union player.
I must read the history, just to see how much Porter knew of his predicament.
Excellent report and I learn a lot from how you transfer elements of the board game to the table top, it’s a great idea and I will certainly look at doing something similar. The board game scenario certainly looks good it’s a challenge to work out the flanking attack is there any way to tweak Jackson’s arrival time or location to add a little pressure onto the Union force.
ReplyDeleteThanks Graham, I am increasingly liking the cross-over aspects of boardgame / figure game. There is a ‘what if’ scenario for Beaver Dam Creek that has Jackson arriving earlier, so there is some scope to play around with that mechanic for this scenario. I would be happy with a ‘what if’ for solo on this because Porter just knows too much.
ReplyDelete