

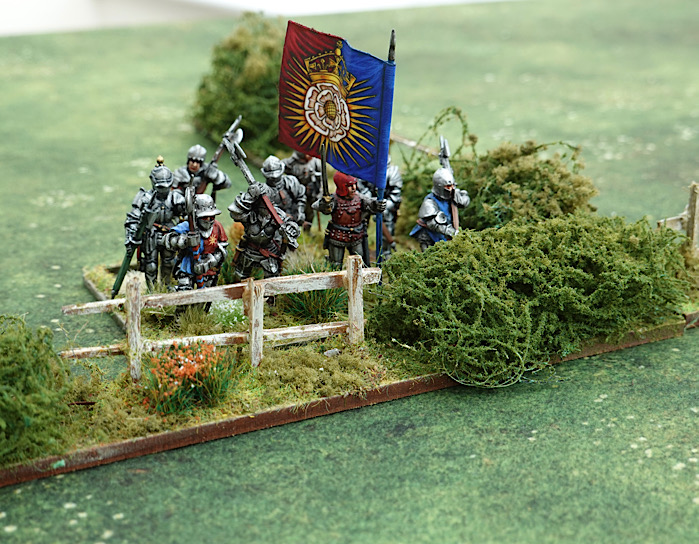
As units slowly pass across my painting table for the Bosworth project, the mercenary contingent continues to grow and so shortly a minor action at my fictitious Parish of Piggy Longton will be fought as the newly recruited mercenaries seek to unite with Lancastrian forces. York (above) will be looking to interfere with those plans.
So, besides the painting, which will see pike, crossbow and handgunners ‘on tour’! this battle location within the parish needs a couple of terrain items added. First up is a barn to sit on the outskirts of Beacan Farm.

Above - I chose the MDF 28mm barn kit from Warbases as it seemed to have a small footprint (90mm x 50mm base), which will help my smaller table (link to Warbases in the resource section below).

Above - At £5 it is a useful kit, especially once embellished. I made a paste up from artist acrylic paste, plus a few drops of brown paint added and with a small palette knife smeared this thinly over the walls between the wooden frame to give a daub effect. This dried the right colour. Some of the wood was lightly touched up with dry-brushing to brighten and preserve the grain that the laser cutting had created.
Now for the roof. I wanted thatch, so I cut a load of brush bristle, lathered the roof with PVA and did thatch. It just wasn’t a good look, so that was all wiped away before the glue set .... just!
Then I did another mix of acrylic paste, spread it on and used a palette knife to draw down thatch lines, let it dry and painted and heavily inked it. it looked okay, but obvious to my eye were some of the original paste spread lines under the thatch strokes and these became too distracting for me ..... so what to do!

Luckily this months Wargames Illustrated magazine has an article for a building that used those green pan scrubber things as a roof surface and I followed their suggestions. The scrubber was cut slightly bigger than the roof and attached with a hot glue gun. It was then spray primed from above and airbrush painted with burnt umber (twice). Dry brushing brought out the texture and then the transformation bit ...... roughly applying PVA glue over the roof so that some gaps were left, a static grass applicator was used to drop 2mm grass onto it. I only had a greeny / yellow shade, but it seems to have worked to give that moss sod effect.

Above - for storage reasons, I prefer to keep buildings as unbased singles, but this deserved a base that could help define a built up area (BUA), so I used a 3mm MDF 150mm x 200mm blank shaped terrain base from Warbases (£1.65) and attached some plastic wattle fencing that came with my Perry plastic cottage kit model.
The base edge was chamfered down with a blade (caution MDF dust is toxic) and the plastic fencing was very effectively attached using 'No Nails' glue (it just needs one surface to be porous, which of course the MDF is).
Artists acrylic paste, heavily tinted with burnt umber acrylic paint and mixed with some flock grass for texture, was spread very thinly (to avoid warping) over the base. Dry brushing, flocks and tufts completed the look. The open area was not tufted, so that it could be occupied by the big 80mm x 60mm bases.

So, a bit of work, but a fairly universal piece resulted that can take its place in a goodly number of games and periods, spanning over a few hundred years. Size wise, this is also working with the 1/72 WWII figures.
My other build was fencing. After the major crime of me binning a load last year in my attempts to break bonds with the 28mm scale, I have been left short on that front. So each time I put an order in to Hoka Hey for bases or buildings etc, I normally have a couple of their fences added to the list.

I like that they are on 3mm thick MDF, so I have not seen warping, but I also like my bases to be a bit heavier flocked / foliaged / tufted than these arrive with, so I used spray picture mount glue on the horse hair hedge bits and heavily flocked them and then PVA’d the bases to add flock, grasses and tufts. The final result to my eye is more pleasing, with the hedge bases now having a greater presence.
Another advantage of accessorising things like this is that by using similar materials throughout, they knit better with other parts of my terrain and bases.
Aside from doing terrain, I have a storyline for the next game and am close to completing the last unit (pike) for the scenario. It will fit onto a 4’ x 3½’ table, which is rather the point of the exercise. The rules used will be Sword and Spear by Great Escape Games.
The main commanders look suspiciously like Henry Tudor leading the mercenary force and King Richard III leading the Yorkist force, but would we really have it any other way! :-)
Coming soon to a blog near you!
Resource Section.
Hoka Hey fence page
https://www.timelineminiatures.co.uk/page/single-terrain-pieces
Warbases barn page
https://warbases.co.uk/product-category/buildings/dark-ages/
Great Escape Games - Sword and Spear QRS page
https://www.greatescapegames.co.uk/sword-spear
My sister webspace COMMANDERS is just getting a refresh and will have a collection of shorter AAR’s. Link.
Looking good Norm, especially like the fences and you can never have too many ! Looks like you are back on 28 mm, I have found I use sculpted thatch rather than fur and cloths as it just works for me 👍
ReplyDeleteThanks Matt, I am slowly building the fence stock back up. I have a 20mm thatch cottage from Lancer Miniatures, which has the exact look that I originally wanted. I may use that as a ‘study’ for my next building and use a very fine clay.
DeleteNice looking building Norm, I shall be using (or trying to) the brillo pad method on a few roofs soon. Hopefully mine will look as good as yours!
ReplyDeleteHi Ray, I was surprised how effective it was, Wargames Illustrated over the past couple of months have been showing this technique ..... thankfully! It certainly passes the 3’ rule.
DeleteFantastic buildings sir!
ReplyDeleteThanks Michal, it should see a goodly amount of service.
ReplyDeleteVery fine scenic additions, I shall look forward to next affray at Piggy Longton.
ReplyDeleteThanks Phil - the troops assemble.
DeleteLovely pieces of work, very realistic.
ReplyDeleteThank you, I did have some pigs on order and had researched colours for painting Gloucester Old Spot. The pigs have arrived and don't look that great, so the paddock is empty! .... for now :-)
DeleteGreat looking WotR figures and terrain. Love the thatched roof.
ReplyDeleteThanks Dean, the period does have a great look to it.
DeleteAnother alternative for thatch is to use felt. You can coat it in watered down pva or even a runny mix of filler and water. Once it is covered but before it dries, comb the thatch in the desired direction. Then paint.
ReplyDeleteWhat a simple idea, i will try that, thanks.
DeleteA couple of nice bits of terrain, and as you mentioned the barn is nice and compact.
ReplyDeleteThanks Peter, I was really surprised that a 28mm item came in so small, but as mentioned, it will double for the 1/72 stuff.
DeleteVery nicely done on the barn and barnyard, Norm! Your figures look great too!
ReplyDeleteThanks Jonathan, as for these particular figures, there was a bit of help with some of those :-) a new base base made up from my own and another's work.
ReplyDeleteThat's a very good value kit and the finished result looks great. I've seen teddy bear fur and towels/flannels both used to great effect for thatched roofing, both with added bits of flock etc to give it an aged look.
ReplyDeleteHi Steve, a superb price and also enjoyed my discovery of their 3mm terrain bases, which seem ideal for a host of building types.
ReplyDeleteFirst class, Norm! Looks great!
ReplyDeleteThanks Steve, I've found I just have to seize the moment when those short bursts of enthusiasm come along for a bit of terrain building.
DeleteSooooo looking forward to this!
ReplyDeleteThanks JB, me too, but strangely I'm starting to get a sense that fictitious Piggy Longton is becoming a real place!
ReplyDeleteThe figures do look very nice Norm and the roofing technique seems to have worked well. I have use small hand towels soaked in PVA then dry brushed three or four times were gradually lighter browns and greens and was quite happy with the result that gave. Looking forward to another Piggy Longton encounter!
ReplyDeleteThanks Keith, I do like the idea of household stuff being repurposed for the wargame, when I first got involved in the hobby, that was pretty much how everything was done.
ReplyDeleteLovely looking command stand and a really useful barn, I've got some lazer cut buildings from the pound store that I'm planning on turning into barns/dark age dwellings, I'll probably use the green fibrous underlay you get for laminate floors as thatch,I might try building some hills out of it too!
ReplyDeleteBest Iain
Thanks Iain, I think that underlay should shape particularly well. I had considered it at one point to line the table top, so that rivers could be cut into it.
DeleteNice looking troops Norm. And I think the barn came out well in the end. I enjoy reading about someone else’s trial and error just so I don’t feel like the only one. 😀
ReplyDeleteI like the look of it on the base too. I keep thinking I’m gonna base up my 28mm buildings but never seem to get around to it.
I feel a sense of apprehension for the people of Piggy Longton; more war is coming that way. 😀
Thanks Stew, I have added a bit more to it since the photo to get a bit more 3D on the open space, without interfering with the placement of figures. Piggy Longton is becoming a crucible of war! a shame for such a pretty, gentle place!
ReplyDeleteThe troops look great Norm - especially like their standard. I think you brought the barn to life despite the difficulties you encountered. Thumbs up!
ReplyDeleteThank Mike, the flag is from Petesflags, kindly donated by a fellow blogger. I have added a few more textures to the barn and it seems to settle on a good balance of looks and functionality.
ReplyDelete