

The hamlet of Piggy Longton
A background description of this battle was given in the previous post (link in the Resource Section below), but essentially, it is early 1471 and the Lancastrian Lord Darcy has just collected taxes from his estates, which are ultimately destined to be transferred to the War Chest of King Henry VI.
Neighbouring Lord Trebian, of Yorkist persuasion, is determined that this should not happen and intends to intercept the taxes for the Yorkist cause. His forces are advancing towards the Parish of Piggy Longton.
The rest of this post gives way to a scenario description and AAR, played out using the Never Mind The Billhooks rules.
Please use the ‘read more’ tab for the rest of this post.
Below is the full map of the fictitious Piggy Longton Parish and an area bounded in a blue box showing todays battlefield. There is a link to the Parish history in the Resource Section below.

For our action today, the two sides will set up like this;

This game is being played on a 6’ x 3½’ table (4’ wide would have worked), the figures are mainly 28mm Perry, with units working on either an 80mm or 100mm frontage. The rules are 'Never Mind the Billhooks', written by Andy Callan and produced by Wargames Illustrated (magazine). Buildings are mostly Conflix (Bachmann), roads by Fat Frank (e-bay), the bridge by Warlord Games, the river, hedge, trees and ploughed land by S&A Scenics, fencing by Hoka Hey, Oxen and cart from Colonel Bills (sent in recyclable jiffy bag - noteworthy for that) and the game mat is by Geek Villain.

Lord Trebian will set up on the western table edge (top edge). Lord Darcy will set up anywhere on the eastern side of Smoggy Brook. One unit of levy billmen will stand guard in Piggy Longton, outside of the Merchant’s House, where the taxes are held.
An ox drawn wagon is also placed outside the Merchants House (see opening photo). This is being loaded with the taxes and once done, it will move down Trotter Lane, into Long Lane, in an attempt to move east (bottom edge) to exit the table and save the taxes.
Forces (all leaders are class 2 (average))
Lancastrian (total strength 109 points).
Lord Darcy - Army Commander and commander of the Mainward. Morale Tokens 7
1 x retinue Bowmen
1 x retinue Billmen
1 x mounted Men-at-Arms (knights) veterans
Earl of Tredington - Commands the Vanward
1 x levy Billmen
1 x levy Bowmen
Duke of Staverton - Commands the Rearward
1 x retinue Bowmen (the Men of Piggy Longton)
1 x company of mercenary crossbowmen skirmishers
Detachment - 1 x Levy Billmen, posted to the Merchant House (see special rules)
Stakes - 1 base of stakes available for initial deployment with archers of choice
Yorkist (total strength 115 points)
Lord Trebian - Army Commander and commander of the Vanward. Morale Tokens 7
1 x retinue Bowmen
1 x retinue Billmen
1 x retinue of dismounted Men-at-Arms (veterans)
Earl of Elkstone - Commands the Mainward
1 x levy Billmen
1 x levy Bowmen
1 x artillery piece and crew
Duke of Ablington - Commands the Rearward (see special rules)
1 x retinue Bowmen
1 x levy Billmen
1 x company of mercenary skirmishing hand gunners
Special Rules.
The detachment of Billmen at the Merchant’s House have been supplied to His Lordship by The Duke of Staverton. Whilst within 4” of the Merchant’s House, this detachment can operate independently of Staverton and can always, while within 4” from the house be given a free order (for 2 actions) whenever Staverton activates (as though there is a sub leader at the house) and can attack in melee even though they are levy without a leader attached.
If any Yorkist unit contacts the Merchant house before the taxes are loaded onto the ox cart or they contact the ox cart once it is loaded, then the taxes count as being captured and will then move with the capturing unit.
If the Yorkists capture the taxes, the Lancastrians immediately loses 2 Morale Points, which may of course cause an instant victory. These points can be reclaimed if the taxes are ever re-captured. This can only be done by destroying or routing (Daunting) the capturing unit. If the capturing unit routs, they will drop the taxes and leave them behind.
Each time a ‘Bonus’ card is drawn, the Lancastrian player additionally rolls 1D6. If the result is less than the current turn number, then the taxes are now fully loaded onto the cart. Once loaded, each time Lord Darcy activates, the cart also activates and can move 12” along the road (only), to exit the eastern table edge (bottom of the table). The moment the cart leaves the table, the taxes are considered safe.
Crossing Smoggy Brook. Below the bridge (left) the banks are soft and boggy, above the bridge, the banks are firmer. To cross, treat the brook as a linear obstacle. Above the bridge, as soon as a unit moves into the water it becomes Disarrayed and takes a marker. Below the bridge, such a unit takes two disarray markers. Units using the bridge do not suffer any movement inconvenience.
Duke of Ablington starts the game having just crossed Smoggy Brook and so his billmen and bowmen start the game with a disarray marker. The skirmishing hand gunners are not so marked.
To win - A side will immediately lose the game under the ordinary Billhooks victory rules (the loss of all morale points plus one, or the loss of an army commander in a duel), but in addition, for the Yorkist side to claim a win, they must also at that time be in possession of the taxes. So if the Lancastrians lose the game under the normal rules, whilst still being in possession of the taxes, the game would be classed as a draw.
The Game.
Opening moves.
NMTBH always starts play with a special manoeuvre phase, in which players take it in turns to move one unit at a time, until the first combat occurs. At that moment, this special manoeuvre phase stops and the game then turns to the normal card driven sequence of play.
Lord Darcy, who is happy with his own positions, does not want to give the Yorkists any extra movement capability, so the Lancastrians immediately put down an arrow volley on their right against Ablington’s archers, bringing the opening manoeuvre phase to an instant end and causing quite a bit of harm to the Yorkist left.
Let the fight commence!
Opening action.
Lord Trebian is aware of the dangers of crossing the brook in the face of determined archers, so his plan is simple and brutal, he will push his vanward over the bridge, with the men-at-arms leading, followed by billmen and they will cut their way directly to the Merchants House along the road. His remaining forces will demonstrate along the brook and keep the Lancastrians pinned.
Lord Darcy is hoping that his archers will do most of the work this day and it is important that they keep the enemy at arms length and deter their advance. To this end, he has placed stakes across his end of the bridge. He will keep his cavalry mounted as a reserve in case he needs to pursue any enemy unit that manage to raid the Treasury.
Ablington’s men (Yorkist left) are still in some Disarray (think disorder) after have already crossed the brook. He spends some time to re-ordering them and then has his archers attack the enemy archers and so an archery duel opens on the Yorkist left.
Not really recovering from the initial Lancastrian volley and shooting poorly in return, their numbers dwindle worryingly and it is not long before they become Daunted (think shaken) and failing their morale, they leave the field, losing 2 army morale points!
This is a really bad Yorkist start and Ablington is obliged to start pushing his now outnumbered billmen forward in an effort to end the arrow storm. He is thankfully supported by some hand gunners.
In the centre, things go equally badly for the Yorkists. Again their archers take heavy casualties from Darcy’s centre and they fall right back - also Daunted. Earl Elkstone has had to abandon these archers to their fate as he joins his levy billmen in rushing across the brook. He is supported by artillery, which are worrying Darcy’s archers with a steady rate of fire.
Lord Darcy responds by moving his archers forward to the edge of the brook to bring the Yorkist artillery into bow range. He also starts to turn his mounted knights to prepare for the crisis emerging at the bridge. It is while his command is split between these two threats that he sees Elkstone’s billmen rushing across the brook. He readies his own billmen to hold them off.

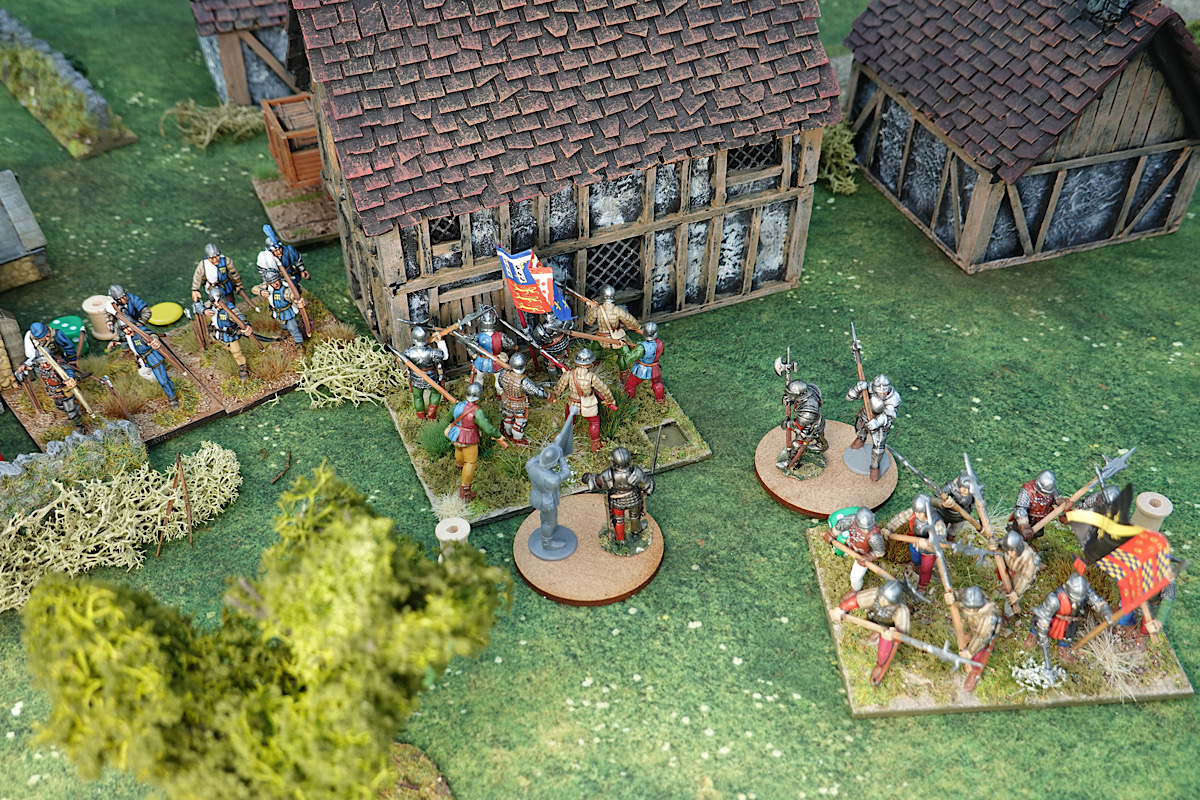
Finally on the Yorkist right (above), their one bit of absolute success. Trebian’s Men-at-Arms have moved over the bridge and torn down the stakes. Their entanglement with the stakes Disarrayed them and gave Staverton’s archers the chance to evade back down the lane, with Staverton keen to keep distance between his archers and the heavily armoured M-A-A, which today seemed fairly proof even against Staverton’s crossbow skirmishers lurking nearby.
Lord Trebian was now across the bridge with his force intact, but the rest of his army were under severe pressure while trying to keep the Lancastrians pinned in place.
The taxes were still being loaded on to the ox pulled cart at the Merchant’s House and Trebian was close to cutting the cart's escape route, but there was still much to do. Trebian had lost much of his archer force and his morale points had dropped from 7 to 4 - can he keep the momentum up at the bridge!
Mid battle
The card draw to activate formations, the chaos of buckets of dice, the special event / bonus cards and the Disarray / Daunted results all come together to bring plenty of nuance to this system and so each battle can take on a character of their own.
We start to see this in the mid battle, especially at the bridge, which has become a critical focus of the battle and the order that formations are activated will matter .... can the archers shoot before the Men-at-Arms move to contact!
Staverton’s archers (the Men of Piggy Longton) when they evaded the M-A-A earlier had fallen back down the lane, but had picked up a Disarray chit and also now have their backs to the enemy. If the Men-at-Arms activate first, then the archers will be toast!
But then typical of this game, a quirk crops up. The Lancastrians win a bonus card which allows a free activation. The Men of Piggy Longton are given this bonus to allow them to turn about and re-face their foe.
Business at the bridge is becoming a bit messy, Lord Trebian is now advancing along the road into an ambush, hemmed in by hedges, with archers up ahead and crossbow armed skirmishers to his left flank.

Trebian (above) gets the first activation card and advances his M-A-A to the enemy archers.

While the billmen (above) following up have to do some fancy footwork to face off against the flanking crossbowmen and suffer a Disarray marker for that manoeuvre.
Trebian’s M-A-A get two actions. He would prefer them to lose their Disarray for one action and then move to contact for the second, but the archers are too far away and it will take two movement actions to reach them, so he abandons the idea of rallying from Disarray and advances to make melee contact with the archers.
The archers would normally dice to see whether they stand or evade, but Staverton is with them, so he can choose. Without some bill support, standing would ultimately be suicidal, so he evades back down the lane, turning into Trotters Lane, putting himself nearer the hamlet and to his detachment of billmen who are guarding the Merchants House ..... but his men pick up another Disarray (now double Disarrayed) and again have their backs to the enemy. For the moment they are safe, but again we are back to who will activate first - this brings some good gaming tension to play.

Elsewhere everyone is now engaged in close combat. The Yorkist centre have Elkstone (above) leading his levy billmen across Smoggy Brook, clashing into Darcy’s billmen and scoring 5 hits, while his artillery continues to rake Darcy’s archers, inflicting a lot of casualties.
The Yorkist left, who have lost their archers, launch their billmen at the Lancastrian archers in front of the Merchants House, who evade and run to the protection of the nearby churchyard at Osric’s Chapel, while Yorkist hand gunners, in support, terrify the enemy billmen, who are still near the Merchants House.
This puts Duke of Ablington almost within touching distance of the Merchants House, where the taxes are still being evacuated. This is a new and unexpected opportunity, aided by the Lancastrian archers evading. The situation is tightly balanced, with several points of crisis and no certainty of which way it will go - I like that about this system.
The final strokes!
The Yorkists get the first two activation cards. On the right, Trebian’s M-A-A- turn into Trotters Lane and prepare to assault the archers. On the left, with the enemy archers scared off, Ablington takes his billmen and enters the Merchants House through its rear, securing the taxes for the Yorkists (photo below).
To make matters worse for the Lancastrians, the Yorkist centre under Elkstone breaks into Lord Darcy’s defensive line, his billmen become Daunted and run towards Trotters Lane. The Yorkist bill pursue and scatter the Lancastrian crossbowmen who are standing in the way.
Things were looking very serious for the Lancastrians, but in a counter-stroke, the Levy Billmen who had been tasked with guarding the Merchants House and were on the other side of it, in the road, burst through the front door and routed Ablington’s looting men, who dropped the taxes and ran.
With the taxes reclaimed, the levy set about helping to load the cart and soon the cart was ready to set off. There was of course danger ahead as Trebian’s M-A-A were now in Trotters Lane, but that became unimportant as events below the bridge were about to decide the matter.......

Lord Darcy had ordered his mounted knights (above) to charge the bill and bow unit that had assembled below the bridge. The billmen absorbed the initial charge, taking heavy casualties, but despite this shock attack, held their ground, but the determination of the horsemen against the decimated ranks of the bill quickly shattered the billmen, who ran, sweeping their archers away with them. The entire 2 units leaving the field (basically the billmen passed their post melee morale check, but then badly failed their end of turn morale check, taken because of excess casualties and were destroyed, taking the archers with them).
In game terms the loss of the two units cost the Yorkists 4 morale points, but at this stage they only had 3 points left, so an instant victory was declared for the Lancastrians.
Conclusions.
I’m not sure whether this write up conveys this, but that was a fantastically enjoyable game. As a solo venture and with knowledge of the system, I still had no idea how it would end until that final morale check was failed by the Lancastrian Bill/Bow unit.
There were a lot of nuances during play that created excitement, but not be included here in the text for fear of the post turning in a novel sized piece!
A combination of the terrain, orders of battle and dynamic rules makes this situation quite replayable as the premise is that you have this armoured fist coming over the bridge and threatening the escape route of the tax laden cart, in what becomes a race and with enough other things going on that the player is fully engaged throughout.
There were several moments in the game when I was torn as what to do, even that final cavalry charge was deliberated upon (due to the harm that the mounted could suffer) and it worked because the knights rolled well, the billmen saved badly, they already had losses due to the crossbowmen and their manoeuvring into position off the road had caused them to be disarrayed, so they could only bring their front rank against the knights - all these things helped the charge to work ..... though even that did not initially break the billmen, it was only the end of turn test for units with 50% or more casualties that swung it for the Lancastrians.
Definitely to become one of my more memorable games for this year!
As a game with around just 8 - 9 units per side and a relatively low figure count, it managed to bring several points of crises to completely individual and separate parts of the battlefield, with each part generating a story that mattered.
I have brought the maps, special rules and orders-of-battle to this post so that anyone wanting to can recreate it either within or outside a Wars of the Roses setting.
Thanks for reading.
RESOURCE SECTION
A full description of the Parish of Piggy Longton can be found in this earlier post. LINK
http://battlefieldswarriors.blogspot.com/2020/10/a-battlefield-to-fight-over-often.html
The prequel to this post (preparations for war), discussing the assembling of forces is here. LINK
https://battlefieldswarriors.blogspot.com/2020/11/preparing-for-war-dungborough-1471.html
A previous post about the Billhooks rules. LINK
http://battlefieldswarriors.blogspot.com/2020/09/giving-wotr-billhooks-rules-first-outing.html
Another Billhooks nail-biter. A nifty scenario and a great battle-report.
ReplyDeleteThanks Andy, there was more that the rules were doing that didn’t get written about, they just deliver a great game.
ReplyDeleteThe Lancastrians grabbed a "taxing" victory from the jaws of defeat, but just barely. Your table and photography look great and the narrative captivating.
ReplyDeleteVery enjoyable. Thank you!
Thanks Jonathan, the game really developed in an unexpected way, with some flip-flopping of who had the upper hand towards the end - all good.
ReplyDeleteAll good, indeed!
DeleteLovely Norm, thoroughly enjoyed the AAR. Got a copy of Billhooks after your earlier recommendation.
ReplyDeleteHi, I was particularly impressed the way that Billhooks worked with the terrain on the table.
DeleteI like your new blog and of course your current project I find very interesting.
A great report Norm, it really gives a great impression of how the rules flow. A fine looking table too I may say.
ReplyDeleteDave and myself were going to look at adapting them to use in our Italian games, don't know when that will happen the way things are going though☹️
Thanks Phil, I have read in a couple of places of people adapting to the Italian Wars so it looks perfectly do-able and I think it make a good fit for your table and figures.
DeleteThankfully the return to normally has just taken a huge step closer with the vaccine news.
That's a great AAR. Going to have to give those rules a try soon.
ReplyDeleteThanks, glad it hit the right mark. On the Wargames Illustrated website there is a link that has a Q&A style download that is helpful.
DeleteGreat pictures, wonderful read.
ReplyDeleteThank you, the positive comments here do help maintain my enthusiasm for the continued blogging of the longer style articles. I really got a ton of pleasure from this particular game, from the planning to the execution - probably the best value free rules I have ever owned :-)
DeleteWhat a great report on a nail biting game - I thought the dastardly Yorkists had grabbed it, but then they were snuffed out by the billmen reclaiming the taxes and the cavalry charge - great stuff!
ReplyDeleteThanks Keith, I think that is what really got me involved with this game, even playing solo, the development of the game was only revealed to me on a moment by moment basis and I had several moments of surprise causing me (as both players) to constantly respond. I was convinced that the Yorkists were losing and thought the scenario needing tweaking, then out of the blue, they had the Lancastrians on the ropes and then by equal surprise, the Lancastrians bounced back to victory - thoroughly enjoyed!
ReplyDeletegreat stuff sir - the table looks fabulous
ReplyDeleteThanks, can’t wait for your own Billhooks battles to resume :-)
DeleteWhat a great AAR Norm! The rules certainly provide a fantastic game and are one of the best 'sets' on the market. The table and figures look great, with some great photos of the action.
ReplyDeleteIt was nice having read the overview of the area to see a part of it being used for the action, which adds something extra for the reader and I'm sure you as the player. Keep up the good work and i'm looking forward to the next game AAR.
Great looking game Norm and your enjoyment shines through in the AAR. For me it is often the story that makes the battle as people rarely fight for no reason and you have created that wonderfully 👍
ReplyDeleteThanks Matt, yes I felt something of the spirit that your AAR’s have, everything just seemed to come together for this one.
DeleteThanks Steve, a thoroughly enjoyable experience. When you look at that parish map, there are a quite a lot of sub-locations that can be used as battlegrounds. In today’s games, all of the leaders surprisingly survived, something I had not thought about, but it has brought some characters into the setting .... all good. Need to do some more painting and growing of the armies, next time around, there may even be a leader that looks suspiciously like a Richard III figure :-)
ReplyDeleteWhat a splendid table...great AAR, we are in the heart of the action!
ReplyDeleteThanks Phil, the rules are skirmish / big skirmish, yet because the armies are divided into 3 wards, you can get that sense of small battle with different things going on at different places on the table, each of which seem to matter at that moment in time, so you are continually going in to very localised action.
ReplyDeleteExcellent looking AAR! I've got the rules and we were planning on getting a game of it before lockdown, something to look forward to in the new year!
ReplyDeleteBest Iain
Thanks Iain, the rules seem ideal for a friendly encounter.
ReplyDeleteA terrific game report! So much action, which could've gone either way.
ReplyDeleteThanks, I was surprised how so much game fell out of just 8 - 9 units per side.
ReplyDeleteAwesome battle report Norm. I do think that this AAR got some extra support from the previous posts, bc the set up really contributed to our buy in to want to know how it turned out. Your WoTR continues to impress. 😀
ReplyDeleteHow did your basing work out with the rules?
Nice job all around. Your excitement for the period is really showing in the text. 😀
Thanks Stew, I think part of my own enjoyment of this game was my earlier 'buy in', from designing the Piggy Longton Parish, researching Old English names and characters, then the video and finally the game, so if that also translates to better readership enjoyment, then that is especially good.
ReplyDeleteThe basing is working fine on several fronts. From painting, I can just do one unit at time with just 7 - 9 figures on sticks, so that feels less burdensome. Thefrontage is giving me the sort of table space hat a 15mm figures game might give and after a couple of games, using dice for casualties instead of removing single figures has become second nature and pretty much invisible to me. I get so drawn into the play that I just see units and contingents fighting.
I use a green dice for the first 1-6 casualties and then add red for the second lot of 6. From the figure it is easy to calculated how many men remain in the first and second rank.
Another fantastic read. I was just about to damn those lucky Yorkshiremen when the tables turned once again and the Lancastrians won the day. Hurrah!
ReplyDeletei look forward to every read, but a great loss not to be sitting there on the opposite side of the table, taking or dealing out the knocks.
Thanks Mike, you would have enjoyed the unpredictability of this one for sure. Mr. Vaccine says there is light at the end of the tunnel!
ReplyDeleteNorm I'm a little late to the party but this is the way to write a BATREP! Wonderful work!
ReplyDeleteThanks Steve, thanks for the kind words, looking forward to your MegaGame outing in December.
ReplyDelete